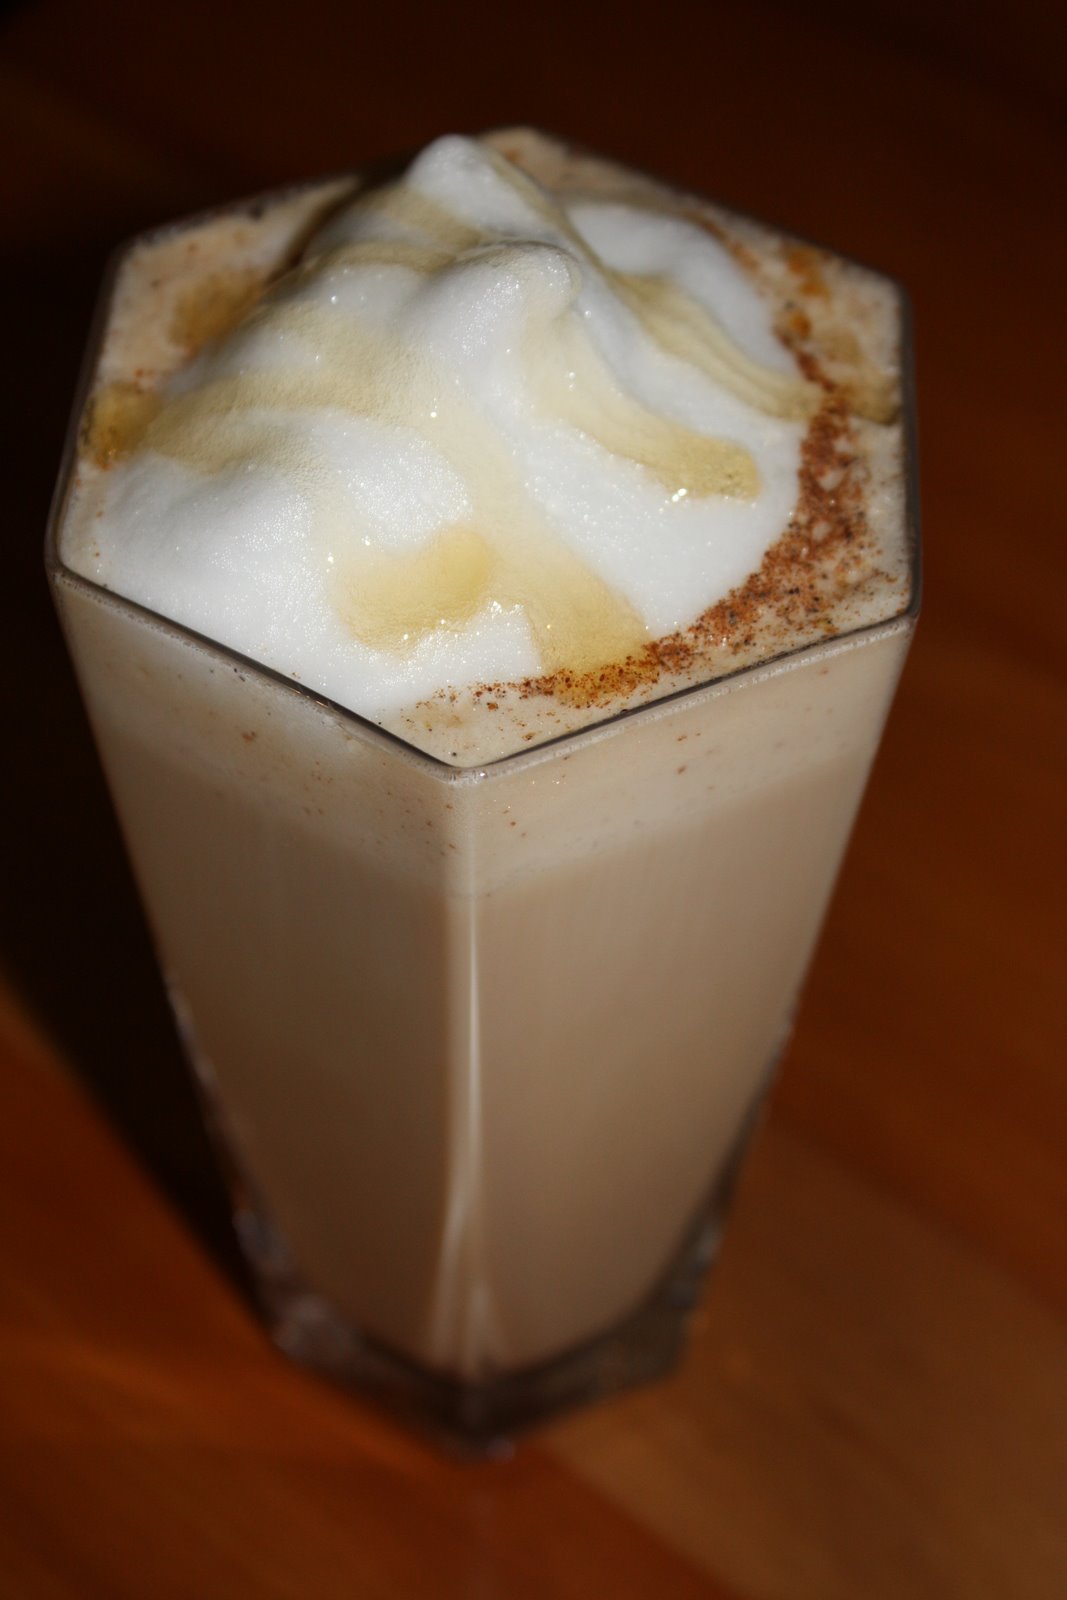
Honey Spiced Latte
On December 10, 2012 by sixtyacrebakerI mostly drink tea; but this time of year, i love a festive coffee drink that isn’t filled with syrups and sugar. Because we have honey bees, I have a nice fresh stock of honey on hand at all times. Paired with warming spices, it is a delicious additiont to a hot cup o’ joe.
Honey Spiced Latte
perfect for a cool day, or apris ski
1 Tbs honey
dusting of cardamom
dusting of cinnamon
dusting of ginger
4 oz of hot espresso
6 oz steamed milk and foam
Put the honey in the bottom of the mug or glass. Dust the spices over the honey. Pour the hot espresso over and stir until the honey melts. Add milk to your liking. Top with foam and dust with a bit more cinnamon and ginger. Drizzle honey on top.
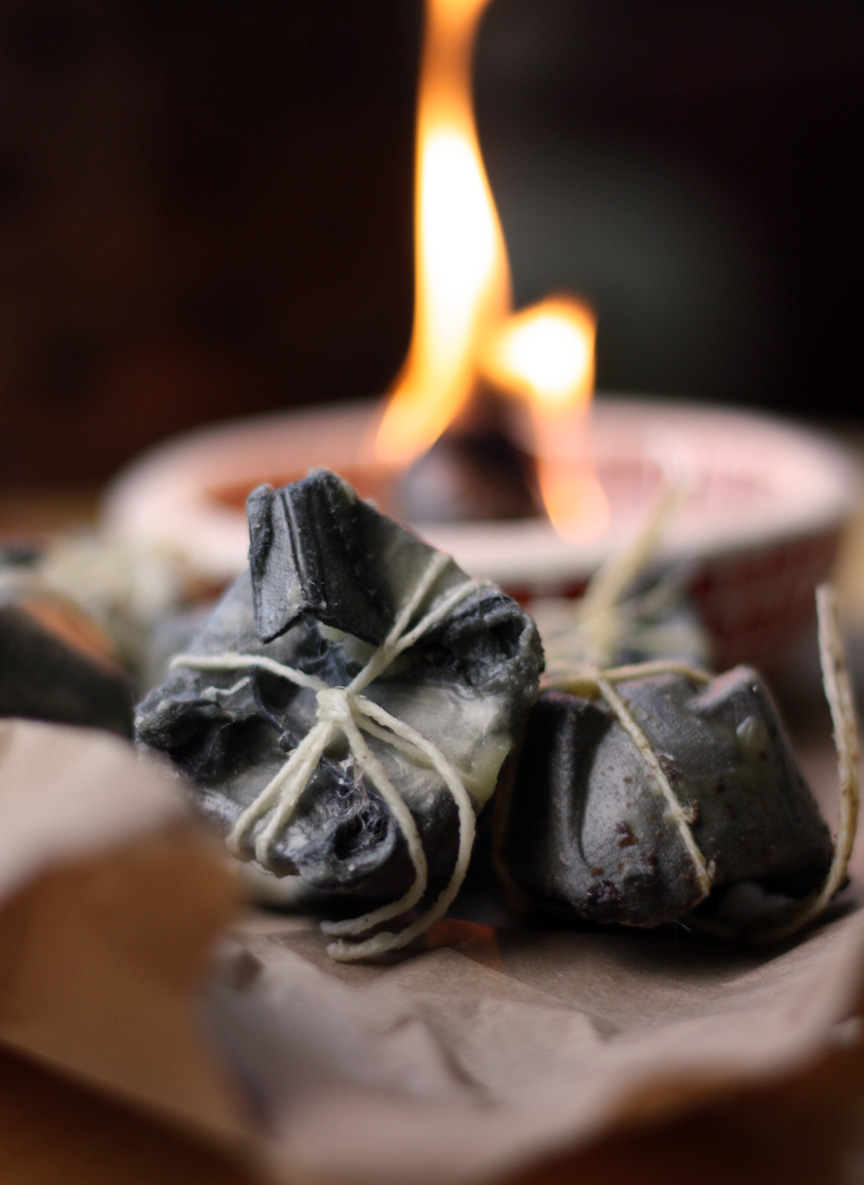
Homemade Fire Starters
On November 30, 2012 by sixtyacrebakerI love the chill of winter. The scent of snow and chimney smoke make me swoon. No matter my hurry, a crackling fire shifts me to pause if only briefly. I repurpose simple household items to make these useful goodies.
Fire Starters
paper egg cartons
dryer lint
cotton kitchen twine
bees wax or leftover candle bits
Place the wax/candles in an old can or jar with a wide mouth and place in a saucepan with water filled so it comes about halfway up the jar. Place over low to medium heat, to indirectly melt the wax. Meanwhile. cut the top off the egg carton, and then cut the egg cups apart. Tightly pack lint into each cup, leaving a bit of headroom, so you can close the tops, but folding the corners in. Tie into a bundle using kitchen twine, allow for a fairly long wick, so you can use it to dip the cup into the wax. Once the wax is liquid, dip each cup into it, allow it to be fully immersed. I use disposable chop sticks or skewers to shimmy the cup, to make sure it is fully covered. Lay on wax or kitchen paper to cool. Once cool, trim wick and you are ready to go!
the wax is used to keep the starters waterproof…which is great for campers and hunters. if you will be using the firestarter in your home, you may not want to add this step. i always do, because i love the smell of beeswax
if you really jam pack these with lint, they will burn for 10 minutes or so and smolder for quite some time as well. i find it enough time to get the kindle lit and the logs on their way
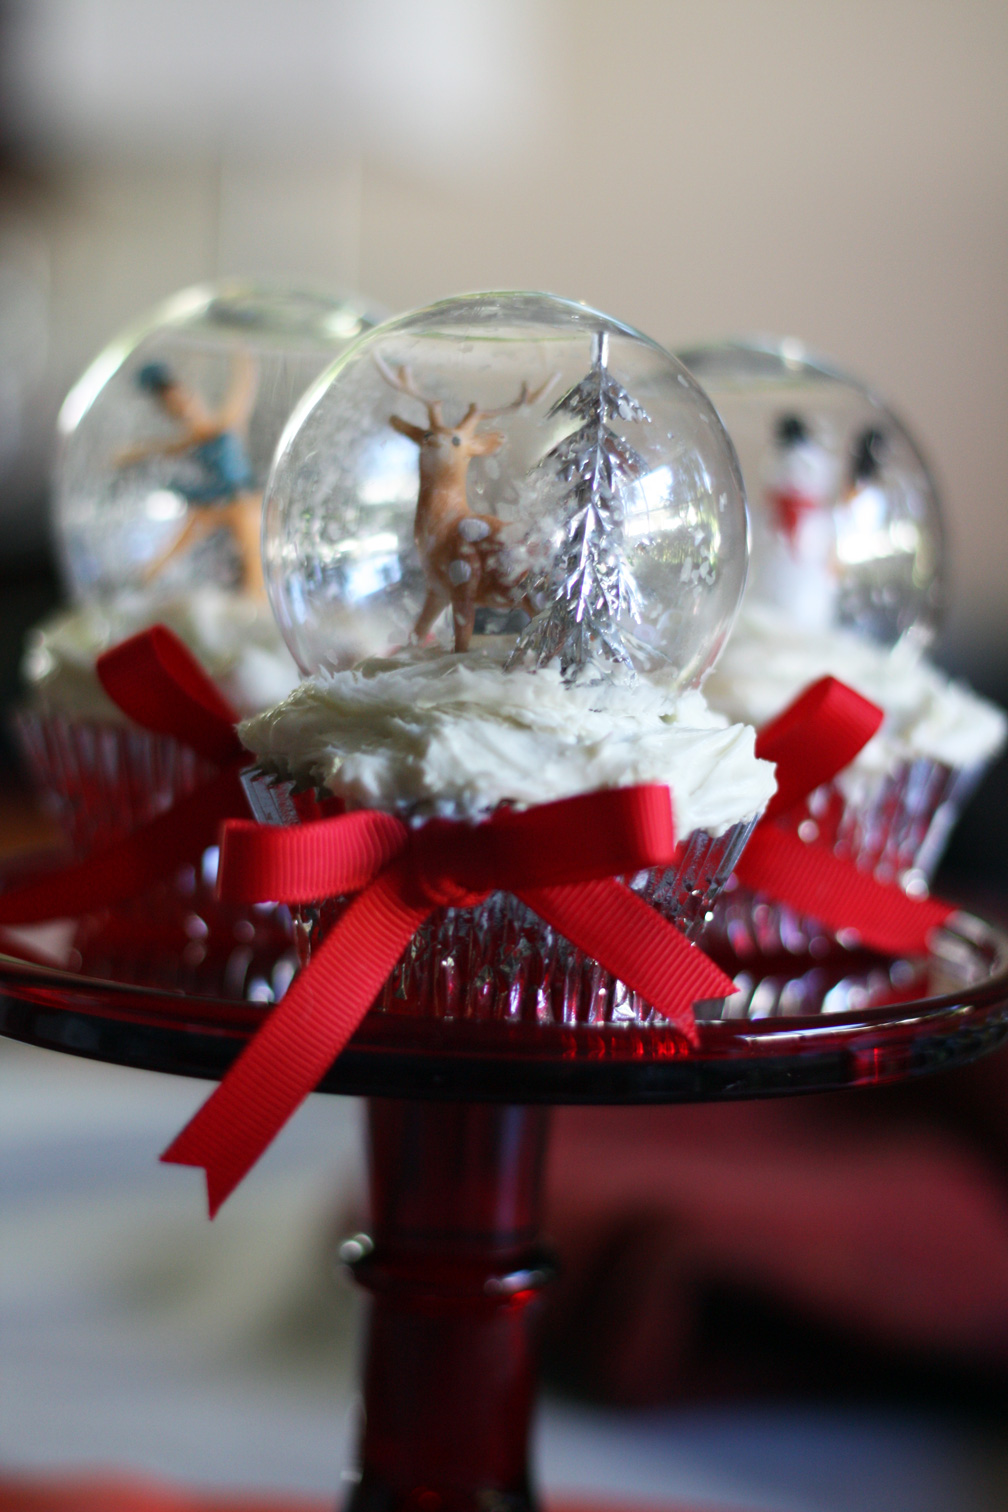
Snow Globe Cupcakes
On November 19, 2012 by sixtyacrebakerI love snow globes. When i see grand collections, a tinge of envy bubbles up; like plastic snowflakes in a whirl. It then turns to a settling calm, because, the last thing i need is another collection. Unless of course we are talking
edible. Like these little darlings. This is an incredibly simple project perfect for your holiday table.
Snow Globe Cupcakes
1 recipe of your favorite cupcake baked and cooled
my favorite
1 recipe of your favorite frosting
1 dozen plastic clear christmas balls
like these

cupcake toppers deer, trees, house in the woods; whatever your fancy
edible glitter in white
ribbon
imagination
using a sharp scissor or craft knife, cut the top off the ornament like so

Wash and dry the “globe” then sprinkle some of the edible glitter in the bottom. swirl it around. Most of the glitter will stick, what doesn’t will fall to the cupcake when you invert. If you want lots of “snow” in the globe, brush a bit of vodka on the inside of the globe, swirl the glitter. It will stick well, and the vodka will evaporate, eliminating any unwanted moisture. Frost the cupcake as you normally would, place your decorations on top, and carefully invert the globe over the top. Finish with a little bow
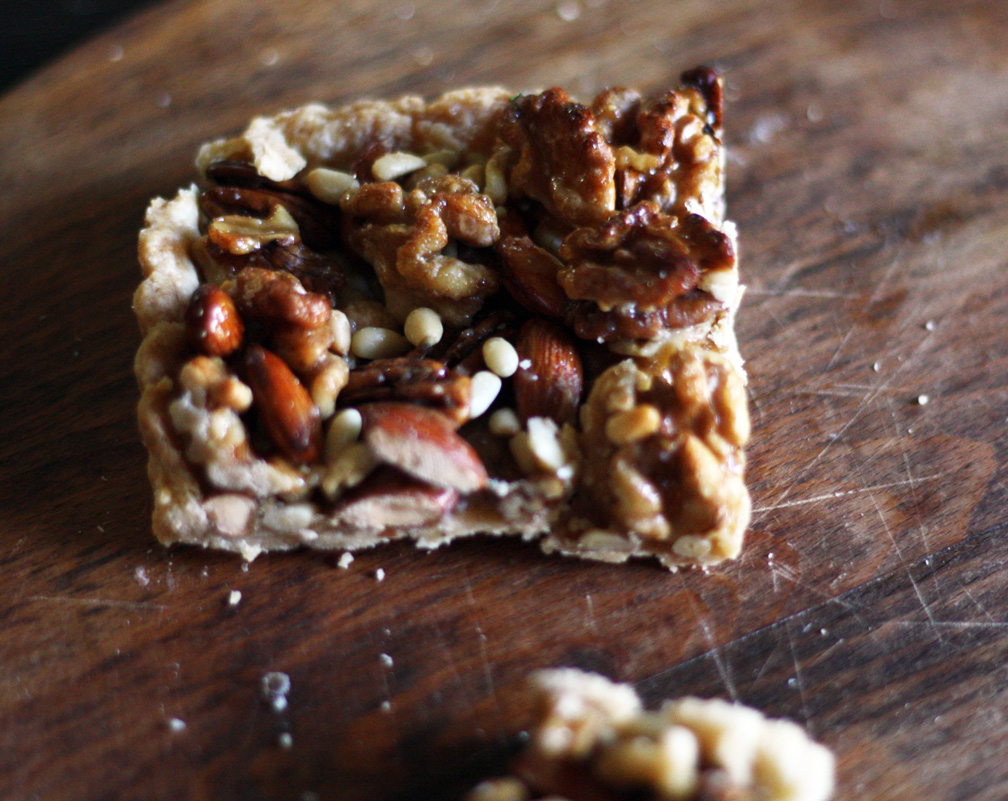
Simple Nut Tart
On November 10, 2012 by sixtyacrebakerDinner parties stump me sometimes. Being that I am trained in pastry, there is a certain expectation that dessert will be served. Andit will be from scratch. Normally not a problem, but i don’t always want to finish
with a substantial & heavy dessert. Sometimes a simple nut tart served with strong coffee and paired with a bowl of clementines, is just the trick.
Simple Nut Tart
1 pastry crust, pressed into an 8″ square tart tin–baked blind
1 cups walnut–toasted
1 1/2 cups pecans–toasted
1 cup almonds–toasted
1/2 cup pine nuts–toasted
1/2 cup dark brown sugar
1/4 cup granulated sugar
2 Tbs honey
1/2 tsp kosher salt
1/4 cup water
1 oz whiskey
preheat oven to 350. place all nuts in a large bowl and mix until well combined. put brown sugar, granulated sugar, honey salt and water in a heavy saucepan. stir well, place on medium heat and bring to a simmer. allow to boil for about 3 minutes. carefully add the whiskey and bring back to a boil. boil for 2 more minutes. the sugar should get a bit syrupy, but should not smoke or turn excessively dark. keep a constant eye on the sugar. remove the sugar from heat and tip in the nuts. stir well, giving each nut a coat of syrup. immediately tip into the baked crust, gently and spreading to cover the entire crust. pop into the oven for 5-7 minutes. remove from oven and allow to cool before serving.
variations
-add orange juice in place of some water in caramel; a pinch of orange zest & a sprinkle of cinnamon to the nuts
-the addition of fresh rosemary when stirring the nuts into the caramel (light hand) make for a beautiful winter tart
–drizzle with bittersweet chocolate or drench in dark ganache
-substitute vanilla for whiskey
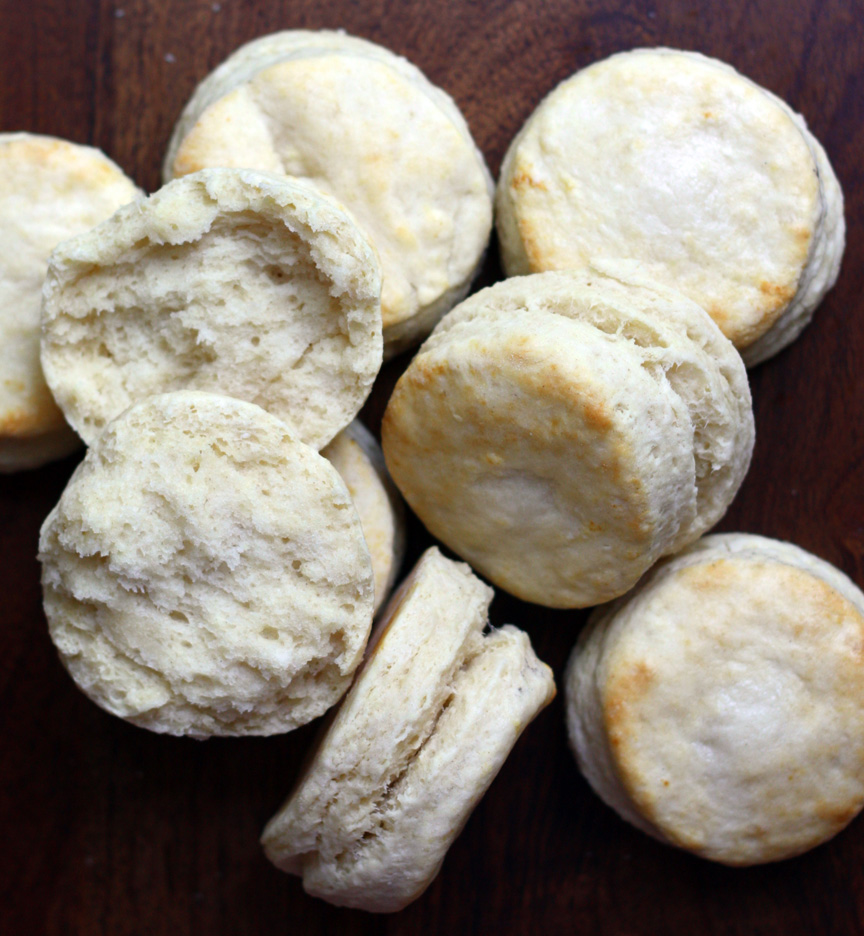
Buttermilk Biscuits
On October 30, 2012 by sixtyacrebakerWhen I was in high school what we called“the roach coach”, rolled up come lunch-time. It was selling all sorts of delicious read really unhealthy food stuffs. Once a week it stopped at KFC; loading up on chicken and biscuits. I would queue
for the length of our lunch break, for those biscuits. Big, fluffy & buttery, they were just the nutritious lunch i needed (ha ha). Those days are long gone. Roach coaches are now gourmet eateries. And i am much more discerning in my biscuit adoration.
Buttermilk Biscuits
2 cups flour-plus more for kneading
4 tsp baking powder
1 tsp bakewell cream
3/4 tsp salt
1/2 tsp baking soda
5 Tbs unsalted butter–cold & cut into small squares
1 cup buttermilk–cold + more for brushing tops
Mix the dry ingredients together in a bowl. Using your fingers or a pastry knife to cut in the butter, allowing for both pea size and smaller pieces of butter. Do not overwork, you want the butter to stay relatively firm and cool. Quickly add in the buttermilk and stir to create a moist dough. Turn dough out onto a well floured surface and press into a rectangle. Do not saturate in flour, but also use enough to prevent sticking. Bring the short ends of the dough in, folding into thirds. Give the dough a quarter turn and press or roll again into a rectangle. Fold into thirds. Repeat 2 more times, using enough flour to keep dough from sticking. After the final turn, roll the dough into a 3/4″ rectangle. Use a biscuit cutter to make rounds, or for simplicity, cut evenly into squares. Brush top of each biscuit with buttermilk, and place on a lined baking sheet. I like to place my biscuits fairly close together, so they bake together a bit. It gives it a little softness around the edges. If that is not your thing, make sure you have at least 1 1/2″ separation when placing in pan. Bake at 400F for about 15-20 minutes, or until golden brown.
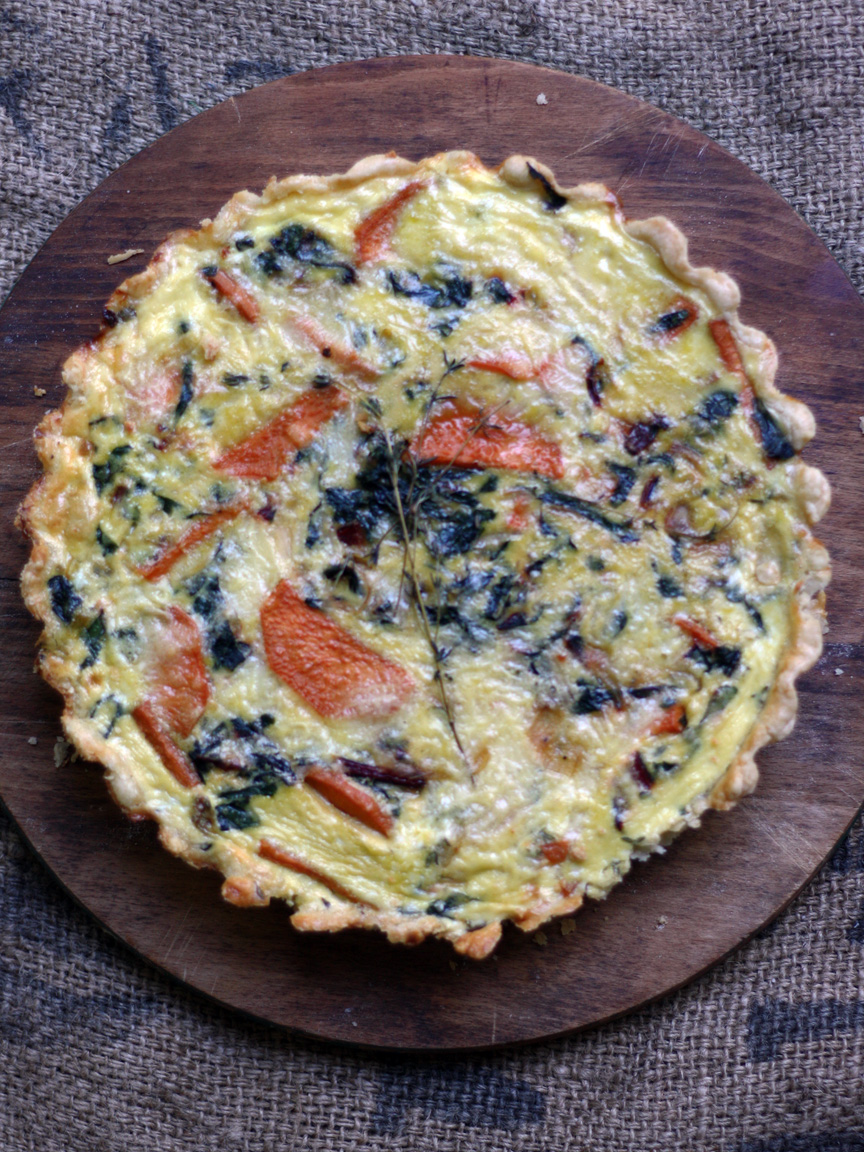
Sweet Potato and Swiss Chard Tart
On October 21, 2012 by sixtyacrebakerI was able to pick up swiss chard, for a song, at this week’s market. Now, creating meals around this favorite green, has been my charge. This morning I was longing for the buttery crust of pie with the wholesome chew
of comfort. I threw together this tart in a jiff, simply using larder staples.
Sweet Potato and Swiss Chard Tart
1 pie crust–press in to an 8-9″ tart pan
1 medium sweet potato–1/4″ slice and halved
1/2 onion–halved and thinly sliced
2 cloves garlic–finely chopped
1 Tbs (about) olive oil
1 bunch swiss chard–ribs removed and chopped into thin ribbons
generous pinch salt and pepper
generous pinch freshly ground nutmeg (or small pinch of dried)
6 large eggs
1/4 cup plain yogurt
2 Tbs grated parmesan
2 stems thyme–stems removed (or 1/4 tsp dried)
1/2 cup grated cheese (asiago,white cheddar, provolone, or jack)
Preheat oven to 375F. Blind bake the crust for about 20 minutes. When you remove the weights, you will fill with the custard and place back in the oven to continue baking. Heat a large skillet over low heat. Pour in enough olive oil to just coat the bottom of the pan. Toss in the potatoes and onions. Cook until the potato and onions begin to soften. You are not frying for color, you are softening the vegetables. Toss in the garlic and swiss chard and continue on low-stirring occasionally) until the chard is droopy and has cast off some moisture. Do not let the garlic burn. Season with salt and pepper and nutmeg. Pour into the par-baked crust and spread evenly to cover the entire bottom. Gently whisk the eggs, yogurt, thyme and parmesan together in a bowl. You want to incorporate the yogurt (eliminating large lumps) without incorporating too much air. Pour over the vegetables. Reduce oven heat to 350F and place the tart on a sheet pan and then in oven. Bake for approximately 30 minutes, or until the eggs do not jiggle when you gently tap the pan, and the crust is golden brown.

Zucchini-Chevre Spoon Bread
On October 4, 2012 by sixtyacrebakerA few days back; Mike, fresh from visiting our long neglected garden presented me with an enormous zucchini. Confession I sorta only grow zucchini for flowers. Occasionally, a few squash survive. When they do grow this large, I use them for bread. Sometimes sweet, sometimes savory. This spoon bread is a great side dish. It also rocks, scooped warm and soft, as a bed for caramelized onions, sunny side up eggs and crispy bacon. Best.Breakfast.Ever.
Zucchini Chevre Spoon Bread
4 large eggs
6 oz olive oil
1 tsp kosher salt
1/2 cup chevre
1/2 tsp freshly grated pepper
1 Tbs honey
1/2 tsp garlic powder
1 tsp fresh or 1/2 tsp dried thyme
3/4 tsp baking soda
1/2 tsp baking powder
2 cups all purpose flour
1 lb (about 3 cups) grated zucchini
1 cup grated cheese (mix of asiago, parmesan and provolone)*
*use your favorite flavorful cheese…if you use a salty cheese, modify your salt to 1/2 tsp
Whisk together the flour, baking powder and baking soda in a bowl, set aside. In a mixer fitted with paddle attachment, beat the eggs and olive oil until pale (about 5 minutes). Add the salt, chevre, pepper, honey garlic powder and thyme. Mix for about another minute at as high speed as you can without splashing. STIR in the flour until fully incorporated, then stir in the zucchini and cheese. Bake at 375F in an 9″ buttered cake tin or cast iron skillet. Bake for about 45-50 minutes. This is a spoon bread, so it will be soft, but should not be jiggly. It will set as it cools as well. Serve warm.
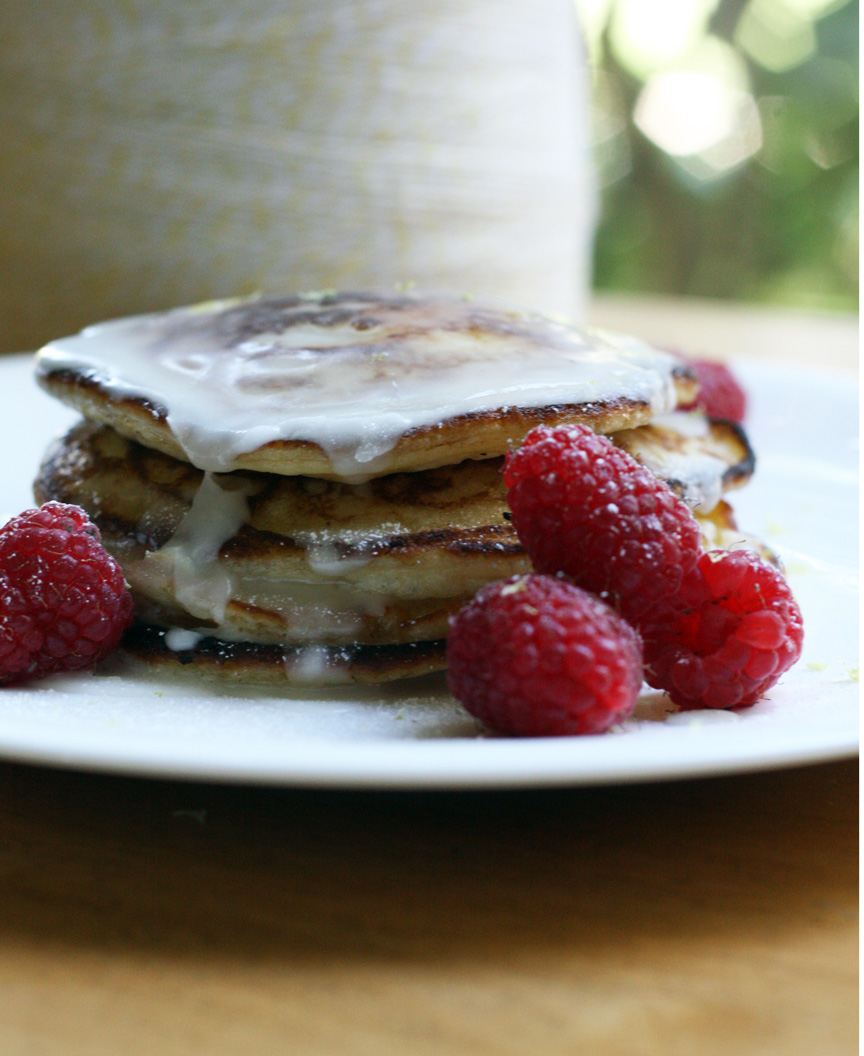
Lemon Ricotta Pancakes
On September 18, 2012 by sixtyacrebakerThe best part about these pancakes is that there is none of that pesky egg-white whipping and delicate folding. With their butter-crisp edges and billowy lemony insides, these pancake say i’m sorry and you’re welcome all at the same time.
Lemon Ricotta Pancakes
1/2 cup ricotta
1 Tbs lemon zest
2 Tbs lemon juice
2 large eggs
1 cup buttermilk
1/2 tsp kosher salt
1/2 tsp baking soda
1/2 cup fine corn meal (floury kind)
1 cup all purpose flour
6 Tbs sugar
Whisk together the flour, corn flour, sugar, salt and baking soda. In a separate bowl whisk together the ricotta, lemon zest, lemon juice, eggs and buttermilk. Stir the dry into the wet a bit at a time, to minimize lumps. Stir slowly, and just to get all the ingredients incorporated. Allow to sit about 5 minutes while you heat up the pan. I like to use butter to cook my pancakes, and i like it to get a bit brown before laying down the batter. But these pancakes are even delicious with pan spray. I suggest pureed fruit, fruit syrup or a glaze made with lemon juice and powdered sugar as a topper.

Pockets Full Of Gold
On September 6, 2012 by sixtyacrebakerI‘m fresh from a long hot bath irresponsibly hot, irresponsibly long. Washing the day’s dust and doubt. You see, today Mike and I inked the deal. The Deal. The deal that moves us from the cloud side of the rainbow to the pot of gold. 1988. The year I graduated college. Freshly minted diploma in hand and the world at my feet. This same year I was certain a 100 year old farmhouse on 10 acres in small town Montana, found in the classifieds, was my perfect next step. You may have guessed; instead of the house on the range, I moved back home and picked up a dumpy rental with friends. I started my professional journey; a fabulous time with great stories, interesting triumphs, love. Mike and I have been talking about a different life since the day we met. The type of life imagined
as a fresh faced grad. These many years later, it is happening. Rather than a two story farmhouse, in a corner of Montana; we are closing on, a doll of a house, perched on a hilltop, presiding over 60 acres and a trio of yaks.
Today we walked the land with the seller. We crossed from one end to the next, down a sloping trail walked by natives, missionaries, herds of cattle, wild pigs, landowners, trail horses, and now us. Mike and I both agree we should make this walk daily; filling our boots with dust, our lungs with fresh breath, and our proverbial pockets with gold.
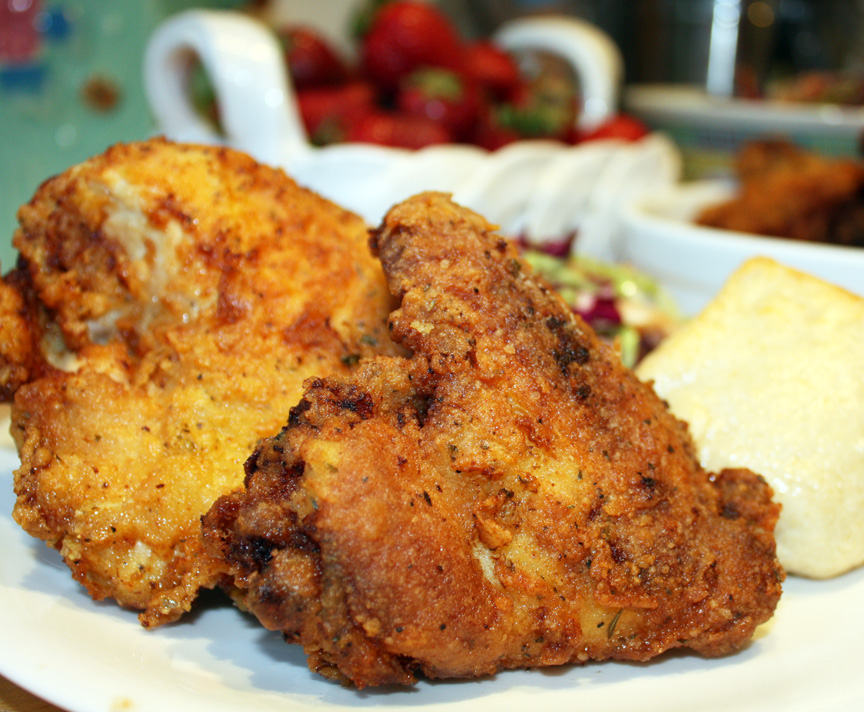
Buttermilk Fried Chicken
On August 24, 2012 by sixtyacrebakerMy last meal would definitely include fried chicken. To me, it invokes warm summer nights, picnic loaded convertibles driven by dapper gents, and running barefooted at the shore. Grand times and a happy childhood. Forget the trimmings. Serve me up a crispy breast, a slather of honey & leave me in my memories.
Buttermilk Fried Chicken
1 whole fryer chicken–cut into parts (or 8-10 of your fave pieces)
Tabasco
buttermilk
2 cups flour
1/4 tsp turmeric
2 tsp sugar
1 tsp onion powder
1/2 tsp dried parsley flakes
1/2 tsp dried thyme leaves
1/2 tsp dried marjoram leaves
1 tsp black pepper
2 tsp kosher salt
1/4-1/2 tsp cayenne pepper
1 tsp garlic powder
peanut oil for cooking
Clean and dry the chicken pieces. Place in a large freezer/storage bag. Give the Tabasco about 5 or 6 shakes into the bag, then put enough buttermilk in the bag to coat all chicken pieces. Mix it around a bit to insure every piece gets coated with tabasco and buttermilk. Place in the fridge and let “marinate” for 4 hours or overnight. Remove chicken from fridge about an hour before cooking to bring to room temperature (if it is a very hot kitchen, use your judgement on this). You do not want to put ice cold chicken into the hot pan, but you also do not want it to sit out for more than 1 hour. Heat peanut oil in a heavy bottomed pan (i use a cast iron skillet), to about half-way up the sides. Meanwhile, prepare the flour. Mix the flour, turmeric, sugar, onion powder, parsley flakes, thyme, marjoram, pepper, salt, cayenne, and garlic powder in a shallow dish. Remove chicken pieces from the buttermilk and immediately drop into the flour mixture. Coat evenly and generously. Drop into the hot oil and be patient. Do not crowd the pan…do it in several batches if necessary. The chicken will take about 10-13 minutes per side depending on the size of each piece. Dark meat takes a bit longer, so put it in the oil first. Turn each piece only once…and keep the oil below 375..but at or above 350. Remove from oil and drain on brown paper or other kitchen paper