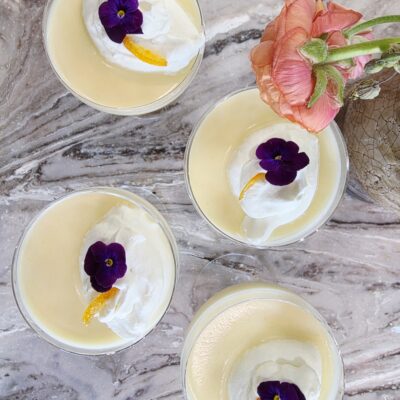


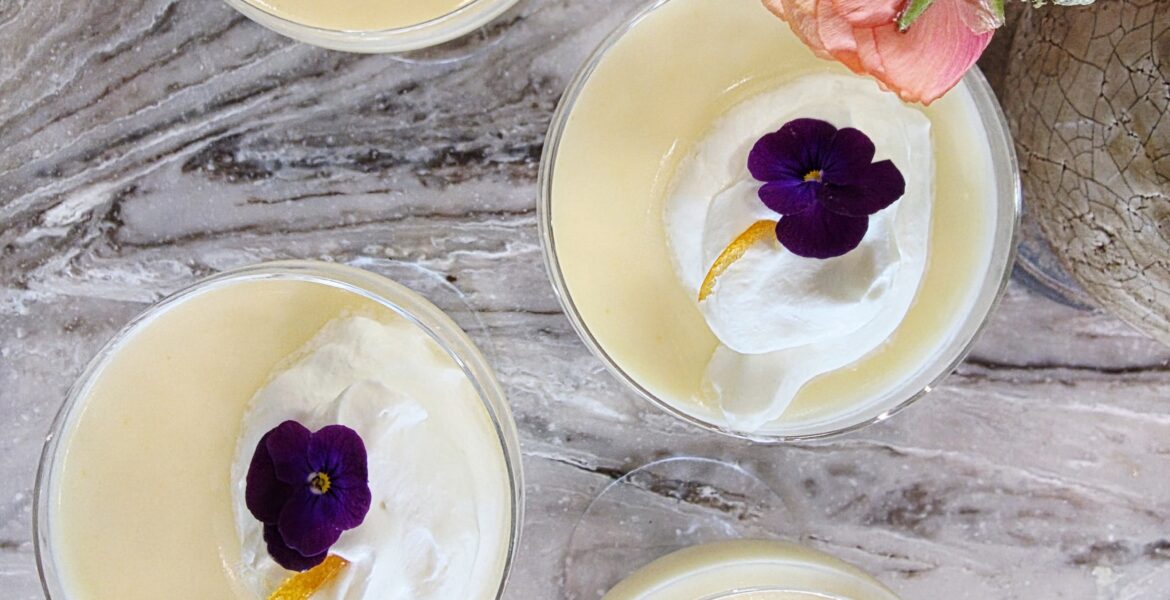
Lemon-Buttermilk Posset
On March 27, 2026 by Christy LarsenNo big story about why or how or who, but I needed a dessert by noon; at 9 am, I didn’t want to turn on the oven, and I wasn’t enthusiastic about anything ticking through my brain. We are an ingredient household, so I had options on hand. My single desire was to make something that matched the warm spring day on the horizon. When I am in a crunch like this, I must admit, I lean into the Brits….inspiration for days… when it comes to simple desserts.
Had I meringue on hand, I would have done an Eaton Mess, but I didn’t, so I went with Posset. It had been years (almost 20) since I last made one…I won’t make that mistake again.
Several weeks ago, a neighbor gave me a bag of lemons that are nearing their useful end. A half-gallon of buttermilk is gathering dust in the fridge door; I can’t even remember why I bought it in the first place. Combining the two in this custard-like treat gave the dessert a multi-layered tartness you wouldn’t get if you used only one or the other. A note: buttermilk doesn’t have the same reaction as heavy cream with heat and lemon–I urge that you don’t exceed the ratio I have used here.
Lemon-Buttermilk Posset
makes 4-6 servings2 cups heavy cream
1 cup buttermilk
3/4 cups granulated sugar
zest of two lemons
1/4 tsp kosher salt
2/3c+1 Tbs lemon juice
In a saucepan combine cream, buttermilk, sugar, lemon zest and salt. Bring to a simmer and let it vigorously simmer for at least 10 minutes. Allow it to reduce a bit, but don’t allow to caramelize. Remove from heat when you can see space between the “fill line” when you first put the pan on the heat, and the current top of the liquid. Stir in the lemon juice.
Give it another minute or two and pour into serving vessels. I like to use a champagne coupe..or pretty small cup/glass.
Refrigerate for a few hours. This is best served on the same day it is made.
Serve with sweetened whipped cream or complimentary jam.

Ribollita
On January 2, 2026 by Christy Larseni am in LOVE with this soup
when I visit Italy I seek it out
even when it dare be placed on
a spring or summer menu
you have to appreciate
thick hearty soup to enjoy ribollita
it is not light
it is not delicate
it is me
as an allegory
in a soup
when expecting visitors,
I post a big pot of this on the hob, for early and late arrivals.
It is a real treat with a snowbank of parm and a generous tip of olive oil
here is the best part
day two
is better than day one
seriously
Ribollita
2 cans cannellini beans–drained
1 large bunch cavelo nero, kale, swiss chard, or other dark leafy green–chopped
3 stems fresh italian parsley–chopped
3 garlic cloves–peeled and chopped
4-5 celery stalks-chopped
3 carrots–chopped
1 onion–chopped
1 29oz can diced tomatoes
1 loaf (approx) stale ciabatta or other hearty bread, crusts removed–sliced or torn
olive oil
chicken or vegetable broth
parmesan cheese
salt
pepper
In a large stockpot, fry the onion, celery, carrot, garlic, and parsley in about 3 Tbs olive oil on low for about 30 minutes. Add the tomatoes, cavelo nero (or other leafy green), the beans, and enough broth to cover. Simmer for an additional 50-60 minutes.
The bread and broth are used to manage the thickness of the soup. I would start with 1/2 the bread, add more broth, and let it sit on low heat for a bit, allowing it to break down. Add more bread or broth to achieve the consistency you enjoy. Season with salt and pepper. When serving, top with parmesan cheese and a glug or two of good olive oil.

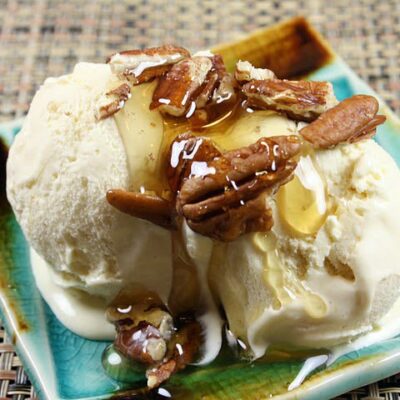
Honey Ice Cream
On April 5, 2025 by Christy LarsenIt seems our egg situation is very different than the rest of our nation. We have hens and our hens lay eggs. Not as many as in the past, as our hens are aging out faster than they are reproducing. For quite a few years we added hens each year, and would find that despite baking and eating eggs on the daily, we couldn’t get ahead of it. It isn’t like that now, but we do have laying hens and we have access to eggs for our dining pleasure.
In addition to eggs, my larder basics include cream, yogurt, and a selection of honey. While we haven’t harvested honey from our bees in many years, we still have jars aplenty.. I have a private stash from our mountain cabin hive (harvested over a decade ago) and a more visible selection from local purveyors.
Facing these ingredients in the glow of the ice box, I am inspired to dust off the ice cream maker and make this simple recipe.
Honey Ice Cream
5 egg yolks
1/2 tsp sea salt
2/3 cups honey
1 cup milk
1/2 cup Greek yogurt
1 cup cream
1 tsp vanilla
Whisk egg yolks, salt, and honey together in a bowl. Heat 1 cup of milk until it simmers. Temper the egg mixture with the hot milk and return the entire mixture to the pan and cook, while continually stirring, until it thickens to a nappe. it will be the thickness of heavy cream. Strain into a clean bowl…let cool a bit. While it is still warm, but not hot, stir in the yogurt. Let cool to room temperature and add the cream and vanilla. Chill and freeze according to the manufacturer’s instructions.
**You can stir in toasted nuts just before you pack into freezer containers.
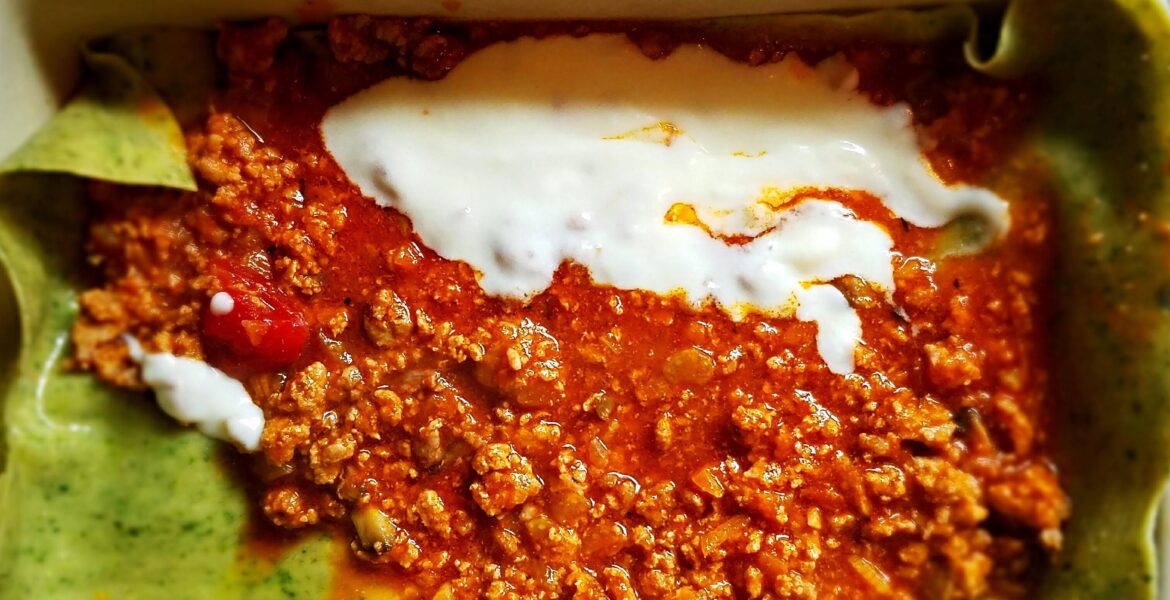
Simple Bolognese
On December 10, 2024 by Christy LarsenIn 2009, I traveled to Umbria with my mother and sister on a culinary vacation. We ate at and cooked in small restaurants and homesteads; along the way, we learned techniques and recipes. One evening, we rolled up to an Agriturismo run by a woman named Elena. Elena lived alone in a small brick farmhouse surrounded by beautiful hills and a forest of olive trees. We were there to learn lasagne Bolognese–traditional with spinach pasta and besciamella heavy with nutmeg–it was rustic and delicious.
There are as many recipes for bolognese as there are cooks. This one is very simple and will work in a lasagne and as a sauce for pasta. Truth be told, many nights we eat it piled on thick slices of toasted bread topped with mounds of parmesan.
Each time I make this, I think of that wonderful holiday all those years ago. After all this time, it is still my favorite version of a classic sauce.
Simple Bolognese
Elena’s Ragu alla Bolognese
1 carrot
1 celery stalk
1 medium onion
1/2 lb ground pork
1 lb ground beef
1 cup red wine
1 cup tomato sauce
1-2 cups vegetable or meat broth
1 clove garlic–thinly sliced
extra virgin olive oil
salt and pepper to taste
Mince onion, carrot, and celery rather fine. Drop them in a pot with enough olive oil to cover the base. Don’t let them swim in the oil, but don’t skimp. Add a pinch of salt. Fry lightly for about 10-15 minutes, stirring occasionally. You do not want the vegetables to brown. Add the minced meat and mix well until the meat browns a little. Stir occasionally. When the meat is cooked, add the red wine and let it cook into the meat allowing the excess to evaporate. Add the tomato sauce, 1 cup of broth and flavor with a bit of pepper. Add the sliced garlic. Cook the sauce very slowly for 2-3 hours, covered. Stir occasionally and add additional hot broth if the meat looks dry or too thick. Use this sauce for pasta or lasagna.
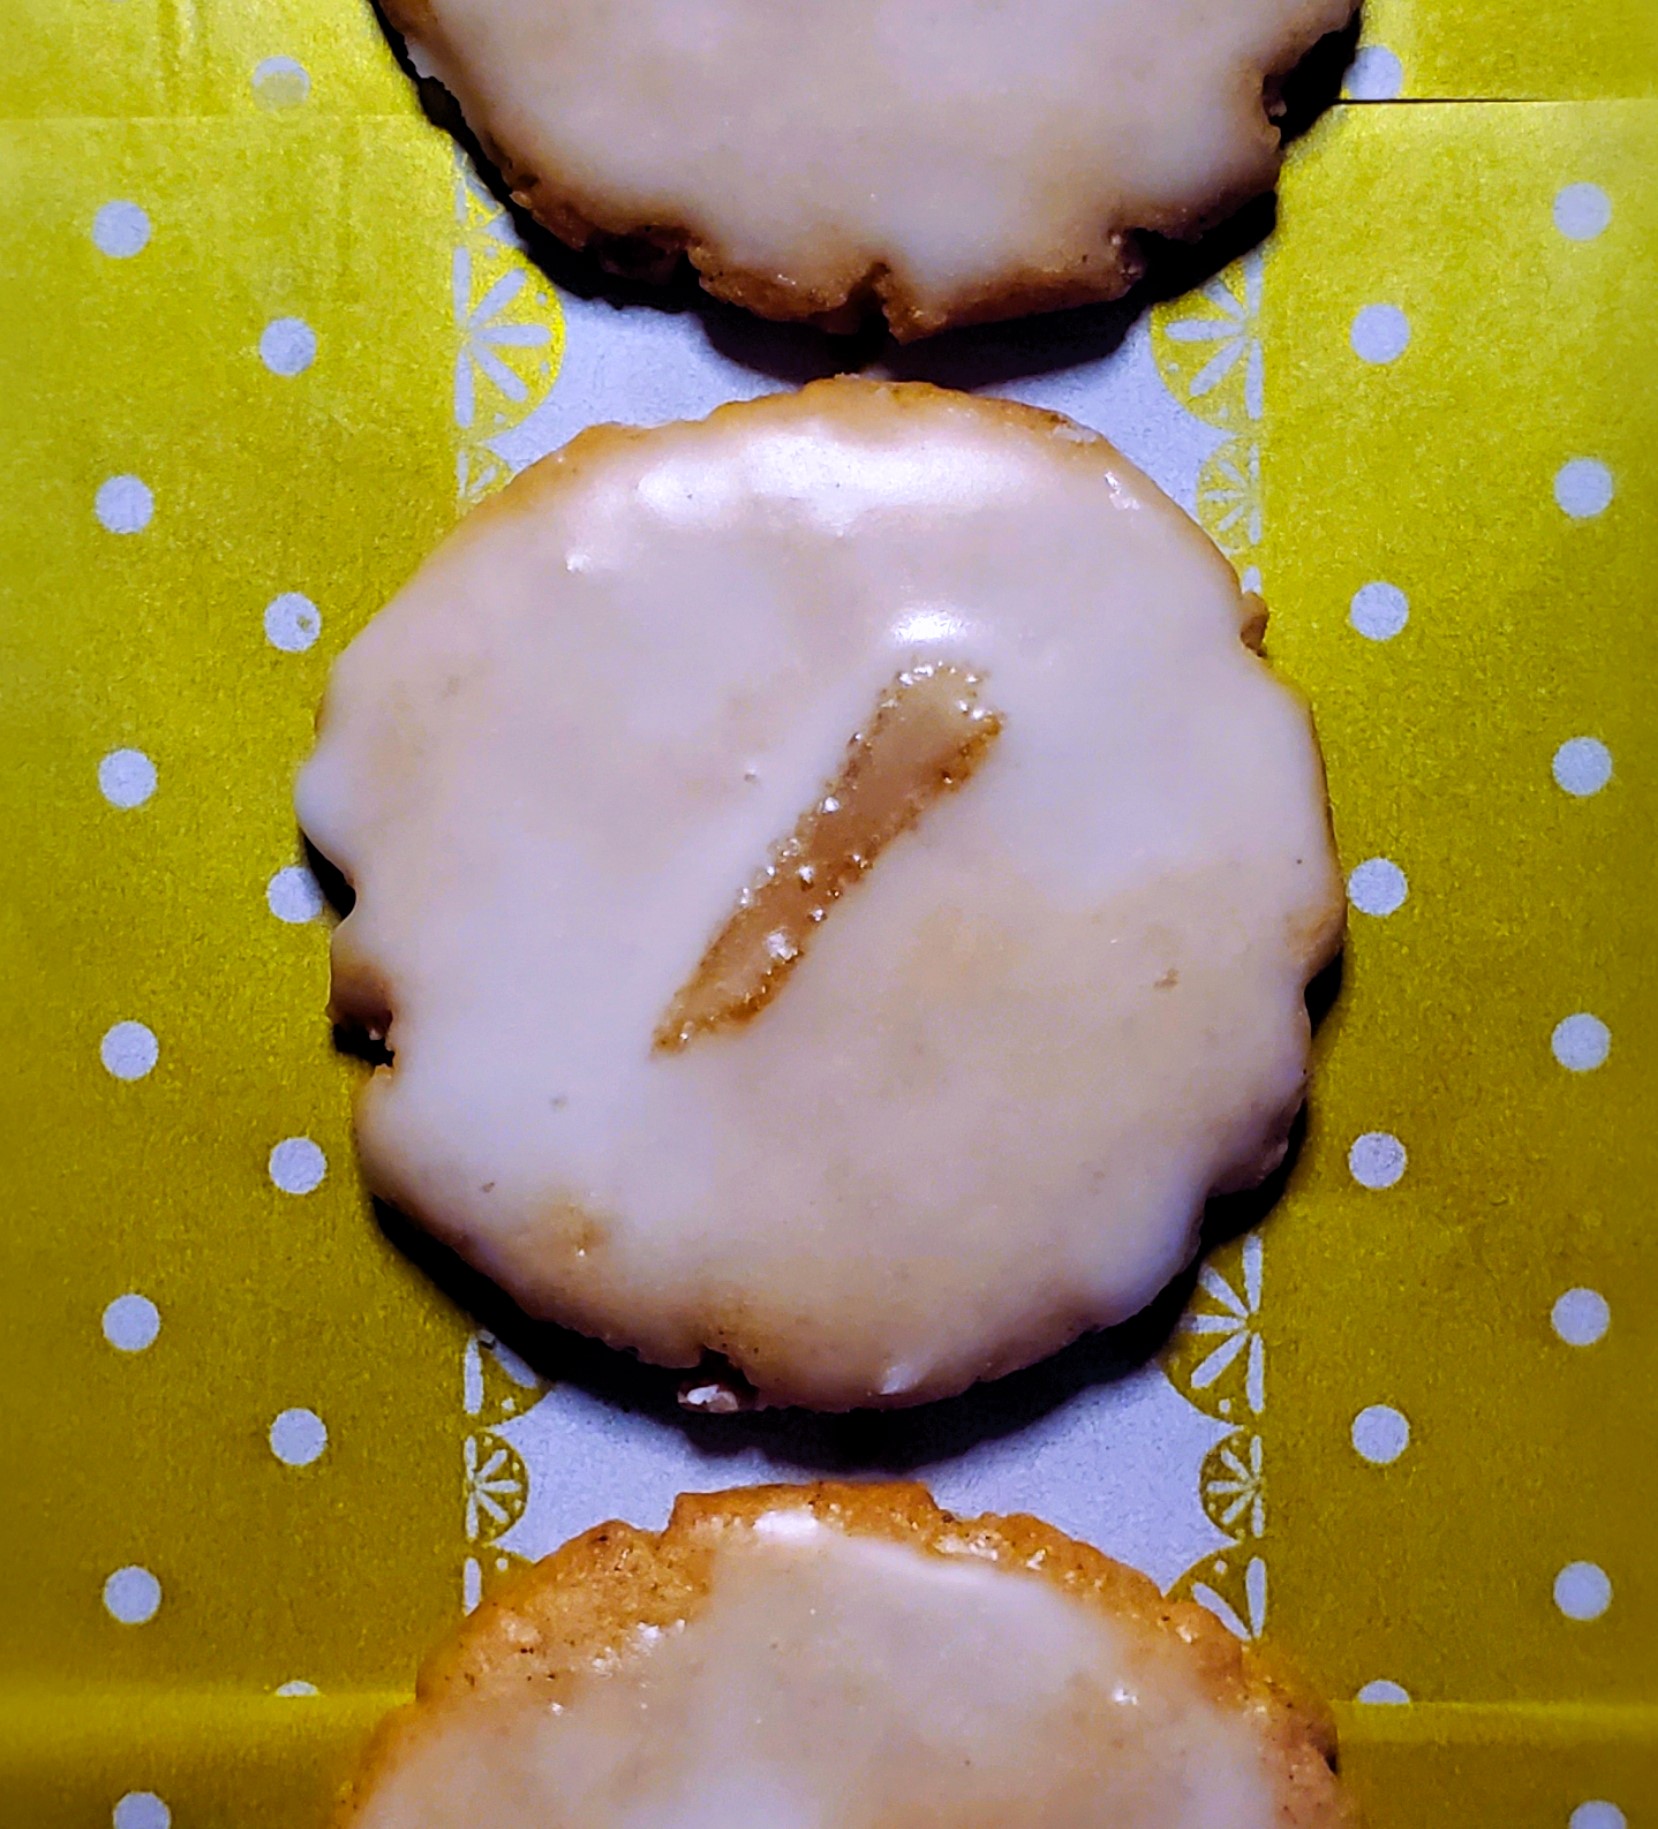
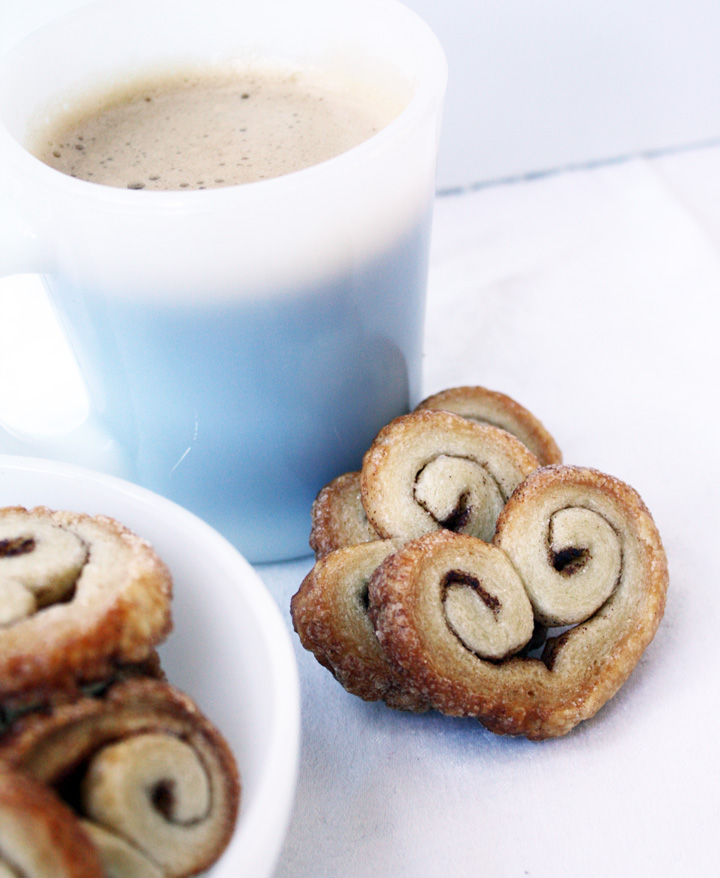
Lemon Glazed Gingersnaps
On November 21, 2024 by Christy LarsenCladia Fleming’s recipe with a little update by me
My first edition of “The Last Course” by Claudia Fleming is well-used and slightly abused. The pages are spattered and worn, and the entire book looks older than its 20 years. It is a great book; if you can find it, I suggest you grab a copy.
These little cookies are delicious, just as Claudia imagined them. As one does, I am giving them a holiday gild. The glaze gives them a few extra days of “freshness” and a distinct citrus punch. Drop them onto your holiday cookie platter, gift them with your favorite tea blend, or drop a few in your glove box for any cookie-related emergency.
Gingersnaps
1 3/4 cups firmly packed dark brown sugar
1 1/2 cups unsalted butter-softened
1 large egg
1 Tbs grated (peeled) fresh ginger
1 1/2 tsp lemon zest
3 3/4 cups all-purpose flour
2 Tbs ground ginger
1 Tbs ground cinnamon
1 1/4 tsp baking powder
1/2 tsp ground white pepper
1/4 tsp ground cloves
1/2 tsp kosher salt
Beat sugar and butter until smooth. Add egg, fresh ginger, and lemon zest and beat well. In a bowl, whisk together flour, ground ginger, cinnamon, baking powder, white pepper, cloves, and salt. Beat until well combined. Form into a large disk, wrap in plastic wrap, and chill for at least 4 hours or overnight.
Preheat oven to 350F. Scoop out 1 tsp of dough at a time and roll between palms. Flatten with the base of drinking glass dipped in flour. Bake 8-10 minutes until crisp or browned. Let cool completely before glazing
Lemon Glaze
2 cups powdered sugar
1 Tbs agar agar
1 Tbs lemon zest
1 Tbs lemon juice
candied ginger, slivered for decoration
Place sugar in a bowl, add the agar agar and lemon zest. Slowly add the lemon juice until you get to your desired consistency. If additional liquid is needed, use cream or water (your choice). If you make it too thin, add more powdered sugar. Dip each cookie into the glaze, add a tiny sliver of candied ginger, and let sit at room temperature until the glaze is set. Store in an airtight container at room temperature.
*if you make ahead, you can bake and freeze the cookies without glazing. Defrost and glaze.
**If you want to be very clever, sandwich a bit of ice cream between a glaze and an unglazed cookie and act like it “was nothing.”
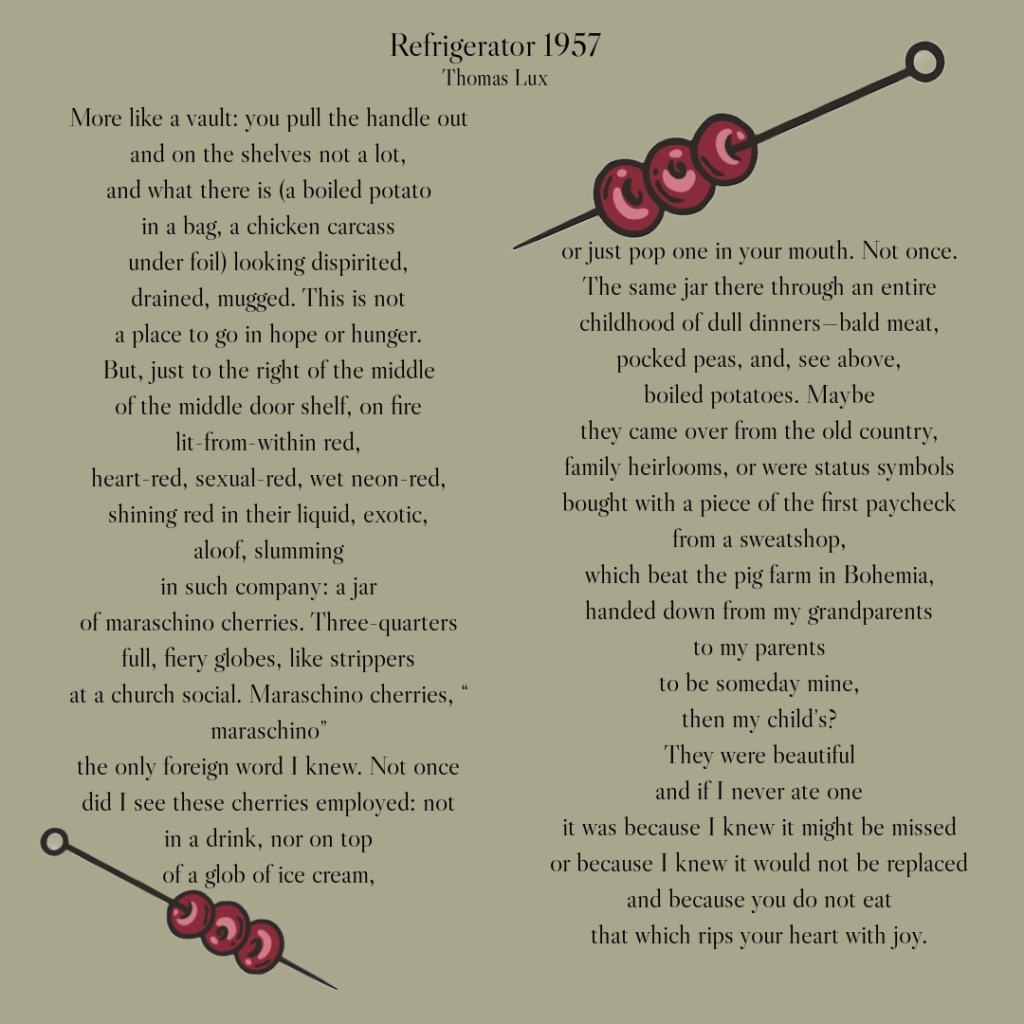
For the love of cherries
On July 13, 2024 by Christy LarsenThomas Lux and his words of encouragement
Something about me…
because really, we who write these things, this words, these blog posts
no matter humility
are longing to share
So
Something about me
I can be very polite; my manners scream of finishing school. When I employ them
I can also be very sharp; my manners scream of an animal caged without water or light
I can be somewhere in between; delightful and distasteful in the same paragraph
My mother used to call me “the girl with the curl”
it was a poem reserved for me and all other little girls with a temper
All this has nothing to do with Thomas Lux except that it perhaps will serve to explain what happened next
For no reason other than because, I found myself with my nose a bit out of joint. It could have been the chest puffery or the perhaps the cigar puffery
there was puffery
Or it could have been the suggestion that the men gather at the bar and the wives find their way to the parlor
I think it might have been the filter of “I have more than you–which makes me better than you” through which he seems to see the world
that set me off
I managed through the use of my love for words and my appetite for words around food, to out snob the snob. Thomas Lux came to my rescue as I turned my nose at the cherries presented with the over fussy (and frankly not so enchanting) cocktail.

The Passion
On July 7, 2024 by Christy LarsenWhen I served this small sip at my Easter gathering this year, I gave it a cheeky name. It was clever, but wholly inappropriate and not for public airing. I’m serving in small coupes which are perfect for a delicate sip, but as this is delicious and refreshing, I wouldn’t blame you if you took a straw to the shaker and called it a night.
The Passion
Fill a shaker with ice. Pour in 2 ounces of vodka (i’m partial to Chopin) and 2 ounces of Chinola (passionfruit liqueur). Add a sprig of fresh thyme and a squeeze of lemon (approx teaspoonful). Put the top on securely and shake it until your arms are toned and your hands are frozen.
Strain an equal amount into 3 small coupes and top each with a generous swig of Fresca. Grab a jar of amarena cherries and tip a drop or two of the juice and a skewered cherry into each glass. If you’ve a patch of edible flowers, they make a beautiful (but not necessary) addition.

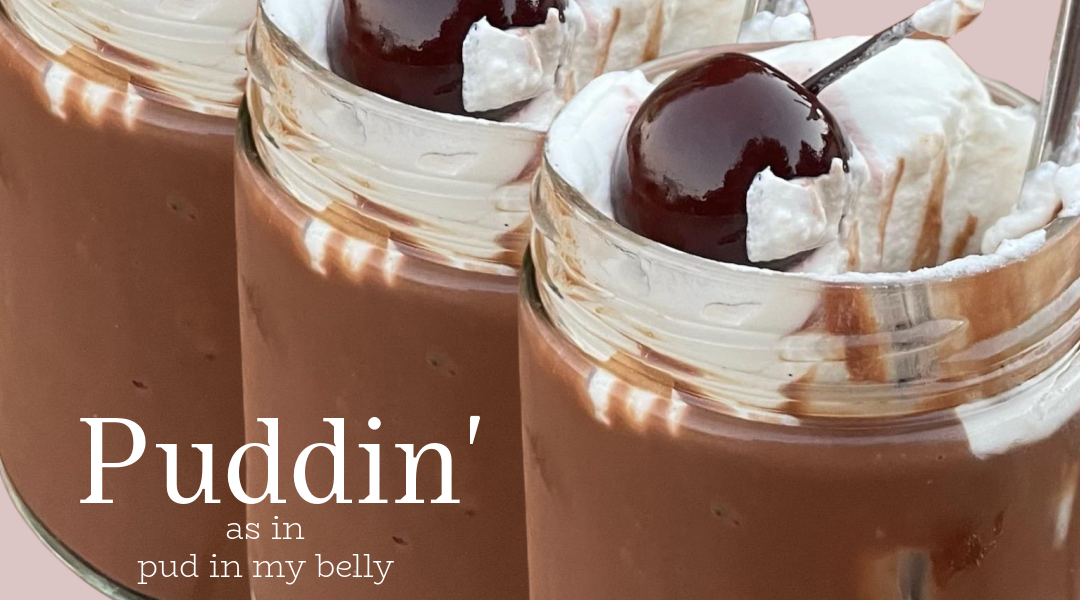
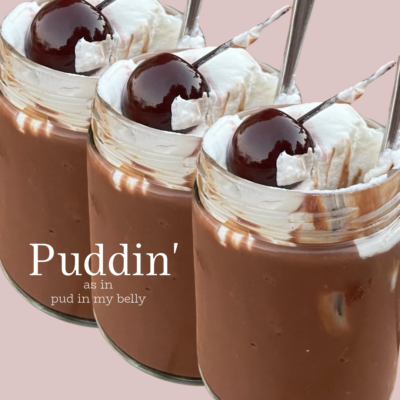
Chocolate Pastry Cream
On February 16, 2024 by Christy Larsenaka puddin’
I came a little late to the pudding game. If you have been following along for any amount of time, you know that I grew up in a only homemade, no convenience food home. Pudding stayed in its box, on the shelf of the grocery store. And…to be honest…whenever I had it a friend’s house, I kinda didn’t see the allure. Don’t even get me started on banana pudding–talk about gaslighting.
I knew pastry cream, because my mom would make it to put in her eclairs, but it took me a while to realize that pastry cream and pudding are basically the same. Except pastry cream uses whole milk enriched with egg yolks and butter, rather than only relying on cornstarch to thicken.
This recipe is very easy and will have you whipping up puddin’ on the daily. It is basically breakfast food
try and convince me otherwise
I enjoy it topped with gently whipped {unsweetened} cream or creme fraiche and a brandied or Amarena cherry for further indulgence
Ingredients
3 cups full-fat milk
3 duck egg yolks, or 5 large chicken egg yolks
1/2 cup granulated sugar
1/4 cup cornstarch
1/2 tsp kosher salt
1 tsp vanilla extract
7 oz bittersweet chocolate chips or chopped bar (63-70%)
1 oz unsalted butter at room temperature
Directions
- Whisk the egg yolks, cornstarch, and salt in a bowl until they are well incorporated
- Heat the milk with the sugar over low heat until it comes to a simmer
- Meanwhile place the chocolate, butter and vanilla in a separate bowl
- When the milk has simmered, use it to temper the eggs. This is done by slowly whisking the milk into the egg mixture to slowly warm the eggs.
- Turn the milk and egg mixture back into the saucepan and heat on low, while continually whisking, as it thickens quite a bit. Once you start to see bubbles forming, remove it from the heat
- Pour hot custard into sieve that is held over the bowl of chocolate/butter/vanilla and allow to fall over and melt the chocolate and butter. Discard any clumps of egg white remaining in the bowl of the sieve. Wait a few minutes, then whisk until butter, vanilla and chocolate are fully melted and incorporated.
- Enjoy warm with a bit of cold cream, or place bowl over a larger bowl of ice water and stir to bring temperature down to room temperature. Place a bit of plastic wrap directly on top to keep a skin from forming. If you like the skin, skip that part. Place in the refrigerator for several hours or overnight to chill completely.
- Serve cold with gobs of cream; cultured or whipped
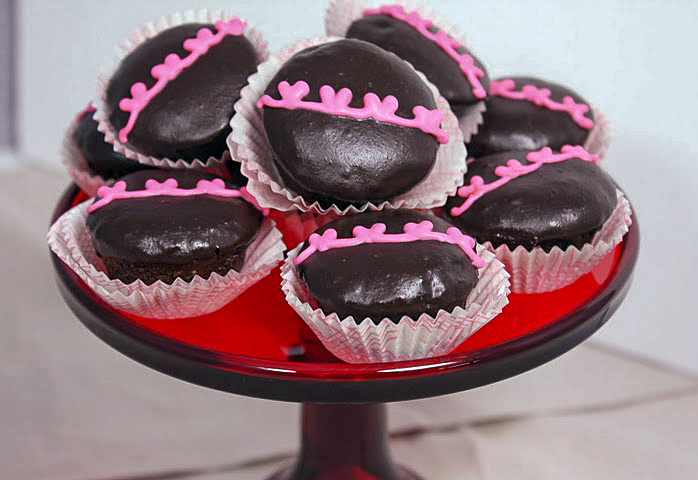
February 14th Yay or Nay?
On February 8, 2024 by Christy LarsenSo tell, me. Are we fans of Valentines, Galentines, Palentines Day?
I kind of am; in the way that it is hard for me to say yuck to pink and red and conversation hearts AND giant boxes of chocolates AND flowers AND testimonies of love.
I’m also kinda not. In the way that I don’t want anyone to feel obligated to spend money or insist there is a right way to spend the 14th of February
In this house, we celebrate with lunch. Sometimes it is a picnic, sometimes it is a restaurant, sometimes it is kraft mac n’ cheese while watching Newhart on DVD. Mike and I swap planning from year to year. Sometimes, we shift it to another day if something comes up or the restaurants get savvy to the tradition and only offer a special Valentine’s Day prix fix meal.
This year, I will be out of town on the 14th. Also, it lands on a day I observe a fasting tradition, so I planned Saturday lunch at a great little fish house in a nearby town. We make a little effort for Valentine’s. Even though we show our love for each other every day, we don’t show it like this. Sometimes, it is nice to shake off the norm and proclaim a day of love designed around commercialism instead of deep and abiding tolerance (she says with tongue firmly planted inside cheek).
If you feel like doing something a little extra for yourself or yourself and someone else, might I suggest a few of these fun and delicious treats?


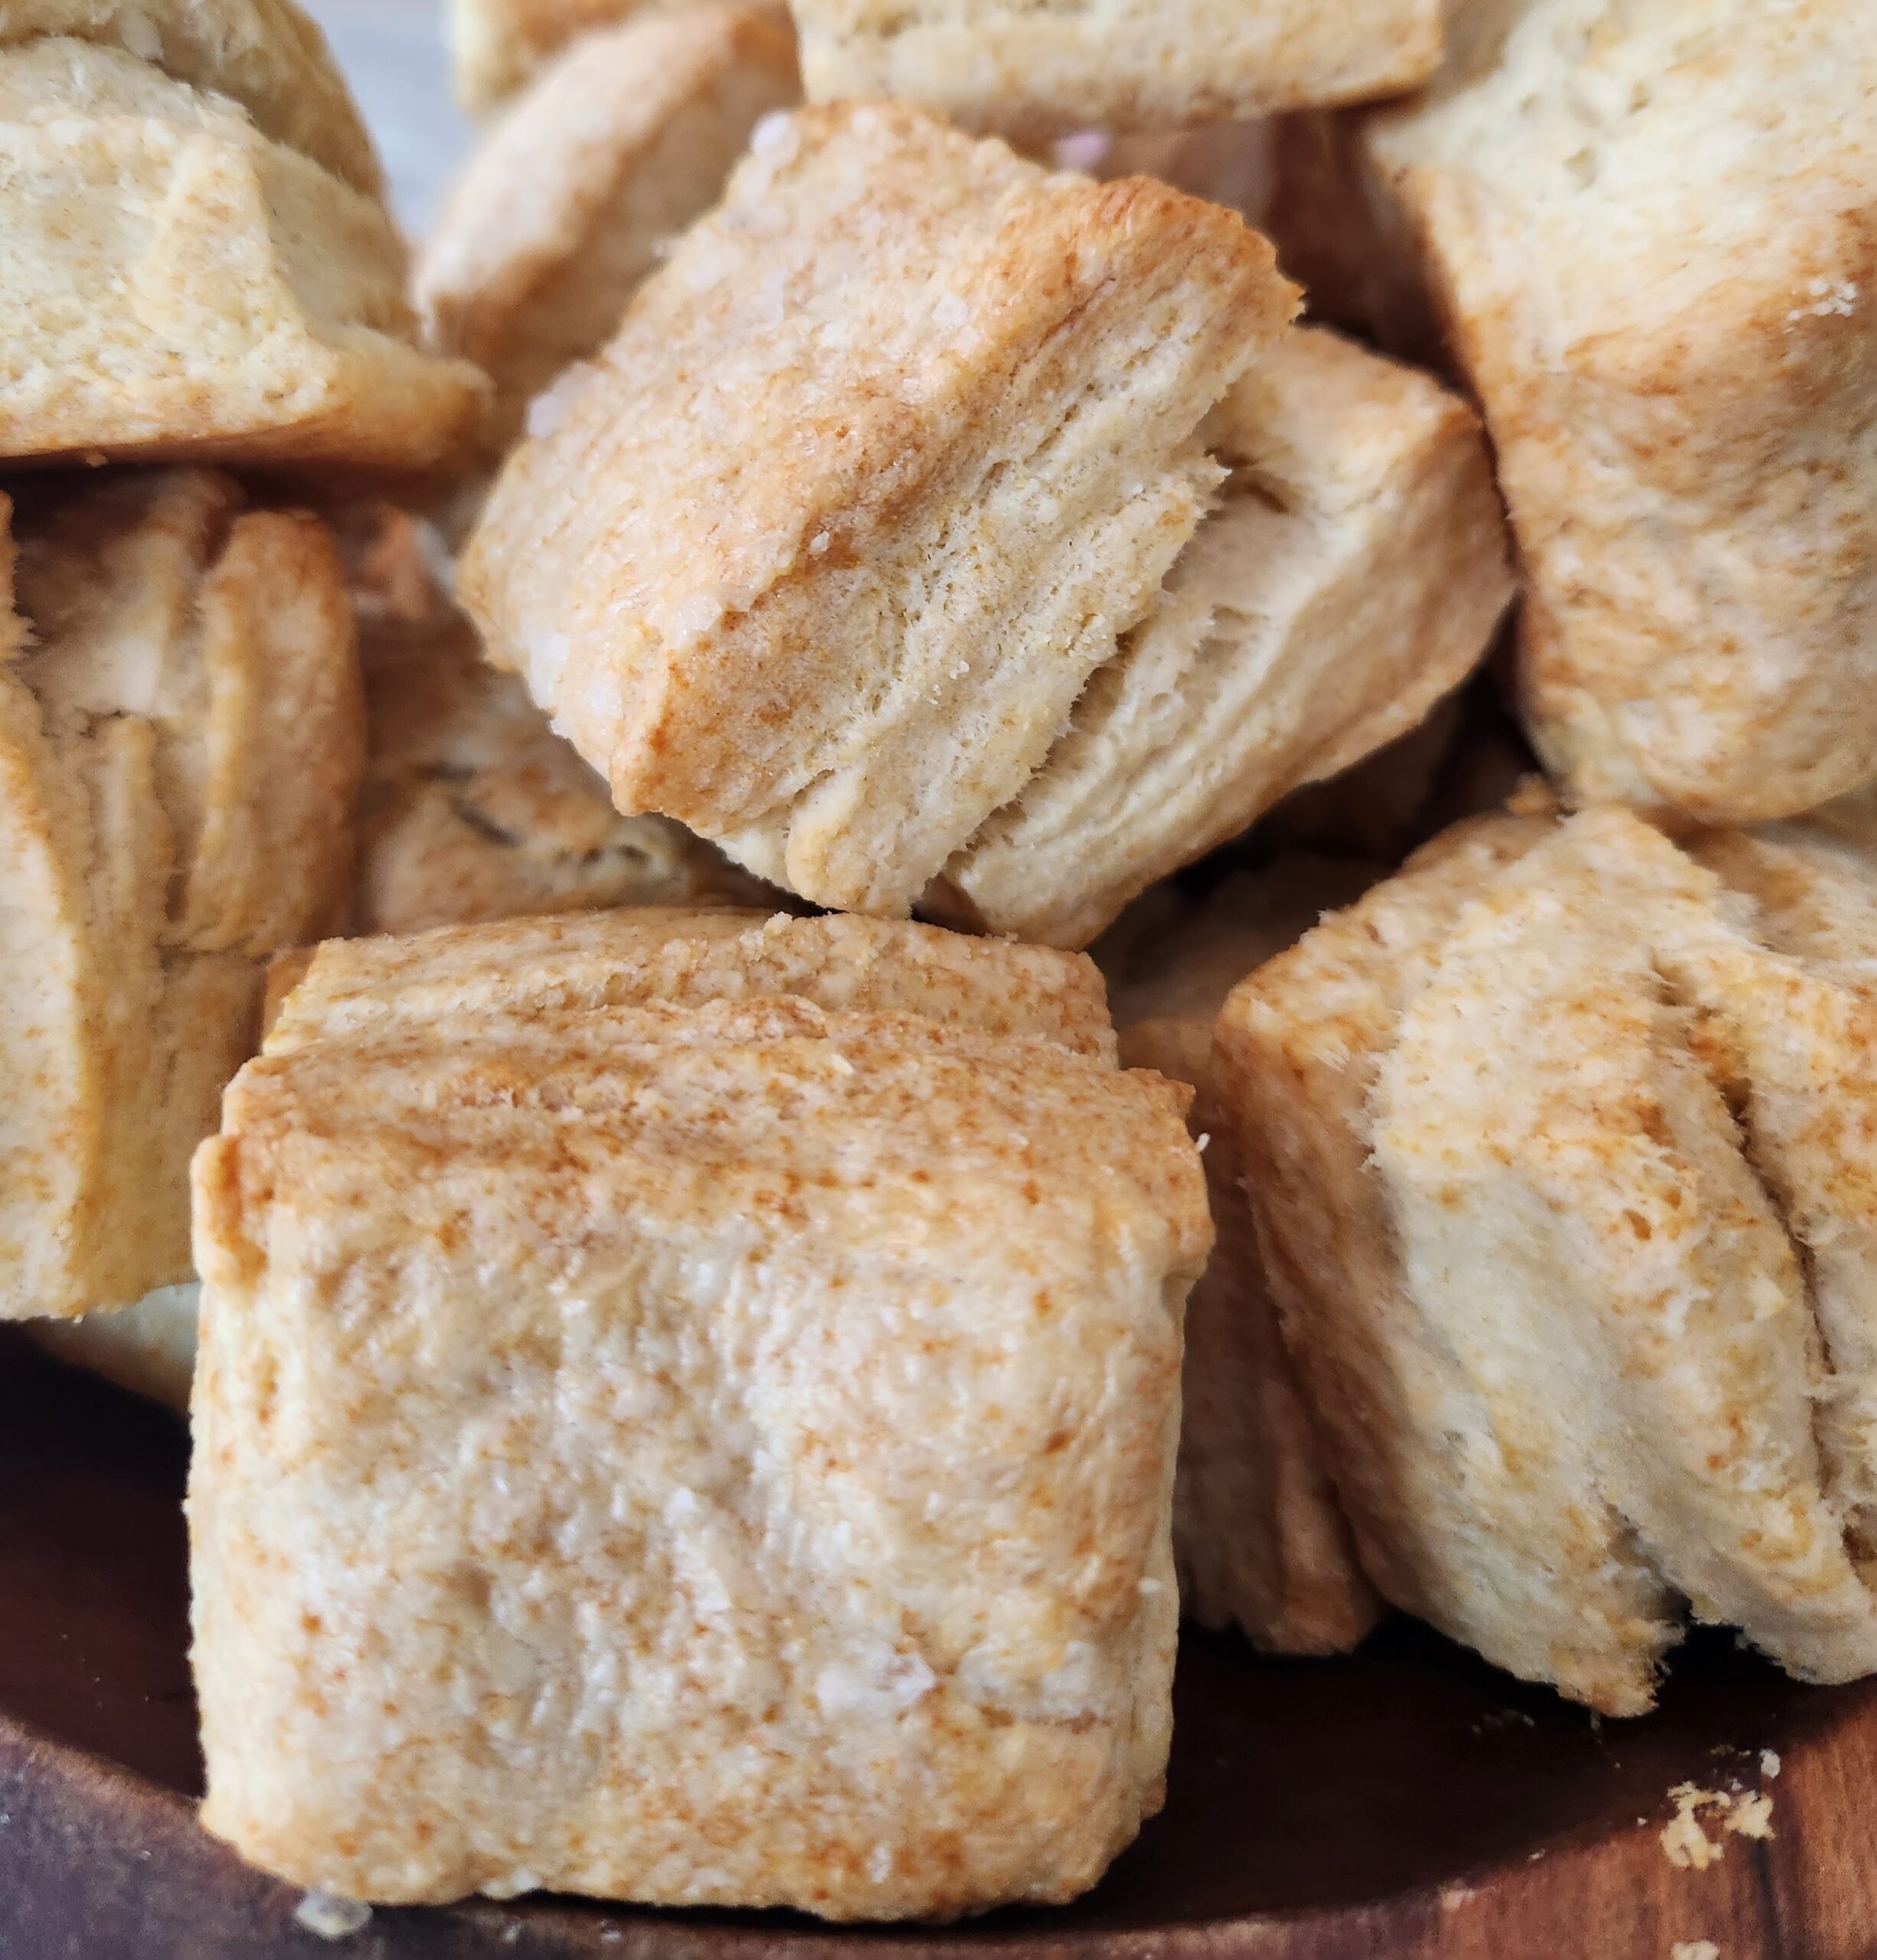
Sour Cream Biscuits
On January 2, 2024 by Christy LarsenMake a surprise visit to my place (how dare you).
Seriously, don’t.
I hate the pop-in and chances are I won’t answer the door.
You wouldn’t.
I live too far out and the idea that you would be anywhere near my place, willing to shell out the gas money, scale the fencing, make it up the drive in your fancy “city” car then get past the livestock and their guardians, is pretty much zero.
But let’s pretend that you mentioned to my husband that you were going to be in town, and he forgot to tell me. Then (and only then) I do take smug satisfaction in knowing that with a quick rummage through my pantry and a few bits from the fridge, I can put together a modest but delicious spread.
Here is the thing. I have learned over the years that having staples on hand is important, but not as important as knowing how to use them. A simple biscuit recipe can go a long way in the entertainment canon. I used this one twice in the past two days; first as breakfast with butter and jam then as a way to sop up spicy gumbo. Sometimes I add a little sugar, occasionally a heap of parmesan. The mainstay is good butter and confidence
Sour Cream Biscuits
makes 9 large or 12 modest squares
2 cups all-purpose flour
4 tsp baking powder
3/4 tsp kosher salt
1/2 tsp baking soda
6 Tbs unsalted butter cold and cut into small pieces
3/4+ cup heavy cream
1/4 cup sour cream
-Flaky sea salt to accent the top
Place the dry ingredients in a bowl. Quickly mix together to evenly distribute. Use your fingers to rub the butter into the flour (or use a pastry knife to cut it in). The goal is to have some chunks the size of garbanzos, others like a BB, and everything in between. Don’t go crazy, this should all happen quite quickly. Add the cream/sour cream and mix so that it just comes together. You may need to add more cream but don’t make a wet dough. Turn it out onto a very lightly floured surface; gently pat into the shape of a square.
Using a rolling pin, roll out to about 1/4″ thick. Fold the dough in thirds (like a letter), give it a quarter turn, roll, and fold again. Give another quarter turn, fold. Roll out into a 9-inch square (about 1/2″ thick) and cut evenly into 9 pieces.
Adequately space on a lined cookie sheet. Brush with cream and with a light hand, dust with flaky sea salt (such as Maldon). Bake at 375F until slightly past golden. Check the bottom to make sure they have color. Let cool fully or just warm. Best eaten the same day. A better idea is to, make a few batches to keep in the freezer and bake off as needed.
For a sweet version, add a few tablespoons of sugar and omit the dusting of salt–serve with creme fraiche, strawberries, brown sugar, and a touch of balsamic for an impressive afternoon tea.