Warm Brie & Date Bites
On November 24, 2015 by Christy LarsenAt the first sign of frost and chill, I begin dreaming of kitchen comforts. I begin to categorize in my head all of the delicious things I will prepare, and the perfect gloaming light in which I will photograph them. Stews, braises, puddings, cakes, savory lamb shanks cooked under the most perfect crust with just the slightest untidy boil-over {meant to look homemade and charming, just shy of a mess} flash behind my eyes, like the world’s best slide show. I will tap the perfectly worn, turn of the century board from my vast selection of props, slide a piece of irish linen {just so} at the perfect angle and pose my dish as if it were Gigi Hadid on Capri.
That is always the plan. Bless my heart for having such a great imagination.
The reality is this. I’m dreaming of kitchen comforts, but I would gladly toss them aside for a kitchen cleaner. I’m positioning our meals between bottle feeding goats and mucking out chicken coops. I own beautiful dishes and linens and worn boards, but find myself opting for those pieces that are within reach in my tiny kitchen. And when I say in reach, I am being literal.
When we have company, I channel my imaginative moments. I {she said sheepishly} create a scene. A “why yes, we always have cocktails and warm truffled marcona almonds on the deck. Here, please stave the chill with one of these throws we keep tucked behind the bar for moments like this”scene. Maybe I don’t go that far…but I go pretty far. Why I do it, is not up for discussion. But how I do it is.
I keep it simple; putting together things that can hit more than one note, and can be mostly prepared in advance.
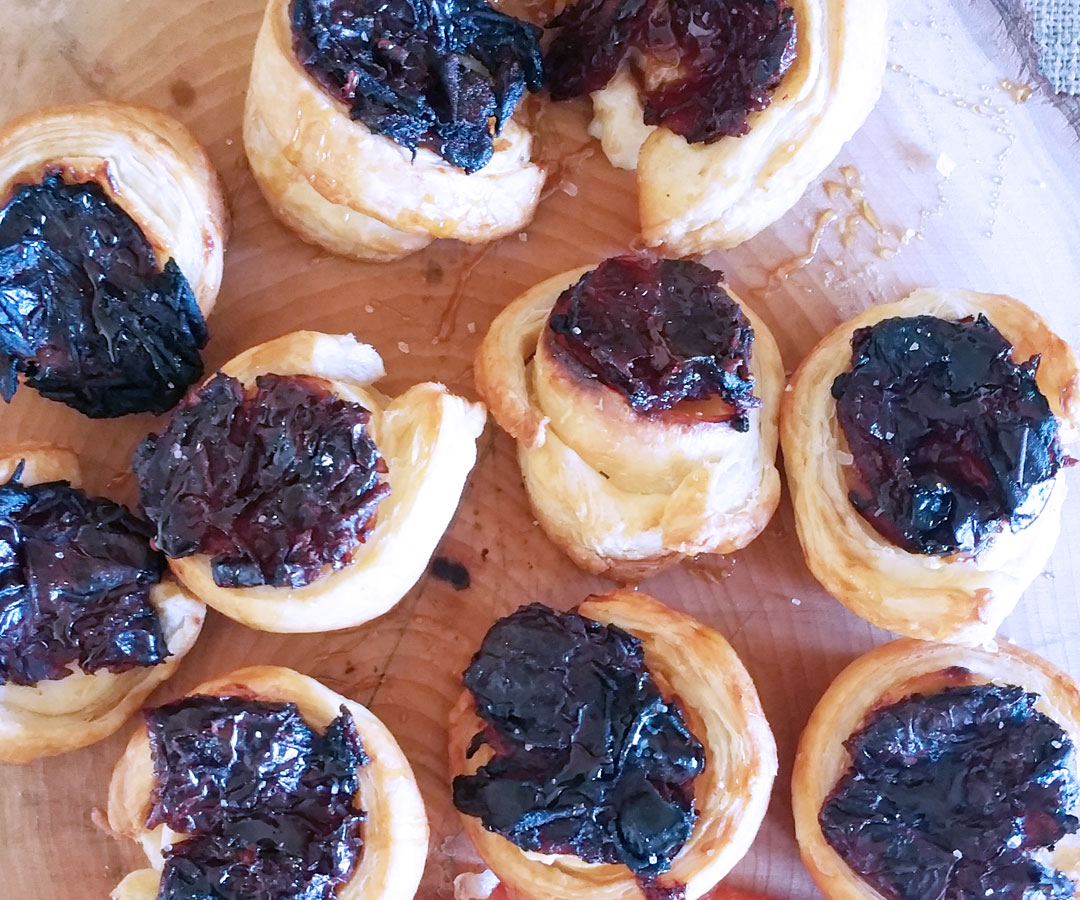
These warm brie & date bites are a wonderful treat that pairs well with champagne, bourbon neat, or mulled cider.
Warm Brie & Date Bites
10 mini brie rounds {i have found them at trader joes}
puff pastry; defrosted and chilled
water
10 large dried dates; pits removed
maldon salt {or your favorite sea salt}
honey
Slice the top off each brie round (it is best if they are cold for this step). Prepare a sheet pan by lining with parchment paper or a silpat. Using a cookie cutter, cut 10 rounds from the puff pastry that are only slightly larger than the brie. Using a knife, cut strips of puff pastry as wide as the brie bites are high. Using a pastry brush, one at a time, brush the 1 round and 1 strip with water. Place the brie on top of the round then wrap with the strip, making sure the ends meet or slightly overlap. Cup the brie in your hand to make sure the bottom is attached to the strip. Leave the open top exposed {the end without rind should be facing up}. Butterfly the pitted date and place, gooey side down, on top of the brie. Continue with remaining brie rounds. Place in refrigerator to chill for a minimum of 30 minutes.
At this point you can cover and keep in the refrigerator overnight.
When you are ready to bake, preheat oven to 400F. Space the bites with at least 1″ between them and bake until golden brown. Depending on your oven, this could be 15 minutes or it could be 30 minutes. Start checking on them at 15 minutes. When the pastry is puffed and golden brown, remove from oven. While still warm, drizzle with honey and sprinkle a bit of sea salt on each one. Serve warm or room temperature.
Bangers & Mash
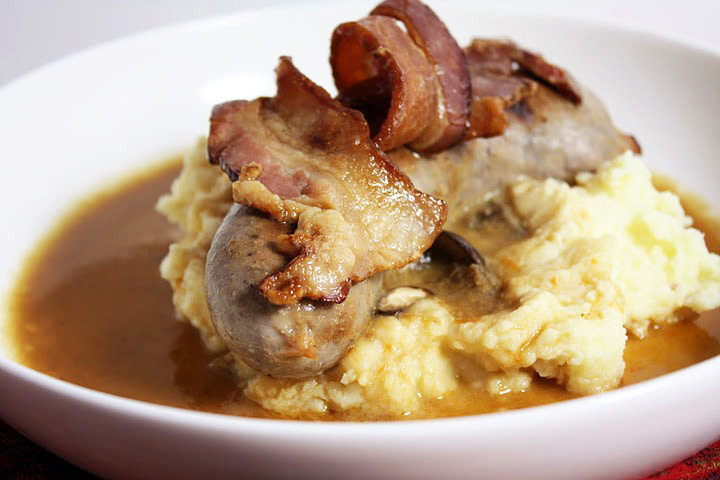
On November 10, 2015 by Christy LarsenSeveral years ago, Mike and I enjoyed a quick trip to London. My good friend Rebecca lives outside of London proper, but popped into the city to treat us to lunch at a fancy restaurant. In typical American fashion, we eschewed the fancy and ordered pub style lunch. And in typical British fashion, Rebecca didn’t flinch. I lived in London, which now seems a lifetime ago, for several years. I always ordered bangers and mash when found on a menu. Its one of those meals that everyone has a version of, and everyone’s mum made best. I always found the meal to be hearty, comforting, and delicious. My version here is an attempt to copy the version we had on our last visit to London.
Bangers and Mash
mushroom gravy
1 stalk celery–finely diced
1 carrot–finely diced
1 onion–finely diced
pinch salt
3 cups beef stock
1 bay leaf
3-4 sprigs parsley
2 sprigs thyme
2 oz unsalted butter-softened
3 Tbs flour
3 crimini mushooms–sliced
4 crimini mushrooms–diced
Cook the celery, carrot, and onion in a bit of olive oil until just softened. Add the beef stock all at once and stir. Toss in the sliced mushrooms, the bay leaf , the parsley and thyme. Cover and let simmer for at least 30 minutes but up to an hour. Strain. Return the liquid back to the pot. Mix together the butter and flour in a bowl. Add the warm stock, a bit at a time to the butter-flour mixture, whisking to make a smooth paste. Once you have a runny paste (much like toothpaste), whisk it into the broth until smooth. Toss in the diced mushrooms and simmer until it thickens and the mushrooms soften–about 10 minutes.
Bangers
4 bangers
4 thick cut bacon rashers
1/2 bottle lager
Put bangers and bacon in a sided saute pan. Pour in beer and simmer until the beer has completely evaporated. Add just a bit of olive oil and allow it to continue to cook until the bangers are cooked through. Your pan will get really dark and scary looking. Don’t worry…it won’t damage (fill the pan with water and slowly simmer on the stove, it will clean right up)
Mash
5 smallish yukon gold potatoes–peeled and halved
1/2 stick of unsalted butter–room temp
2 oz cream chese–room temp
milk
salt and pepper
Boil potatoes in salted water. drain and return to pot. Toss in butter and cream cheese and mash. Add enough milk to get your desired consistency. Once you add the milk, you have to be mindful. Do not whip and beat endlessly. If you do, you may end up with gummy mash–yuck. Better to have a lump or two. If you like silky mashed potatoes, run them through a ricer before adding butter and cream cheese. add salt and pepper to taste.
To Assemble
Place a generous portion of potatoes on your plate. top with the sausage and enough gravy to make you smile. Top with a rasher of bacon.
Fresh from the Field Pumpkin Pie
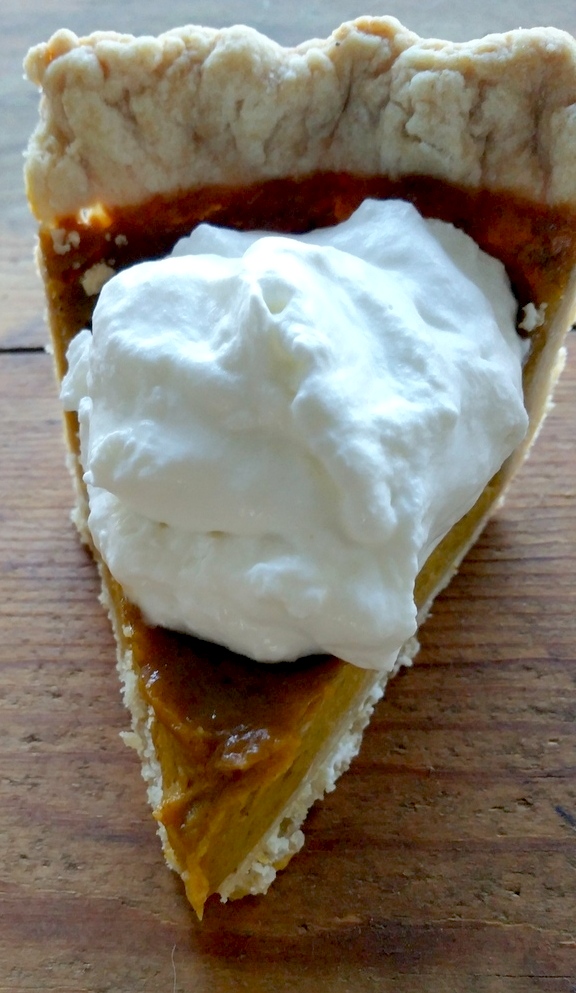
On November 3, 2015 by sixtyacrebakerPumpkin pie and I have made a bit of a journey together. Up until a decade or so ago, I used canned pumpkin and its accompanying recipe for my pie. It was good. Libby’s had a bit of a lock on the pumpkin pie market and deservedly so. Canned pumpkin, canned milk, sugar, eggs, spices. Easy as pie, right? It wasn’t until I started buying sugar pumpkins, at the farmer’s market, and subsequently growing my own,that I began making homemade pumpkin puree. The change has been slow, and deliberate. Moving from canned pumpkin to homegrown was a bit more daunting than ditching the canned milk. When we moved to the ranch we started growing some heirloom varieties of pumpkins. After a myriad of taste tests and bum to prove it, we’ve decided that the Jarrahdale pumpkin makes the best pie. Or should I say, my best pies are made with Jarrahdale pumpkins. The flesh is firm and a bit sweet after roasting and decidedly “pumpkinny”. When processed it is very smooth and makes an almost pudding like pie. Admittedly, they can be difficult to find..and this recipe works well with any (except jack-o-lantern type) pumpkins…but if you see one…grab it. They keep well, look eerie and taste amazing.
Pumpkin Pie
makes an 8 or 9 inch standard depth pie
1 recipe flaky pie crust (recipe follows)
2 cups fresh pumpkin puree (instructions follow)
2 whole large eggs
2 large egg yolks
1/2 cup whipping cream
3/4 cup dark brown sugar–gently packed (add a bit more if you like a sweeter pie
1/4 tsp salt
1 tsp cinnamon
1/2 tsp ground ginger
1/8 tsp ground cloves
1/8 tsp freshly ground nutmeg
1/8 tsp allspice
*note: you can add or eliminate any spices you wish. I only suggest that you don’t overdo the cinnamon. The flavor of fresh pumpkin is gentle, if you put too much cinnamon, you will kill the subtlety.
Preheat the oven to 375f.
Whisk all ingredients, except the eggs, together in a large bowl and taste for sweetness and spice. At this point you can add a bit more sugar (add 1 Tbs at a time) and spice. When you are happy with the flavor, whisk in the eggs and egg yolks and place the bowl in the refrigerator while you “blind bake” the crust. Be sure to bake only until the crust begins to look cooked, but not browned. You do not want to over bake, as you need to put it back in the oven once you fill with the pumpkin custard. Remove the crust from the oven, remove the weights and parchment paper, and immediately pour in the custard. Reduce the oven heat to 350f. Place the pie on a baking sheet and bake for approximately 40 minutes. It is important that you watch it. You do not want to overcook the custard. It is done if you tap the side of the pan and you get a slight jiggle/ripple in the middle of the pie (1 or 2″ from the center of the pie). Just as if you have skipped a small rock into a pond. If the ripple starts from the outer rim of the pie, it is not done. If it doesn’t ripple at all, pull it from the oven and get it on a cooling rack right away. Let cool at room temperature. Store in refrigerator.
Pie Crust
you can use a favorite recipe, or even a store bought crust (which simply isn’t as good, but I understand). This is a simple recipe that I use for a nice tasting and sturdy crust.
2 1/4 cups all purpose flour
3/4 tsp kosher salt
1 Tbs sugar
1/2 cup cold butter–cut into chunks
1/2 cup lard
5-6 Tbs of cold water + 1/2 tsp vinegar
In a large bowl mix together the dry ingredients. Add the butter and shortening all at once and “cut” into the pastry. I like to use my hands for this. I will work the mixture until the butter and shortening are incorporated into the flour in hazelnut size pieces. Add enough very cold water to bring the mixture together, but it should not be sticky. It should also not be dry. Handle the dough as minimally as possible, wrap in plastic wrap and refrigerate for at least 1 hour or overnight. If you are making the pastry well in advance (more than a day), I suggest wrapping it and freezing it. Raw dough will turn gray after a time in the refrigerator.
Fresh Pumpkin Puree
Do not use a pumpkin that you would use for carving. They can be stringy and don’t carry the flavor of sugar or (in this case) the jarrahdale pumpkin. Wash the pumpkin well, cut in half and remove all the seeds and stringy bits. Reserve the seeds and roast them for a treat. Place the pumpkins, cut side down on a lined baking sheet and place in a 350f oven until they are very soft. Let cool, remove skin run through a ricer, food mill, or immersion blender. For a silky smooth texture, process the “meat” of the pumpkin until it is no longer lumpy. I use a hand blender which works perfectly, but you can use a processor as well. Place puree in a cheese cloth lined colander and let drain 6 hours or overnight. You will need 2 cups for the pie recipe, but your pumpkin might yield more. You can freeze the extra at this point.
