


Chocolate Zucchini Cake
On July 17, 2020 by Christy LarsenI must admit that the provenance of this recipe or idea of it anyway came from elsewhere. I have been making it for so many years and have futzed with it along the way, that I have no idea where it all started. It has become a favorite of ours and our farm stand guests mostly because it lives under the guise of being healthy. You know, with it being loaded with veggies and all.
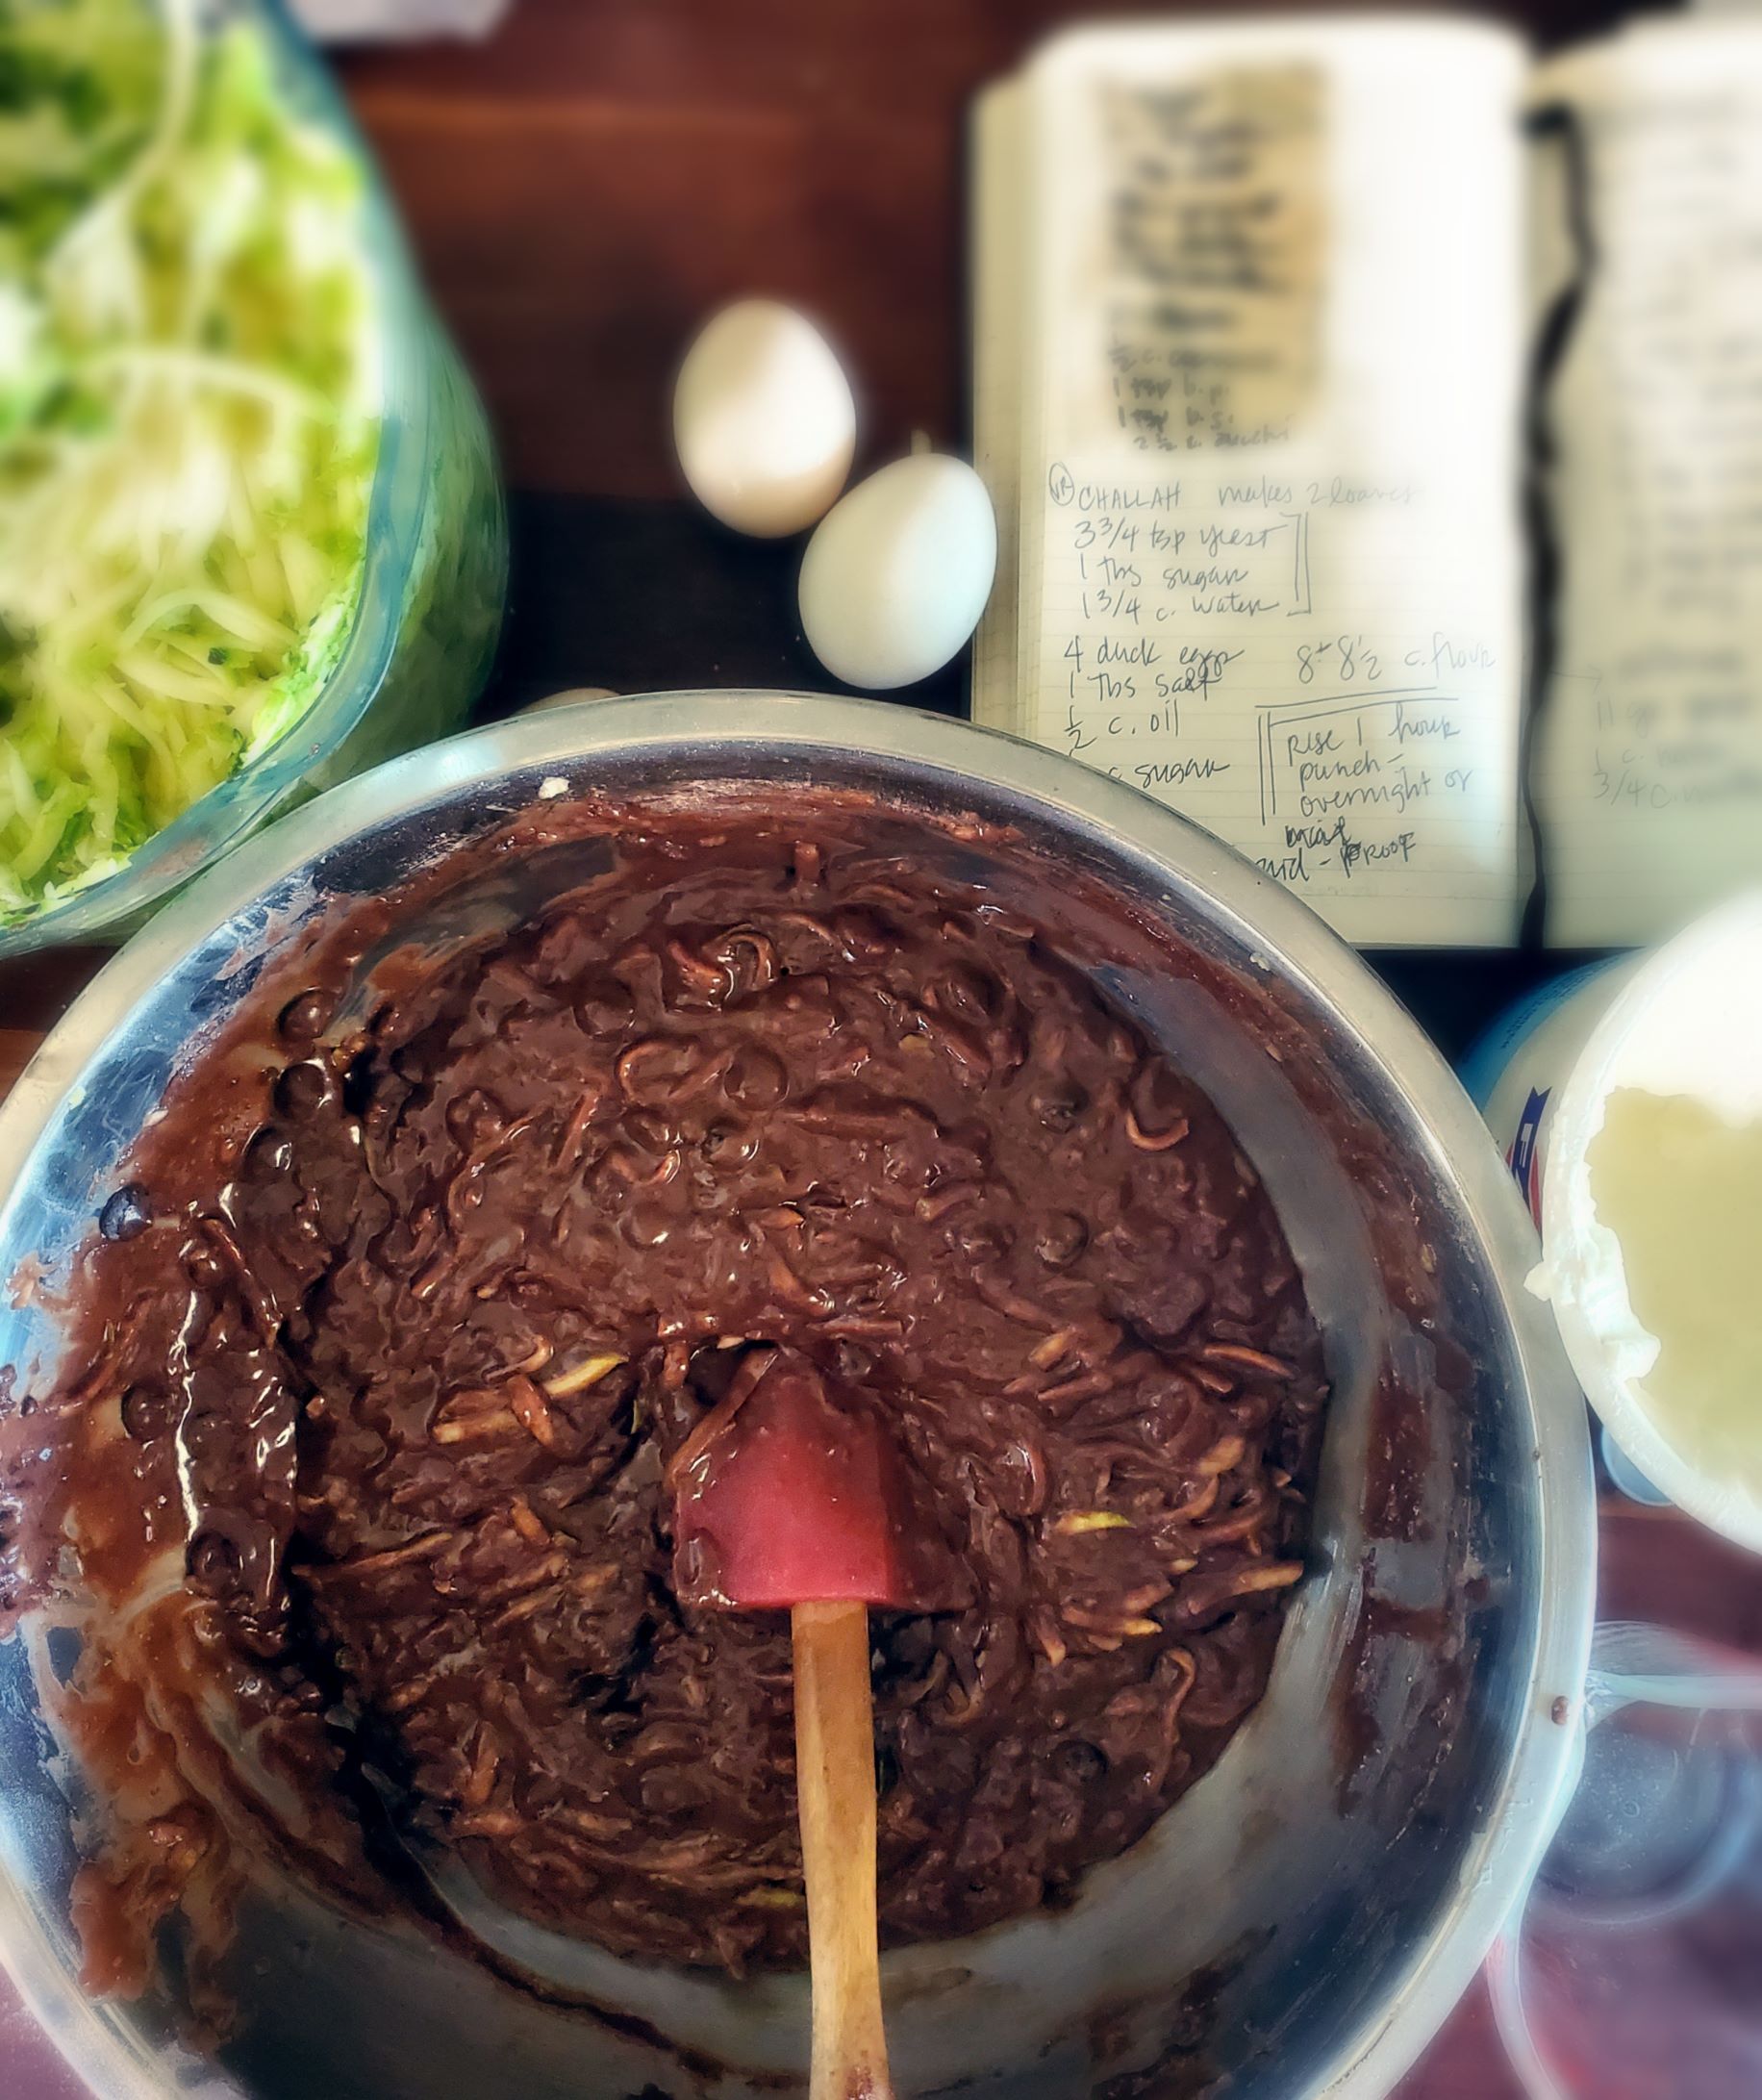
We grow a ton of zucchini here. This is a story told by anyone who successfully grows zucchini. We are all trying to unload our bumper crop by mid-summer to anyone who makes eye contact. It is a prolific and delicious vegetable that is difficult to stay ahead of. Now that I grow my own, I am always amazed at the perfect (and small) grocery store versions of them. I imagine they must pay people to sleep in the field with a ruler in hand and harvest at just the right moment. Mine are always imperfect and sometimes downright giant. This cake is filled with grated zucchini. It can be a perfectly beautiful one or a monster from your garden, but I do recommend that you have more flesh than seed when grating.
The recipe calls for oil and duck eggs. I have had success using vegetable oil, olive oil and lard. I have not made this recipe with butter, nor have I substituted apple sauce and cannot endorse either. As for eggs, I use duck in most of my baking. For this rustic cake, I would use large or extra large chicken eggs if you cannot find duck. If you cannot find large or extra large, you can use what you have. It may alter the result, but it shouldn’t ruin it. If that just won’t work for you, look up the weight (liquid weight) of a, extra large chicken egg, multiply by two and then weigh the eggs you have until you get to the number you need. If you end up needing only half of your egg–whisk it before measuring. Baking is a science, but its not a science fair.
You will want to sneak this into your lunchbox on-the-daily despite it being loaded with veggies
Chocolate Zucchini Cake
2 duck or extra large chicken eggs
2 cups granulated sugar
1/4 cup lard (melted) or oil of your choice
2 tsp vanilla extract
3/4 cup plain yogurt
1 tsp kosher salt
2 cups all-purpose flour
1/2 cup cocoa powder
1 tsp baking powder
1 tsp baking soda
2 1/2 cups grated zucchini
1 1/2 cups bittersweet chocolate chips (you can add more or less to your individual taste)
powdered sugar for decoration
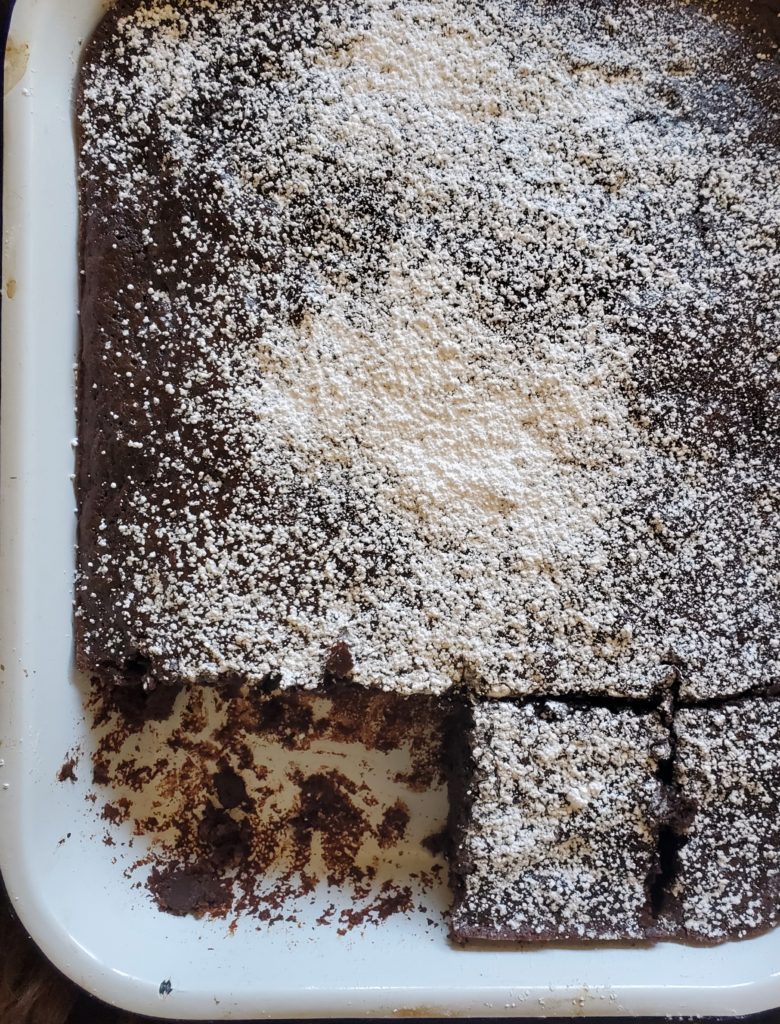
Prepare an 8×13 high sided baking pan with vegetable spray or butter and preheat the oven to 350F.
In a large bowl, whisk the eggs and sugar together until they are well incorporated and they begin to lighten. Add the lard (or oil) and whisk until fully emulsified. Whisk in the yogurt and extract and give it a good 30-second workout. Switch to a wooden spoon or spatula and stir in the salt, flour, cocoa powder, baking powder, and baking soda. Do not over mix, but make sure everything is incorporated. Stir in the zucchini. If your cake mix is stiff, add up to 1/4 cup of water to help loosen. You do not want it to be runny, it should be the consistency of warm pudding. Add chocolate chips and tip into your baking tin. Bake for approximately 45-50 minutes. It is done when the top is resistant to your touch or a cake tester comes out clean. Remove from heat and allow to cool. Sift a bit of powdered sugar on top and serve straight from the pan. a
If I am to be honest, this cake gets about a 30-minute respite in our house. It is lovely served warm accompanied by a cold glass of milk
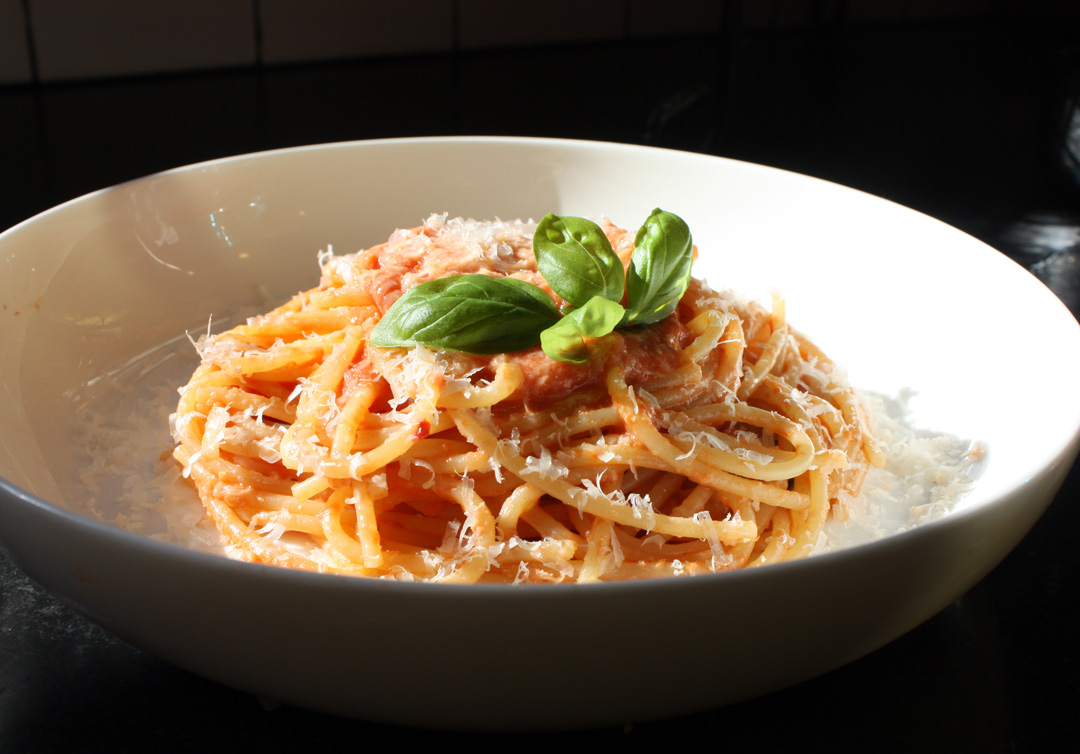
Spaghetti alla Vodka
On March 20, 2020 by Christy LarsenMy grandmother was famous for her alla vodka but not exactly like this. For one thing–she was a traditionalist and used penne. She also didn’t make her own tomato-infused vodka because she was a widow raising kids, with limited amount of time on her hands. Not all sorts like I do (she says with her tongue firmly in cheek). Our garden produced so many late harvest tomatoes that I found myself using them in a variety of ways; sundried, oven-roasted, confit, and soaked in vodka.
Tomato Infused Vodka
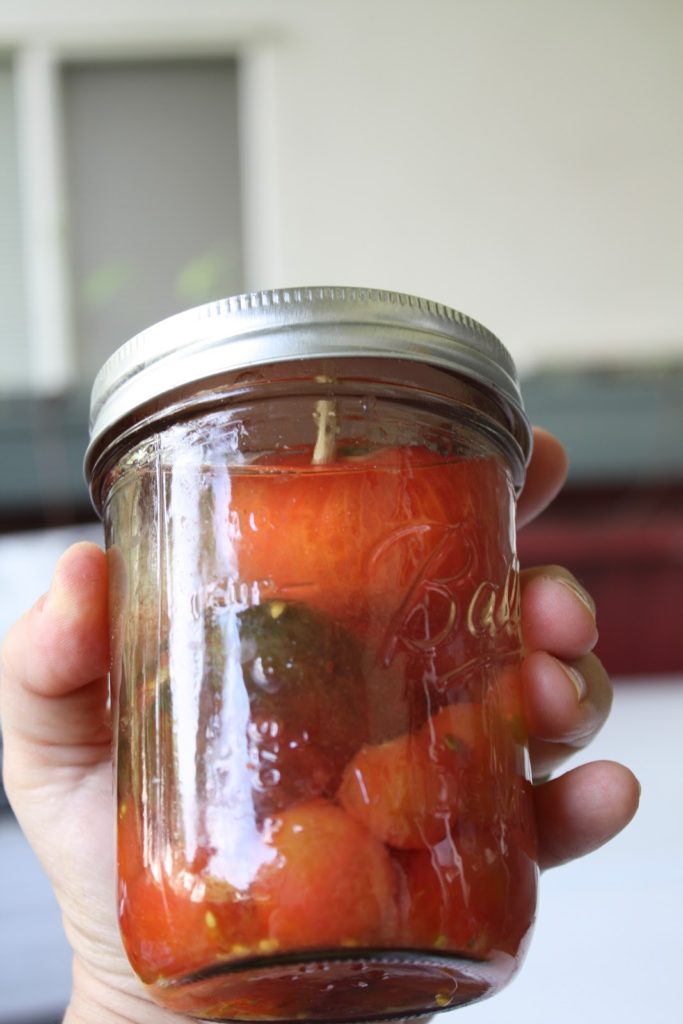
This is really simple. Peel tomatoes and cram into a jar, use a skewer to secure tomatoes if they start to float to the top. Fill the jar with vodka and store in the refrigerator for at least 5 days. I make several jars because I like to use the tomatoes and the vodka for my sauce. Leftover vodka is really great for a bloody mary.
Alla Vodka
1 lb spaghetti or pasta of choice
olive oil
1/2 of small onion–finely diced
2 garlic cloves–finely diced
6-8 basil leaves–chiffonade
1 large tin peeled whole tomatoes or combination of vodka soaked tomatoes and tinned tomatoes to equal about 4 cups whole
1/2-1 tsp crushed red pepper flakes
1/2 cup tomato soaked vodka (or another vodka you have on hand)
1/2 cup heavy cream
1/4 cup grated parmesan plus more for serving
Cook pasta in salted water, according to package instructions. Saute onions and garlic in olive oil over low heat, careful not to brown, but allow to get translucent. Meanwhile, place the tomatoes in a food processor or blender and pulse until smooth. When the onions and garlic are ready, add the tomatoes and vodka and let simmer for about 10-15 minutes. Add the basil, red pepper flakes, and heavy cream. Allow to heat through then stir in parmesan, and toss in the drained pasta. If the sauce seems too thick, use a bit of the pasta water. Shave a bit of parmesan on top of each individual serving, along with additional crushed red pepper, if you like spicy.

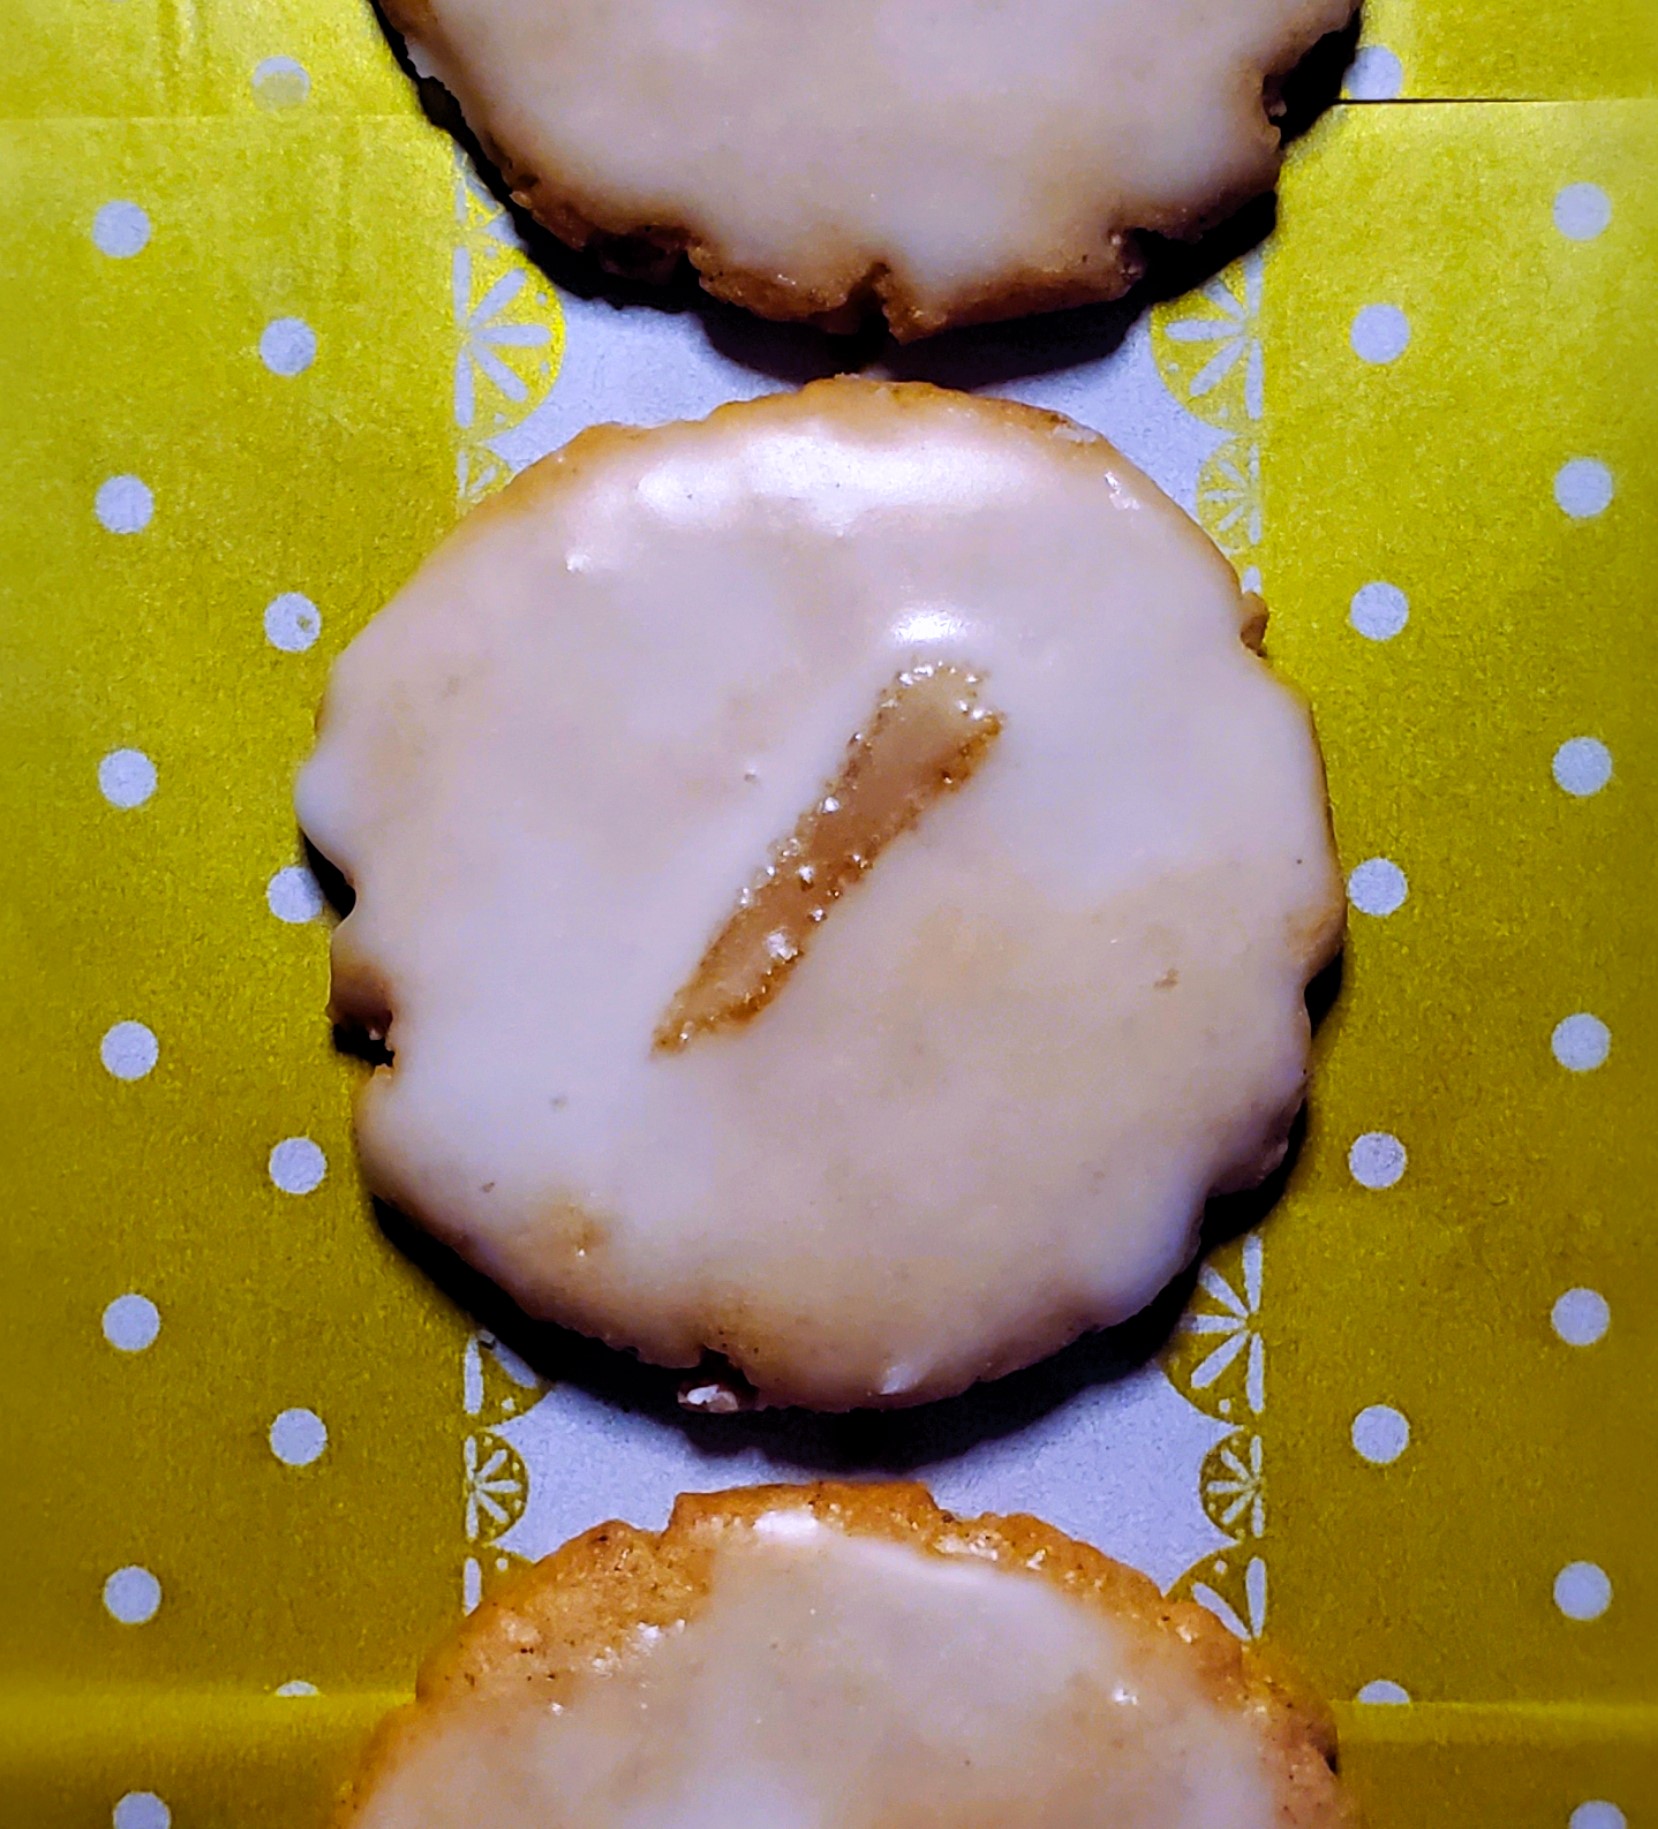
Iced and Snowy Stars
On March 15, 2020 by Christy Larsen I love this shortbread recipe and use it shamelessly whenever I can. Every Christmas my mom would bring out special cookie cutters. The ones she used for shortbread. The mystery still remains why they were shaped like playing card suits and; how”spades” and “diamonds” scream Christmas I never thought to ask
perhaps I should have
She rolled the dough out thicker than usual, slightly underbaked them and half-dipped them in chocolate. They are perfect that way and are still my favorite way of eating them
They are also delightful rolled a bit thinner and baked a bit longer. When glazed with ivory tinted royal icing, and flavored with a bit of almond they are the best accompaniment to your morning cuppa.
Shortbread Cookies
1 cup butter–room temperature
3/4 cup sifted powdered sugar
1 tsp vanilla extract
1/2 tsp salt
2 cups flour
Beat sugar and butter until completely mixed together, but not light and fluffy. Add vanilla and salt and mix until just incorporated. Slowly stir in flour and only mix until just incorporated. Divide dough in 2 portions, wrap in plastic and place in the refrigerator for a few hours or overnight. When ready to bake, roll out and bake on parchment paper. Top with sprinkles or leave plain and bake at 325 until just starting to brown on the bottom. Once cooled you can dip in tempered chocolate or glaze with royal icing (alton brown recipe here), flavored as you choose.
Just a simple tip: I glaze the cookies using a pastry bag and let them dry. I then dip a small paintbrush in a bit of Everclear or vodka (or you can use extract) and gently swipe it across the top. I then immediately sprinkle the sugar on top. the liquid will evaporate almost immediately–but it will allow your sugar to stick without sinking into the icing.
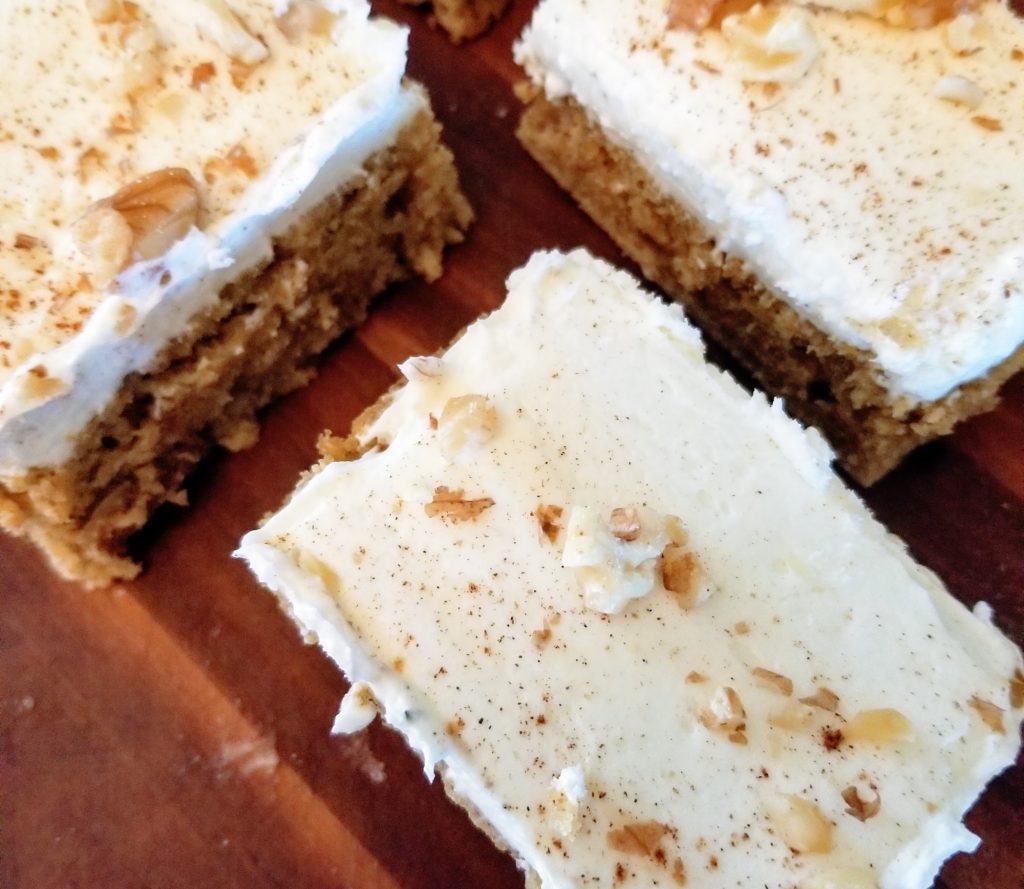
Parsnip Spice Cake
On March 4, 2020 by Christy LarsenLiving in California affords us a “winter garden.” All my favorite roots and brassicas are thriving in our cold, but not bitter-cold, temperatures. The other day, I found myself with dirty nails and an armload of parsnips.
After a few snaps of frost, parsnips (left in the ground) can become quite sweet and are a delicious addition to a cake heady with spices. Mostly because I can, I like to ice this cake with a nice thick cap of snowy cream cheese frosting, a sprinkle of spice and just enough walnuts to let people know it is a nutty cake.
While you can play with the pan size to make it quite high, throw into a loaf, or double to make a lovely layer cake, I like it best when it is unfussy and almost more of a slice than a cake. This way, as I reach for my second helping, I don’t feel nearly as gluttonous. After all, it does contain a vegetable.
Before you get started, I need to talk to you about the frosting. You may hate me for this, but in my not so humble opinion, cream cheese frosting should taste like cream cheese, not like sugar. This is why my recipe has a “to taste” caveat on it. I start very slow with the sugar and add as I see fit. Yes, it should be sweet, but just at the mark of sweet, not sugary sweet. You can disagree with me and pile the sugar in, it’s your choice, but I think you will be just as happy with something that has a nice tangy kick to it.
This cake recipe is adapted from Bon Appetit 2006
Parsnip Spice Cake with Cream Cheese Frosting
CAKE
1 1/2 cups all-purpose flour
1 cup granulated sugar
2 tsp baking powder
1 Tbs ground ginger
1 1/2 tsp ground cinnamon
1 tsp freshly ground nutmeg
1/2 tsp ground clove
1/2 tsp ground allspice
1 tsp kosher salt (i prefer diamond crystal)
3 large or extra-large eggs (duck eggs work great)
1/2 cup olive or vegetable oil
1/2 cup whole milk
1 tsp vanilla extract
2 cups grated parsnip–grated on small holes of a standard grater–packed down
1/2 cup walnut pieces–toasted
Place all of your dry ingredients (including sugar) in a bowl. In another bowl whisk together the eggs, oil, milk, and vanilla. Pour into the dry ingredients and whisk until just incorporated. Stir in parsnip until incorporated, then stir in walnuts.
Pour into a pan of your choice (13×9 makes a cake that is about 1 1/2 inches thick). To prepare your cake tin, grease, then line bottom with parchment paper (i also cut strips for the side of the pan for extra insurance), then grease again. Bake at 350F until done (top is springy) about 25 minutes. I set my timer at 20 minutes and check, then add minutes or pull out of the oven if finished. NOTE: A loaf pan and/or smaller pan for thicker cake will take longer because of less surface area. Please keep this in mind. Let cool completely on baker’s rack.
FROSTING
16 ounces cream cheese–room temperature
8 ounces unsalted butter–room temperature
generous pinch kosher salt
1/4 cup toasted and chopped walnuts
a pinch of cinnamon
a pinch of ginger
powdered sugar to taste (start with 1 cup and add 1 tablespoon at a time)
Using the paddle attachment on an electric mixer, cream the butter and cream cheese until fully incorporated. Add the salt and mix again. Add powdered sugar and mix until completely incorporated. Check for sweetness and add more sugar if desired. Mix until it is light and fluffy. Place into a large piping bag. Cut the tip off the bag giving you approximately an 1/2″ hole in the end and pipe even lines across the cake. Use a spatula to smooth the frosting, careful to keep at an even level. You are looking for a frosting layer of about 1/4 to 3/8 of an inch. Sprinkle the cinnamon, ginger and walnuts over the top.
NOTE: If you are a warm cake fan and like to serve dessert in the vein of an English Pudding, you can serve this cake warm with a bit of custard or double cream. Alternatively, you can use the cream cheese icing and let it melt into a puddle; it will be just as delicious.
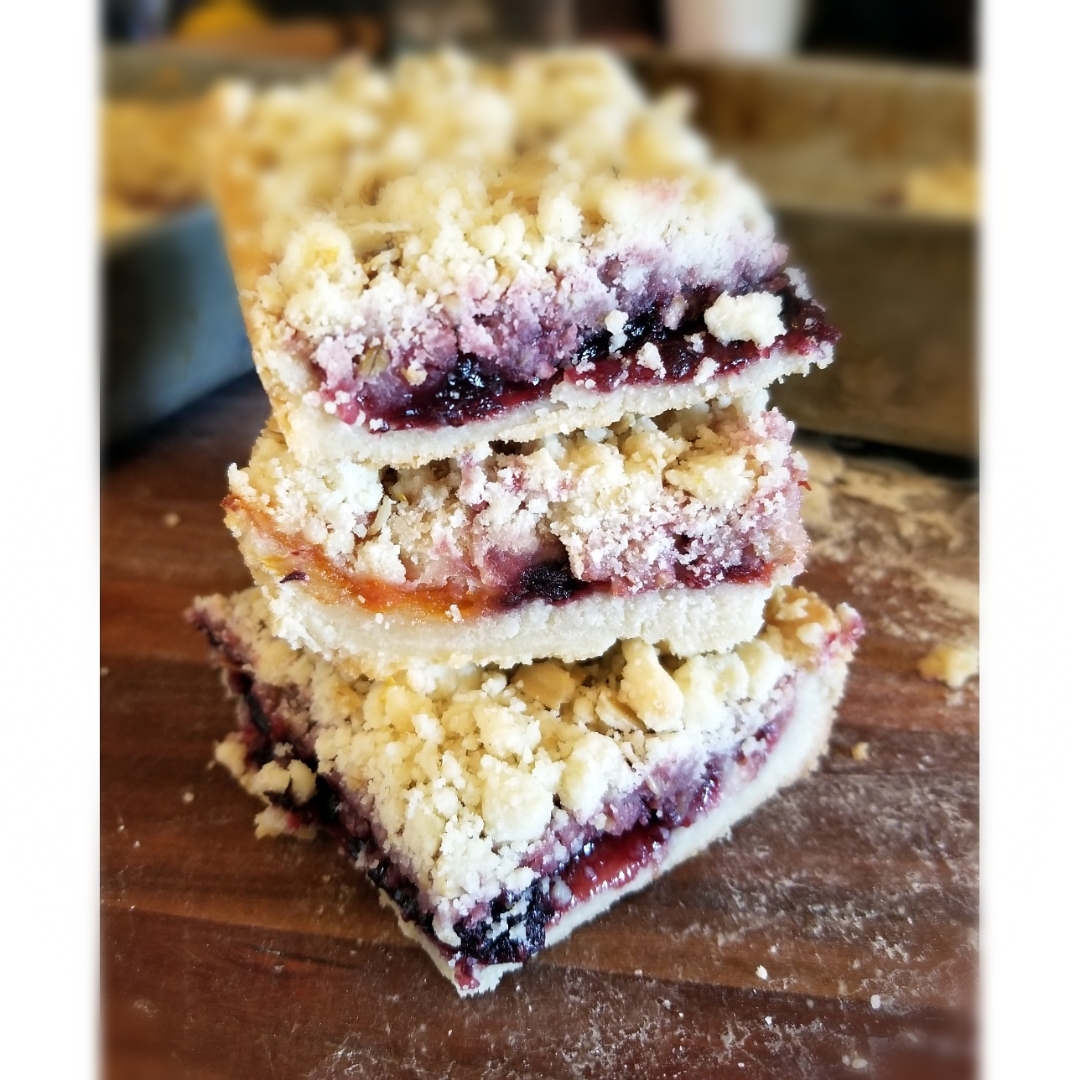
Jammy Jam Bars
On October 11, 2019 by Christy LarsenBeing a person that spends the summer and early fall preserving fruit in the form of jam, while also being a person that eats very little jam is the dichotomy I find myself to be.
I do however love things filled with jam; scones, hand pies, thumbprint cookies are all things I love. I also love these jam bars. This is a great way to use up the half-empty or “just a smidge” left jars that may be occupying the top-shelf in your refrigerator at this very moment. If you purchase a jam specifically for these bars, please splurge a bit; you do not want to use a jam that is sticky-sweet.
Jam Bars
makes 9 large bars
1 cup unsalted butter–room temperature
3/4 cup granulated sugar
3/4 tsp kosher salt
1 1/2 tsp vanilla
2 1/3 cup all purpose flour or 2 cups all purpose and 1/3 cup whole wheat
1 1/2 cups of good jam (single flavor or mixture)
1/2 cup rolled oats
1/2-1 tsp spices–use is optional. choose spices that are complimentary to your jam. I find ginger, cardamom, and cinnamon work well with most jams, but you can be as creative as you like, or omit altogether.
1/2 cup toasted and chopped nuts–optional
Preheat the oven to 350F. Spray the bottom and sides of an 8 or 9″ square cake pan (the 8″ will result in thicker bars).
Cream the butter, sugar, and salt together. Add the vanilla, scrape down the sides of the bowl and mix well again. Add the flour all at once and mix until just incorporated.
Press about 1/2 of the mixture into the bottom of your pan to a thickness just less than 1/4″. Press some of the mixture up the sides to create a bit of a ledge (about 1/4″). Pour the jam evenly on top of the crust. If you are using several flavors try not to fully mix the flavors; either layer or intersperse to avoid muddling too much.
Add the oats, spice, and nuts (if using) to the remaining mixture and lightly mix with your hands. If you are a salt-loving person, you can add a few more pinches of a finishing salt here, or use salted nuts in the mix. Generously sprinkle the mixture on top of the jam layer. I like to use a mixture of small bits and large chunks on top. To make larger chunks, simply pinch pieces together and drop onto the jam. I’m partial to lots of topping, but if it seems too much for you, don’t use it all. You can bake it off separately and have as a topping for yogurt or ice cream, or even as a snack.
Bake for approximately 20-25 minutes or until golden brown. Cool before cutting.

Chicken and Sausage Gumbo
On October 6, 2019 by Christy LarsenI’m not claiming authenticity here. I mean, this has the elements of a classic gumbo, but then I took a bit of a turn with adding bloody mary mix. I like the ease of it, and it tastes good.
There is a short window of time here on the Central Coast where hot stew-like foods coexist with the harvest of okra. That window is now. While our days are still warm, our mornings and overnights are cool enough to crave the warm embrace of this spicy gumbo. And this is spicy. If you find it a bit overwhelming for you, dial back the additional cayenne, and add a dash or two of vinegar in place of the tabasco. You can also dilute a bit more with the chicken stock. If it really, really is too much, add a bit of yogurt or sour cream to your individual bowl to draw the spice back a bit; authentic, no, but we’ve already established that.
My gumbo spice mix is Emeril’s spice mix from his New Orleans Cooking book, with just an addition or two on my part. It’s a nice spice to keep around to add a bit of oomph to soups or even baked chicken.
Gumbo Spice
2 TBS Chili Spice & Paprika
1 TBS Ground Coriander, Garlic Powder, Onion Powder, Kosher Salt
2 tsp Ground Cumin
1 tsp Cayenne Pepper, Crushed Red Pepper, Dried Oregano, Dried Thyme, & Black Pepper
Mix and keep in an airtight container
Chicken and Sausage Gumbo
1 1/2 LBS Boneless/Skinless Chicken cut into cubes (I use a mixture of thigh and breast)
2 CUPS Chicken Stock
2 TBS Gumbo Spice
4 Andouille Sausage links–cut crosswise into pieces
1/4 cup flour
2 CUPS sliced okra (fresh or frozen)
1 Medium Onion–chopped
3 Stalks Celery–chopped
1 Green Pepper–chopped
3 Cloves Garlic–chopped
14 oz can Diced Tomatoes–undrained (or the equivalent of diced in-season tomatoes)
1 cup Mr & Mrs T’s Bloody Mary Mix (spicy preferred)
2 bay leaves
1/2 cup Scallions–sliced
2 tsp (or more) Worcestershire Sauce
1/2 tsp Dried Thyme
1 tsp Kosher Salt
1/2 tsp Black Pepper
1/2 tsp White Pepper
1/4 tsp Cayenne
2-4 Dashes Tabasco
Olive Oil
Cooked rice to serve
Brown the sausage in a little bit of olive oil. Keeping the heat on medium, remove the sausage with a slotted spoon and add the chicken pieces. Cook until browned on all sides, then sprinkle with the Gumbo Spice. Remove from pan with a slotted spoon and add to the sausage. Add more oil to the fat in the pan, resulting in about 1/4 cup in total. Staying on medium-high heat, add the flour and stir until the mixture reaches a medium-brown hue. When it is brown turn off the heat and quickly add okra, onions, garlic, celery, and green pepper. Allow the sizzling to stop, then add chicken stock, stir while scraping all the bits off the bottom of the pan. Add Mr & Mrs T’s, tomatoes, green onions, bay leaf, thyme, black pepper, white pepper, and cayenne. Bring to a boil, then reduce to a simmer. Add back the chicken and sausage and let simmer for at least two hours–you want the vegetables to lose their crunch completely. The longer it simmers the better. Taste for salt and spice level; adjust as necessary
Serve with or without rice, and add Tabasco as desired.
In my opinion, this tastes even better on day two. Freezes and defrosts well.
Serves 6-8
Squash Soup
On October 5, 2019 by Christy LarsenEvery year we grow pumpkins and squash in our gardens. It is always a bit of a
This past year we had good success with the Boston Marrow Squash. It is big and orange like a pumpkin, but it is not round and begging to be carved for
The Boston Marrow was once a very popular variety which was sold commercially. Its flesh is a bit dry and sweet. I believe it is in the
Our root cellar is not quite finished, so we have been storing our squash and pumpkins on the back porch. I do not recommend this. It is actually a horrible idea. My hope is that I will get through them all before the hand of time takes them away from me (or even worse, those dreaded squirrels).
I wish I had an actual recipe for you…but I never measure and I use what I have on hand. Hopefully, you will feel inspired to do the same.
Here is how it went:
Peel and cut about your squash (or pumpkin) into 1/2″ size cubes–about 3 cups…but as many cups as you would like. I like to match the number of cups of squash to cups of stock (or water). For every 3 cups of squash, finely dice 1/4 of an onion and 1 garlic clove.
In a stockpot, put enough olive oil to just coat the bottom. Toss in the onion and garlic and slowly cook until they are soft. If you see them starting to brown, add a bit of stock or water (an ounce or two) to stop the cooking. Stir in 2-3 Tbs curry powder, 1/2 tsp ground cumin & 1/2 tsp paprika. Let the paste get a bit cooked. Add to this the squash and give it a nice stir. Add your stock/broth/water to cover the squash. Grate 1/4 of an apple into the mixture (more if you’d like a bit more sweetness). Cook until everything is soft.
Remove from heat and run the mixture through a blender or use an emersion stick to fully puree the mixture. At this
Rinse your stockpot and then put it back on the stove and pour your puree back in. Turn the heat on low. This is where you start futzing. Add a tsp or so of Braggs, a little black pepper, additional curry powder if you think it needs it. Salt if it needs it. If it is too thick, add more stock/water…if it is too runny, let it cook a bit to reduce.
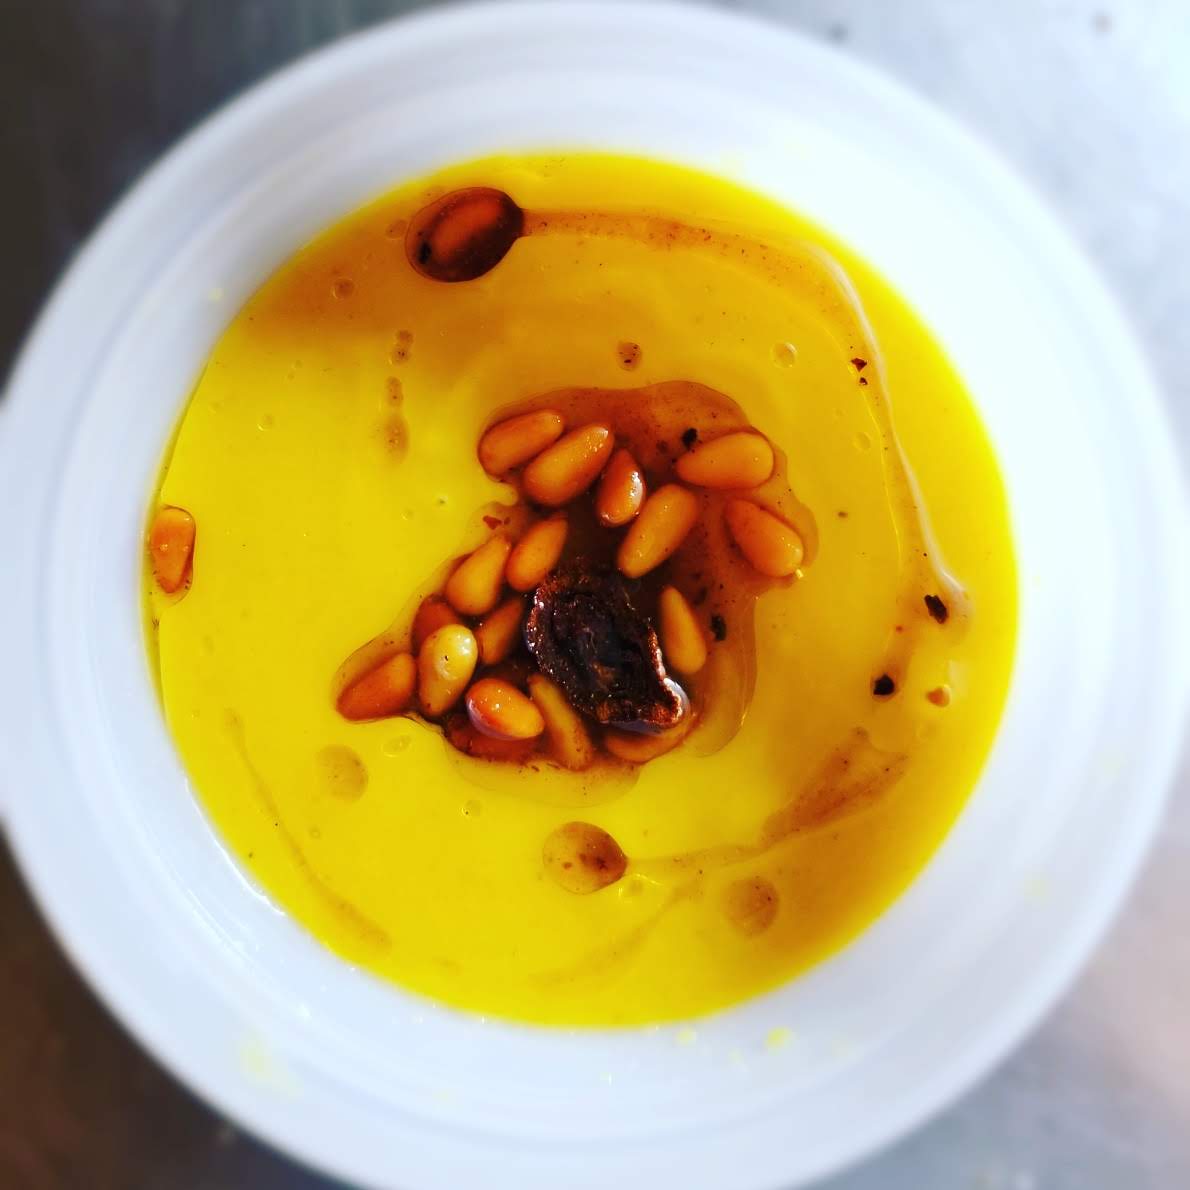
To Top: put some olive oil in a small saucepan…maybe 1/4 cup. Toss in a tsp of curry powder, a pinch of red pepper flakes a handful of dried onions, or fresh onions, or onion powder and a handful of pignoli nuts. Cook until hot and the flavors are melded.
To serve: Put the soup in a bowl and top with your delicious curry pignoli oil. Ta Da!

Good Food-Good Folk
On September 21, 2019 by sixtyacrebakerFarm to Table Dinner
One of the beautiful things about living on a farm gives us access to wonderful food. We grow, raise and make most everything we eat here on the ranch. This time of year everything is plentiful. It is a perfect time to throw a big farm dinner.
So we did
The day was hot..well over 100 degrees when we were setting up, and we were all struggling to keep hydrated. The thing about where we live is that in the late afternoon a nice breeze picks up, and then once the sun goes down, it is rather pleasant.
So 104 at three, 90 at six, and 60 by ten pm.
We set up a kitchen in a stock trailer (it was scrubbed clean!), pulled everything we needed down to the pasture, and readied for a 6:30pm guest arrival.
As you look through the photos you will see our great network of friends that helped us put this event together.
The menu was a bit ambitious, but I was able to do quite a bit of prep in advance which helped keep the stress in the kitchen to a minimum and a nice flow to the evening.
The evening started with a lovely wine tasting hosted by a neighboring vineyard. We paired a few appetizers with the wine, then moved to the table for the evening meal. We served everything family-style and encouraged the guests to mingle and share.
One of the highlights of the evening was the music provided by my husband and his good friend Sam. They have been playing together for over a decade and had a great time “picking and grinning” It was a real treat for everyone.
Alright, I think I have talked enough. Enjoy the photos of the evening and follow us on instagram @vicarious_ranch to be the first to know when we do this again.


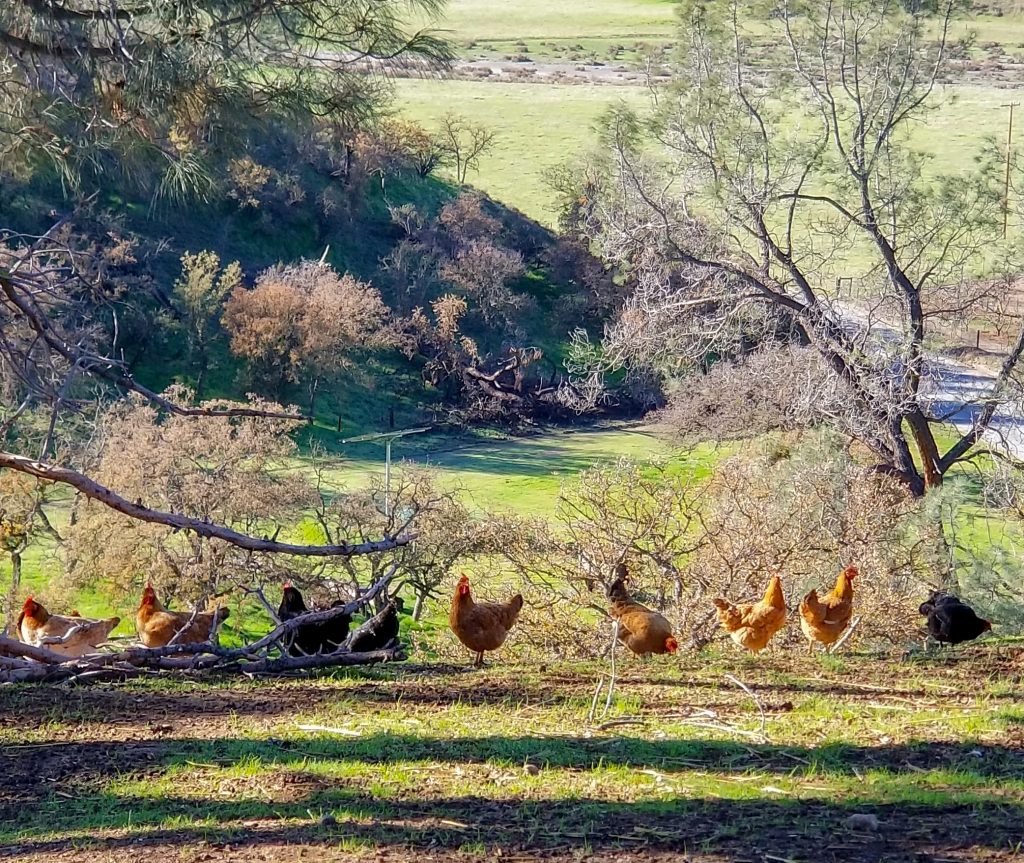
Harvesting Roosters
On February 6, 2019 by Christy LarsenLet me start at the beginning
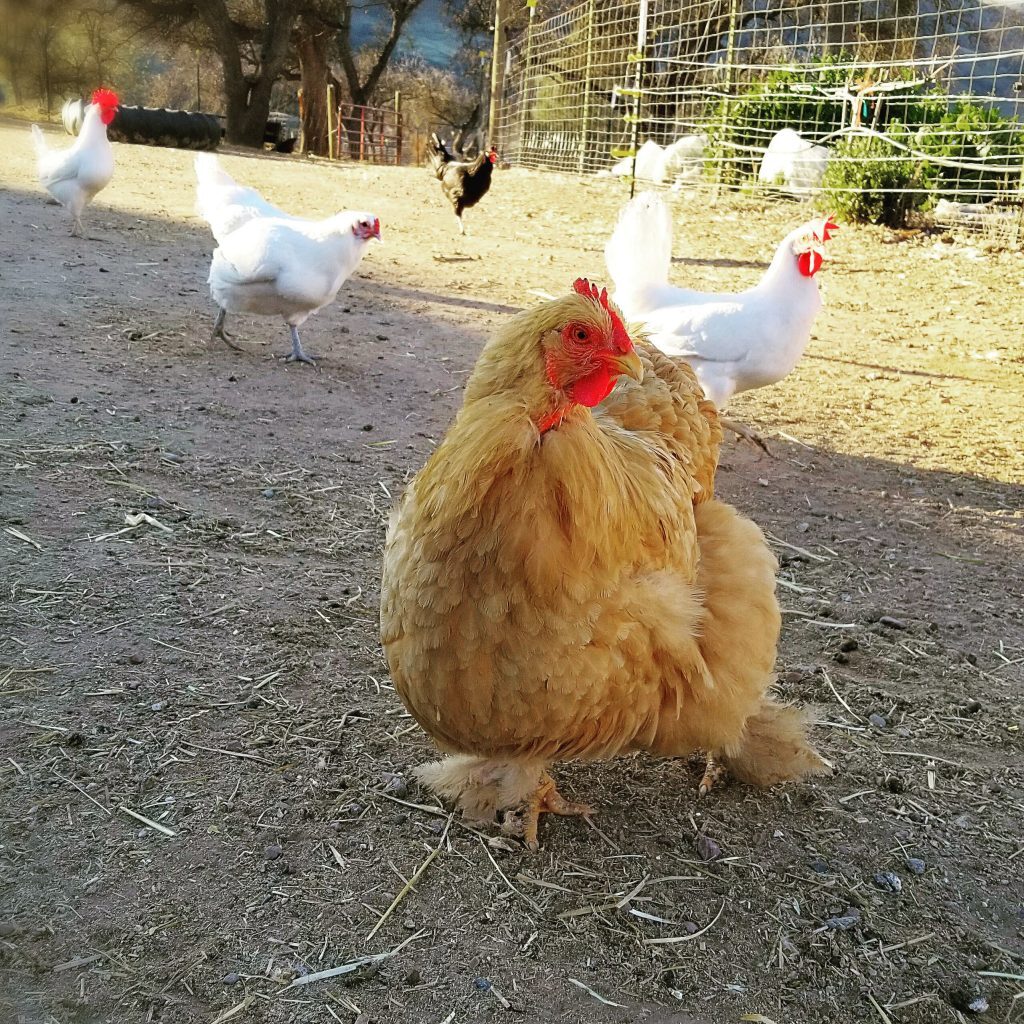
Our first set of chickens arrived via the afternoon mail and we were giddy upon their arrival. We did all of the things one does with new chicks, including daily health check and brooder cleanings. Fast forward several months and we moved them to their new coops. We had placed several moderately sized coops throughout our property and built a larger barn style coop for the bulk of the birds. We named many of our favorites, and moved to singularly naming a breed {our barred rocks for example were all named roseanne}, when we realized that we were using up “all the good names”, and we would soon have sheep, goats, dogs and pigs to name. I fussed over them and essentially took role-call each sundown.
We had placed coops throughout our property, including a large barn with a automatic door. We were obsessed with doing everything right. Making sure every chicken got back into a coop in the evening., double-triple checking everything was perfect. We also monitored broody hens {broody hens are those that will sit on eggs in the hope of bringing chicks into the world}, to make sure they didn’t hatch out any chicks.
That was how we started.
Fast-forward to today.
These chickens can fly.; not launch and fly away, fly, but fly to the top of fence lines, barn roofs, or to the top of a car.
And they do.
It didn’t take long for them to abandon the coops and scatter themselves throughout the property finding interesting places to roost overnight; most notably, in the trees.
These same chickens have access to 60 acres and countless places to be broody and hide clutches of eggs.
And they do.
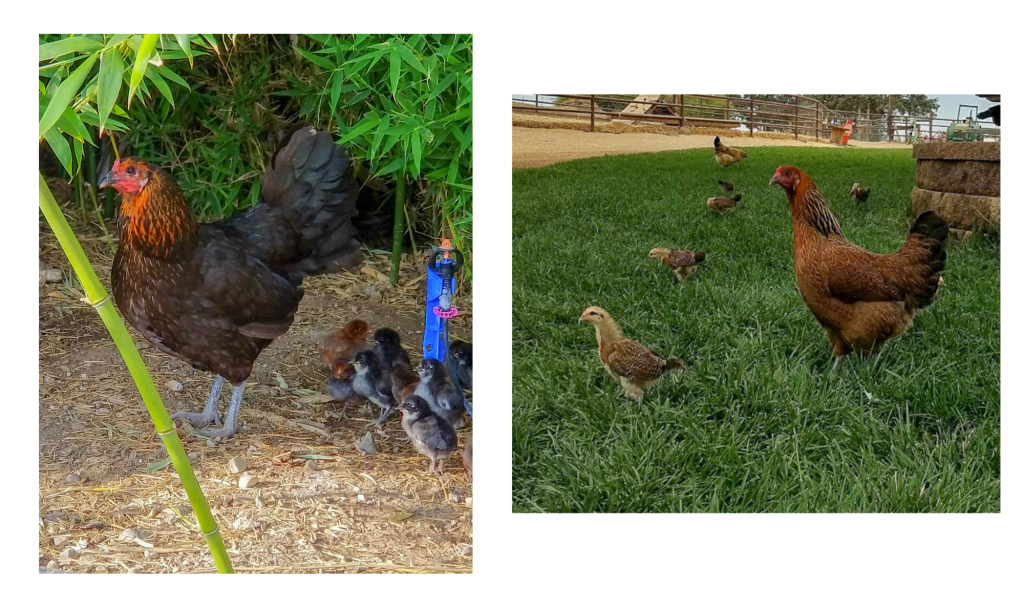
Just as the weather starts to warm, I notice chickens disappearing for months at a time only to reappear with a large brood of their own. We welcome this, it is a great way to support natural selection. It transfers the daily routine of cleaning and feeding from us to them. It ensures our flock will continue to thrive without us having to purchase new stock from a breeder each year. It is a good thing, with one small challenge; for every female chick, there is inevitably a male. Unfortunately, a 1:1 ratio of male to female is not ideal for our flock.
We like roosters, they are not a problem, unless we have too many.
It’s not the crowing; most people think its the crowing. Even though crowing actually happens all day, and all night {not just at dawn}, it is part and parcel of the music of farm life. Our primary issue is that roosters are rough on the hens. They have their salient points like being fiercely protective, and generous with food (allowing the hens to eat first before taking their share). It is remarkable, but they also constantly grab the chickens by the feathers on the nape of the neck, to mount them; it is rough on the hens.
As a way to control the number of roosters, once (sometimes twice) a year, gather as many roosters as possible and close them in one of our abandoned coops for a day or two. When chickens roost in
On harvest day, the first thing I do is make sure we release any of our favorite roosters.
Yes, we have favorites; Maurice Chevalier for
Roosters are not all the same; we have some that are purebred of special breeds, we have some that are incredibly beautiful,
Without going into graphic detail, the process is very quick. We spend more time in preparation for the event than time harvesting. Sterilizing everything, sharpening knives, and setting up the equipment can take hours, but it is vitally important.
We harvested 20 roosters and they ranged in weight from 4-7lbs. We pluck them, dress them, clean them, and bag them for the freezer. From start to finish, it took us about 4 hours.
The larger roosters will be used for coq au vin, and the smalls are best used for stock.
The gizzards were fried for lunch, the livers will go into pate, and I cleaned the hearts for use in risotto and yakitori. Stay tuned for those recipes.
I am often asked about hens for meat, and if we raise them. The answer is yes we have, yes we will again, but we won’t raise chickens that are bred for meat. I will do a post on that soon as I have a lot of opinions about it.
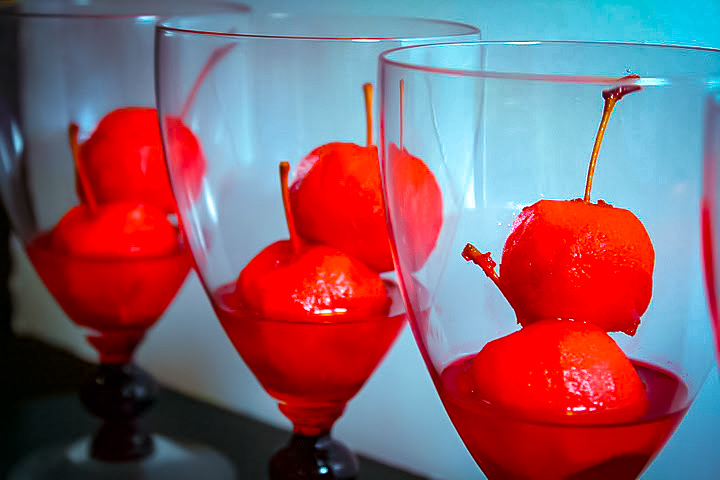
Red Hot Apples
On January 30, 2019 by Christy LarsenMy husband has a
Some time ago we were eating lunch at
It so happens that I am a bit of a
I used standard poaching technique as you would do for pears. Instead of wine, spices, and zest, I used a bag of red-hots.
who knew?
After preparing the warm crimson bath, I thought to check the internet and there are quite a few recipes for cinnamon apples {many using red hots} so I figured I was on the right track.
I imagine these would be beautiful canned in their own syrup, warmed over ice cream, or as an oversized “cherry” crowning a soft warm chocolate cake
Or you can enjoy as we do, one by one; the soft sourness of the crab apple paired with the sticky sweet of the red hot is a lovely combination.
red-hot apples
2 cups granulated sugar
2 cups water
1-14oz bag red hots
pinch of kosher salt
a dozen or so crab apples, peeled (you can core from the bottom if you like
Place the sugar, water, red hots and salt in a heavy pot. heat over medium heat, stirring occasionally to ensure the red hots melt properly (they tend to stick to the bottom of the pan). Once everything is melted, bring the mixture to a simmer and gently plop in the apples. Let simmer for about 15 minutes (these soften quickly, so pay attention). Remove apples and place in a shallow storage pan, cover with hot syrup. Let cool a bit, then store in the refrigerator.
*note…there is quite a bit of extra syrup when all is said and done. you can use it to make more apples, or you can put it in a jar and use it for cocktails.
ps. I took a few of these and put them in a pickling brine with mustard seed and star anise and they made a nice condiment for pork.