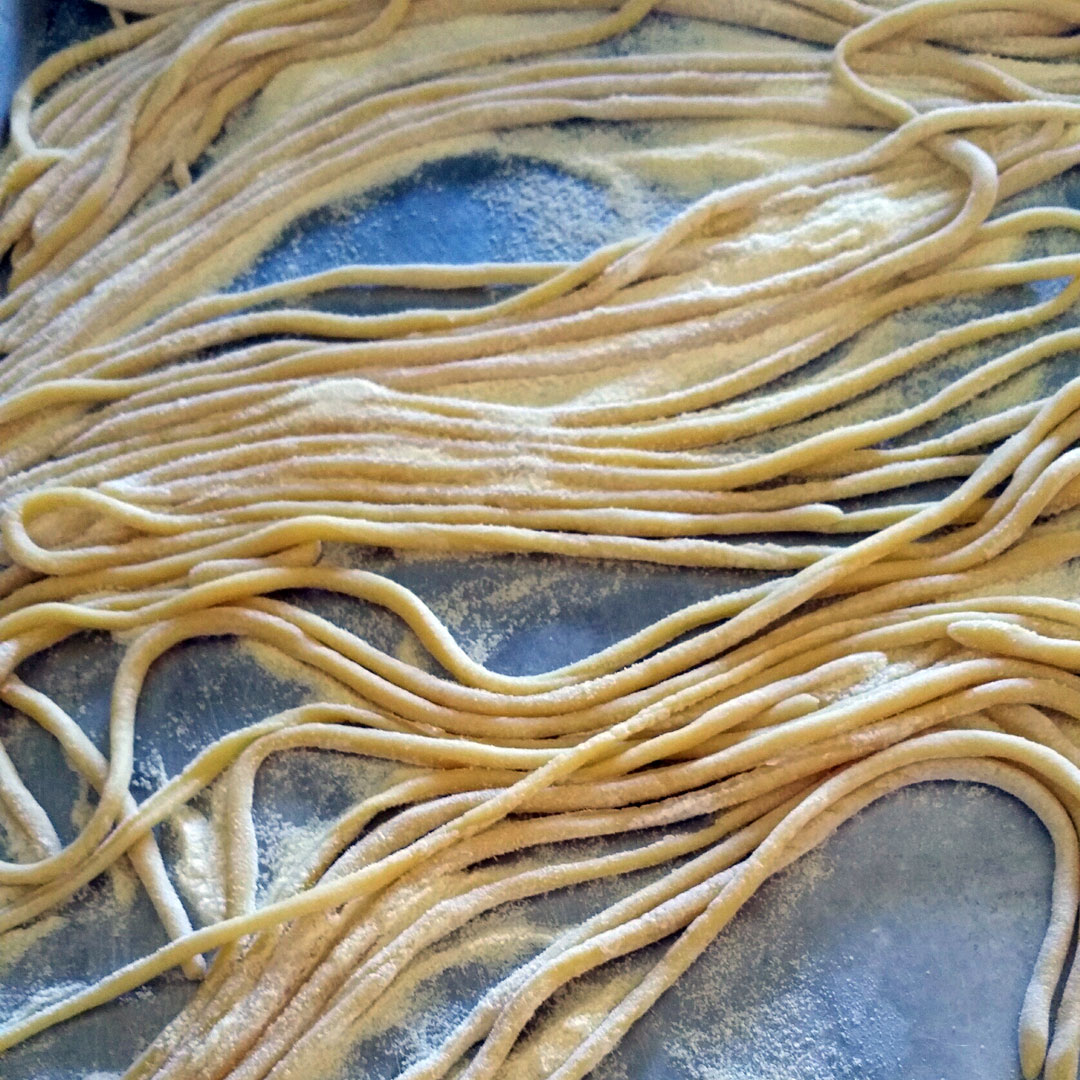
Pici Pasta
On April 26, 2015 by sixtyacrebakerPici pasta is a favorite of mine. When I see it on a menu, I order it. Pici is in a class of its own. It is fresh and chewy, and incredibly slurpable. Truth be told, I use this dough for my cavatelli as well, because of the chew factor.
When I was a kid, my grandparents would arrive on the day summer vacation began and stay until labor day. Some kids would come back from summer vacation, tanned, thin and 3 inches taller than they were when they left? Not this kid. My belly would be slightly rounder, I’d rattle off Italian phrases like I was Sophia Loren. I knew who Sophia Loren was. I was tan. We’d spend long evenings on the sun porch, eating, laughing, listening to the radio, and playing cards. My grandfather was an ace gin player and at a penny a point, we barely noticed our piggy bank dwindling. The food we ate was always delicious, and always from scratch.
Upon the gran’s arrival, the suitcases were hauled into the kitchen and unloaded. It was like Christmas. Literally. Grandma Grace would bring the Christmas stockings she collected from her bank and held from December until June. They were filled with hard candy and cheap toys; we loved them…and her for carrying on this tradition far longer than we really deserved. The grandmas were a tag team. Although they only saw each other this one time a year, they collaborated all year on what to bring with them to California. Out of the cases would come whole salami and prosciutto, buckets of polly-o and parmesan, capers, olives, anchovies. They were like traveling deli salesmen.
We didn’t think it odd at all.
Around day two or three the pasta making began in earnest. The dining room table, the pool table, the kitchen table, were all covered in sheets and dusted with flour. The pasta roller was brought down from the high shelf in the service porch and everyone was enlisted in the task of making pasta. We had one shot at making enough pasta for the summer. Mapping out how many dinners, who would be visiting, how much would each person eat, and what type and shape of pasta was a bit of an ordeal. The kitchen a bustle, until pasta making began. The room became silent. Everyone with a task; everyone working toward a common goal.
My job was always to transfer the pasta from the kitchen to its assigned table. Sometimes, most times, more went into my mouth than on the table. yes raw. Especially if it was cavatelli. I just loved the chew.
Still do.
Which is why I love this recipe. It has that bit of a chew. It also has a raw egg, so eating it uncooked is a risk you have to decide about on your own.
Semolina Pasta Recipe
*use for pici, cavatelli, orecchiette
2 cups 00 flour
1 cup semolina flour
3/4 tsp kosher salt
1 extra large or jumbo egg (i use a duck egg)
1 Tbs olive oil
1/2 cup (+/-) cool water
Place 00 flour, semolina flour and salt in a large bowl. Mix to combine. Make a large well in the center of the flour and fill with egg, olive oil, and 1/2 cup water. Using a fork mix together until all flour is moistened and the mixture is coming together. Use your hands to get the dough together in a ball. Turn out onto a floured work surface and knead for approximately 10 minutes. The dough should not be wet, and it shouldn’t be scraggy, but it should be a bit stiff. If the dough is too wet, use a bit of flour when you knead…just a bit at a time.
Wrap in plastic wrap and place in the refrigerator for about 1 hour.
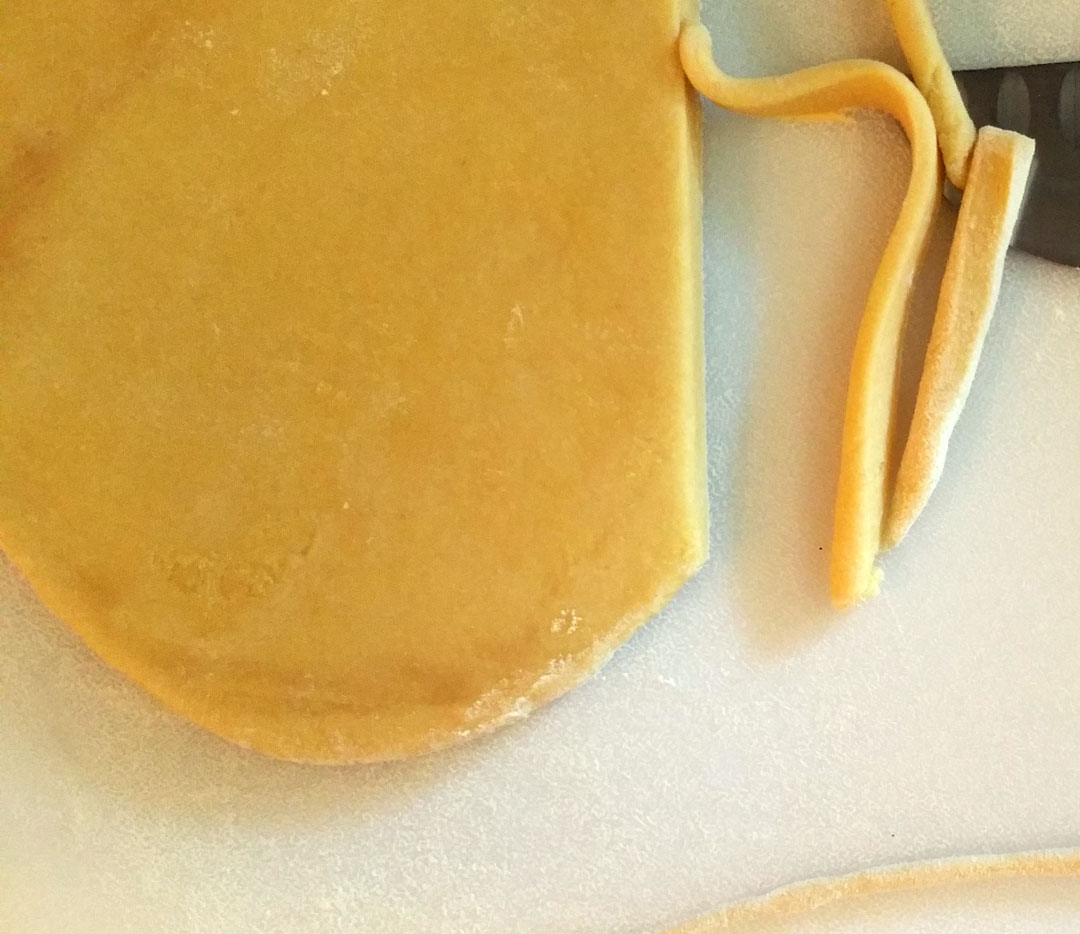
To roll out the pici:
Roll the dough with a rolling pin, on a lightly floured surface to about 1/4″ thick. Using a knife, cut the dough into strips about 1/8″ wide. Gently roll each piece on a lightly floured surface, starting from the center, and work your way out. Place on a tray dusted with semolina flour.
Cook in a large pot of salted boiling water for about 8-10 minutes. Serve with your favorite ragu.
** pici pasta is not spaghetti. it is thicker and a bit denser. As I said before, it has a bit of a chew to it.
Here is a short video demonstrating how to roll out your pici
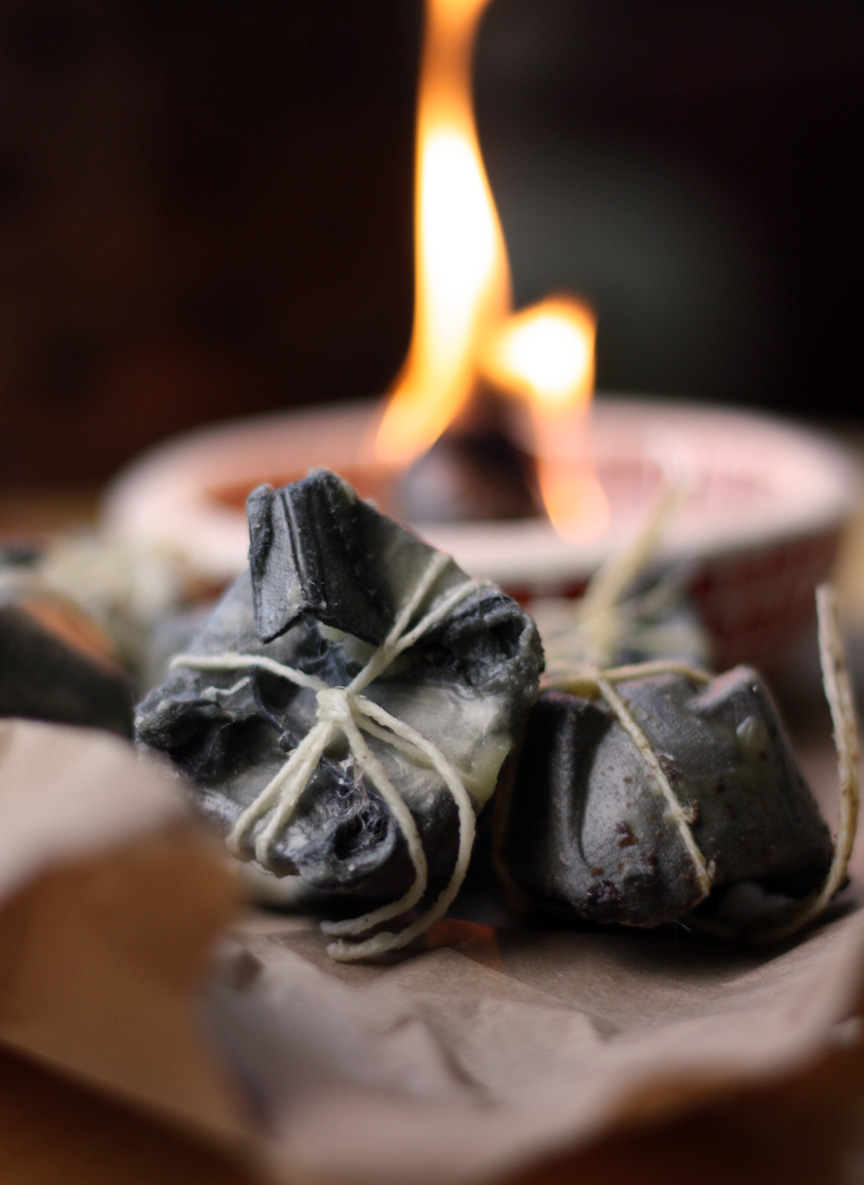
Homemade Fire Starters
On November 30, 2012 by sixtyacrebakerI love the chill of winter. The scent of snow and chimney smoke make me swoon. No matter my hurry, a crackling fire shifts me to pause if only briefly. I repurpose simple household items to make these useful goodies.
Fire Starters
paper egg cartons
dryer lint
cotton kitchen twine
bees wax or leftover candle bits
Place the wax/candles in an old can or jar with a wide mouth and place in a saucepan with water filled so it comes about halfway up the jar. Place over low to medium heat, to indirectly melt the wax. Meanwhile. cut the top off the egg carton, and then cut the egg cups apart. Tightly pack lint into each cup, leaving a bit of headroom, so you can close the tops, but folding the corners in. Tie into a bundle using kitchen twine, allow for a fairly long wick, so you can use it to dip the cup into the wax. Once the wax is liquid, dip each cup into it, allow it to be fully immersed. I use disposable chop sticks or skewers to shimmy the cup, to make sure it is fully covered. Lay on wax or kitchen paper to cool. Once cool, trim wick and you are ready to go!
the wax is used to keep the starters waterproof…which is great for campers and hunters. if you will be using the firestarter in your home, you may not want to add this step. i always do, because i love the smell of beeswax
if you really jam pack these with lint, they will burn for 10 minutes or so and smolder for quite some time as well. i find it enough time to get the kindle lit and the logs on their way

Halloween Costumes 2011
On November 2, 2011 by sixtyacrebakerYes I know. Halloween is in the past and we have moved rapidly on to the next big holiday. Never-the-less, I want to share something. I am not a seamstress; although there was that one quarter of sewing in jr. high school where we made pillows and wrap skirts. Really, I don’t even know how to sew legitimately, but I do it anyway. I act unafraid and I improvise. I’m sharing with you, so you understand it is possible with little or no training, combined with a bit of creative thinking, anyone can make these costumes.
For the Child Catcher Coat
I used simplicity pattern 5386–closed the back and didn’t add the collar or cuffs. I cut the sleeve pattern as prescribed, then pinned parchment paper to it, and fashioned it around my arm to the desired shape…and cut the parchment to match. Opened it up..and had a new sleeve pattern. All of the colors and patterns, are added on top of the the original coat giving it heft. I made this in one afternoon. The glove is a black glove with a piece of oasis duck-taped on it. the lollipops are simply stuck and hot glued.
For the Planet of The Apes Costume
I used butterick pattern b4574–instead of an open collar for the shirt. I kept it closed and added a rolled collar, and hemmed the shirt cuff rather than adding elastic. From the same pattern, I was able to make the vest–eliminating the cap sleeves and shortening it to hit at the hip. The vest is made of pleather. I was able to make the ridges by taking strips of the pleather hot-gluing 1/4″ cording down the center, then sewing the strips onto the vest. The ammo belt is also pleather, with a covering of fishnet.
I know this all seems rather simplified…but it is to make a point. It ,em>is rather simple. Sewing is all about the preparation. Much like carpentry, measure twice and cut once. Prepare your materials, pay attention to the directions and don’t sweat it. I doubt anyone will criticize your costume while you are handing them candy.
I hope you had a great Halloween and aren’t freaked by the notion that Christmas is only 52 days away.
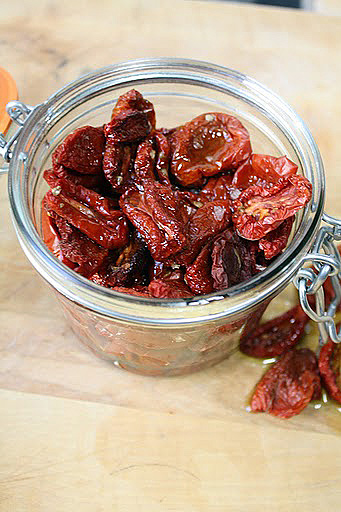
“Sun Dried” Tomatoes
On July 30, 2011 by sixtyacrebakerOur first tomatoes to ripen this season were our Romas. Unfortunately, they ripened while we were away from home. By the time I picked them they had shriveled on the vine. Handfuls upon handfuls of tomatoes baking in the sun. Going from sun-kissed
to heat stroke in my absence. Solar energy had zapped my tomatoes. Once picked, I sliced each tomato in half, placed them cut side up on a sheet pan and sprinkled with sea salt. I popped them in a 175-200 degree oven to dry. About 2 hours later, or maybe 3 i lost count. They should be checked on every 30 minutes after the 1st hour. They should be dry, but not dried out. After cooling, I stuffed the deep red chewy goodness into a fancy jar and smothered them with good olive oil.
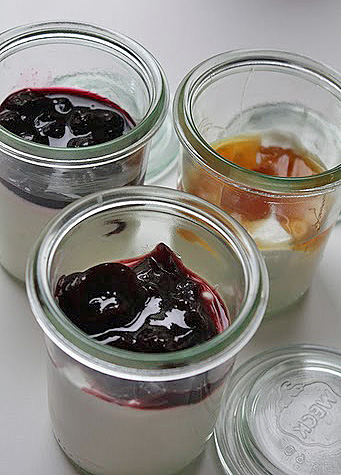
Homemade Yogurt
On April 27, 2011 by sixtyacrebakerMy mother is not a hippie. She would never be mistaken as “granola”. Birkenstocks have never graced her perfectly manicured feet. However, when I was a kid, the dogs were fed brewer’s yeast, our bread came from the health food store, red dye no. 2 was banned from the house, and our yogurt was homemade. I thought it was so lame. My friends were eating yogurt with dreamy flavors of coffee, chocolate, and lemon swirl, while I was being brainwashed. Brainwashed to believe that mine, while not sweet like pudding,was filled with acidolphilus. It would be myy best defense against turistas, if ever I found my 8 year old self in Mexico with a head of unwashed lettuce in one hand, and a tall glass of tap water in the other. Here in lies the rub. Now as an adult, I love homemade yogurt and find myself extolling the virtues of good bacteria without apology, to anyone who will listen.
Homemade Yogurt
1/2 gallon milk (i use 2%)
1/4 cup good quality plain yogurt-room temperature
jams, jellies, honey, fruit–to serve
Preheat oven to 185F. Heat milk in a pot that will best retain temperature over low heat until it reaches 185F. Once it reaches the desired temperature, pop it into the preheated oven and allow to sit for 30 minutes. Remove from oven and allow the milk to cool to 110F. When the milk has cooled to 110F add the yogurt and stir well. It is important to keep the milk at 110F for the next 7-10 hours.(i have a warming oven that i use which will keep a consistent low temperature. Other methods can be a warming pad, creating a foil tent over a electric skillet, testing the residual heat of an upper oven, while the lower oven is on, placing the pot in a water bath and keeping the water at 110F) After 7-10 hours you will see thickened milk soaking in the whey. Give this a good stir, then spoon into containers and place in the refrigerator for at least 12 hours before eating.
What I do next is not necessary, but Mike and I have different ideas about how thick yogurt should be. I like mine extra thick, he doesn’t. I place the yogurt in a sieve lined with cheesecloth over a large bowl, and let it sit for a few hours or overnight. The yogurt becomes the consistency of cream cheese, and the whey collects in the bowl. I place the yogurt in one container and the whey in another. When I make up my pots of yogurt, I whisk in enough whey to achieve the desired consistency. The extra thick yogurt is great as a spread on bread or for flavored dips.