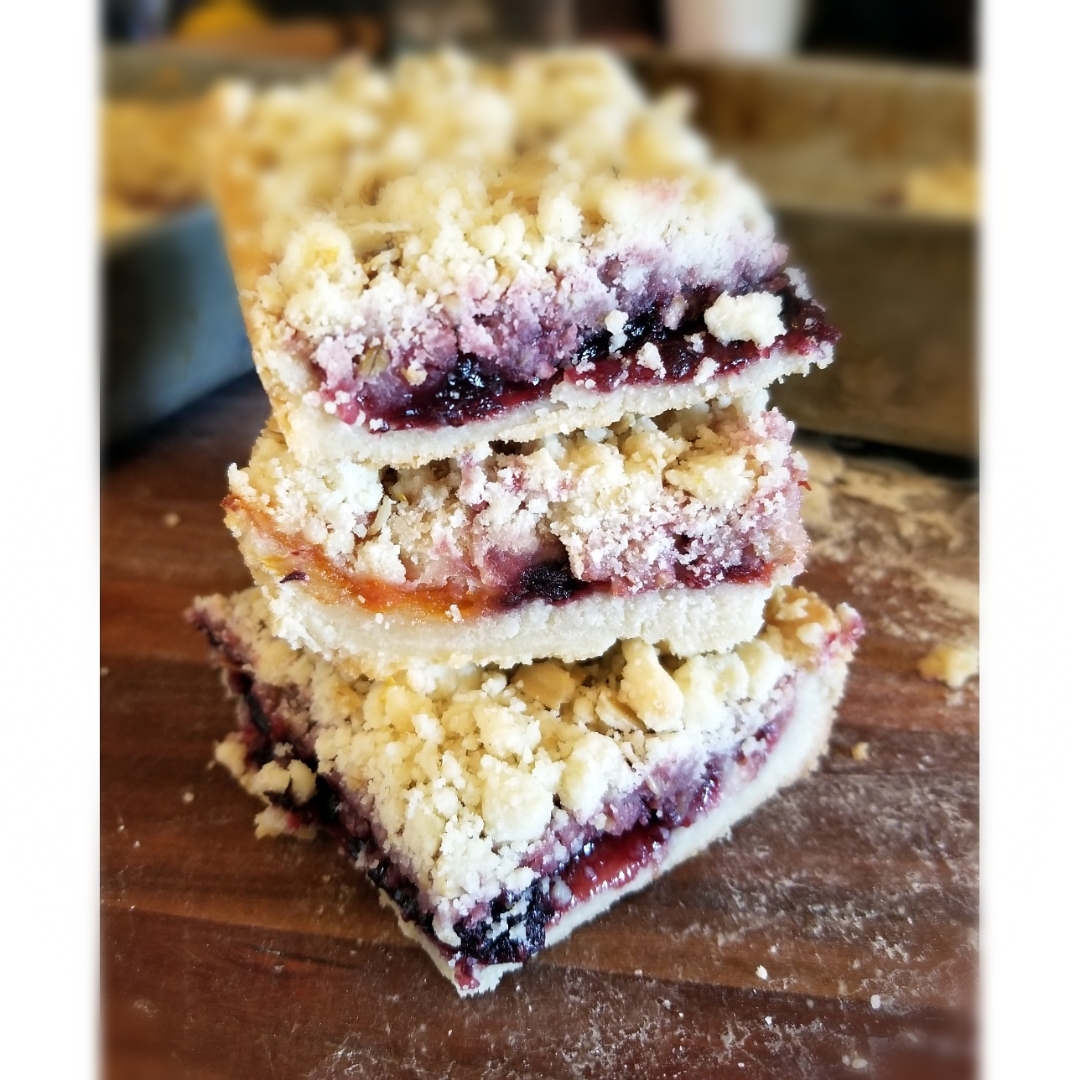
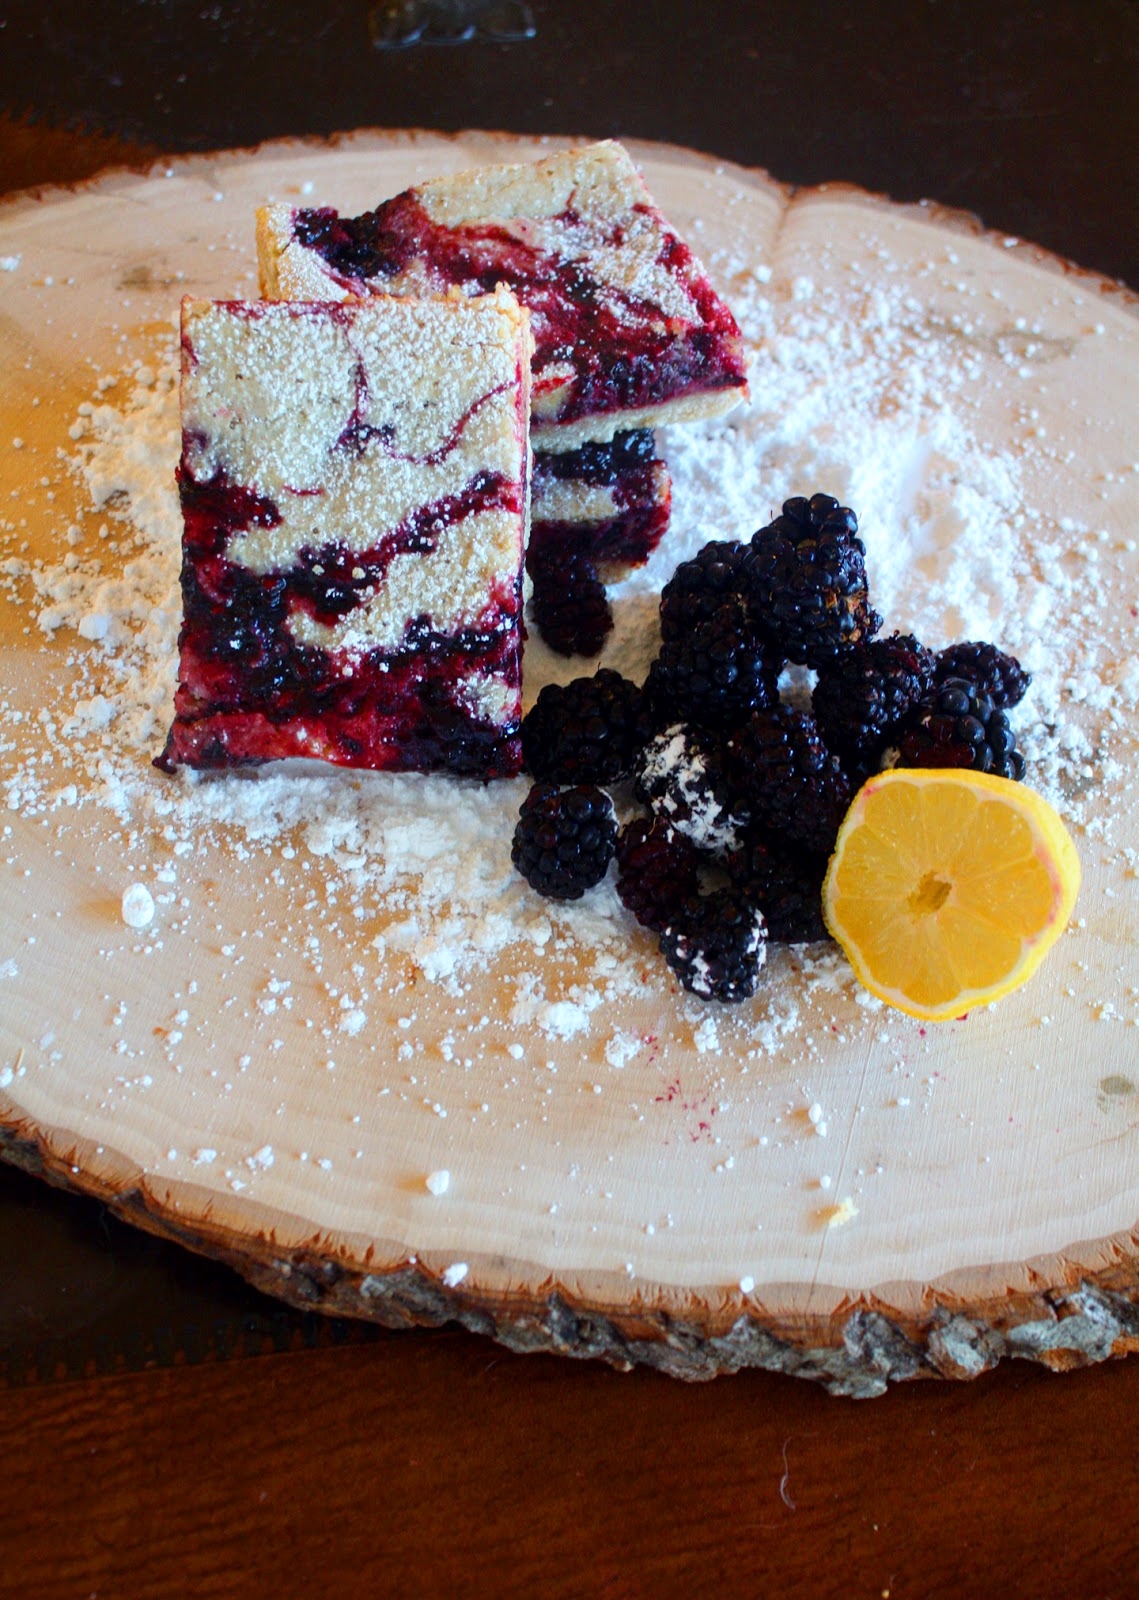
Jammy Jam Bars
On October 11, 2019 by Christy LarsenBeing a person that spends the summer and early fall preserving fruit in the form of jam, while also being a person that eats very little jam is the dichotomy I find myself to be.
I do however love things filled with jam; scones, hand pies, thumbprint cookies are all things I love. I also love these jam bars. This is a great way to use up the half-empty or “just a smidge” left jars that may be occupying the top-shelf in your refrigerator at this very moment. If you purchase a jam specifically for these bars, please splurge a bit; you do not want to use a jam that is sticky-sweet.
Jam Bars
makes 9 large bars
1 cup unsalted butter–room temperature
3/4 cup granulated sugar
3/4 tsp kosher salt
1 1/2 tsp vanilla
2 1/3 cup all purpose flour or 2 cups all purpose and 1/3 cup whole wheat
1 1/2 cups of good jam (single flavor or mixture)
1/2 cup rolled oats
1/2-1 tsp spices–use is optional. choose spices that are complimentary to your jam. I find ginger, cardamom, and cinnamon work well with most jams, but you can be as creative as you like, or omit altogether.
1/2 cup toasted and chopped nuts–optional
Preheat the oven to 350F. Spray the bottom and sides of an 8 or 9″ square cake pan (the 8″ will result in thicker bars).
Cream the butter, sugar, and salt together. Add the vanilla, scrape down the sides of the bowl and mix well again. Add the flour all at once and mix until just incorporated.
Press about 1/2 of the mixture into the bottom of your pan to a thickness just less than 1/4″. Press some of the mixture up the sides to create a bit of a ledge (about 1/4″). Pour the jam evenly on top of the crust. If you are using several flavors try not to fully mix the flavors; either layer or intersperse to avoid muddling too much.
Add the oats, spice, and nuts (if using) to the remaining mixture and lightly mix with your hands. If you are a salt-loving person, you can add a few more pinches of a finishing salt here, or use salted nuts in the mix. Generously sprinkle the mixture on top of the jam layer. I like to use a mixture of small bits and large chunks on top. To make larger chunks, simply pinch pieces together and drop onto the jam. I’m partial to lots of topping, but if it seems too much for you, don’t use it all. You can bake it off separately and have as a topping for yogurt or ice cream, or even as a snack.
Bake for approximately 20-25 minutes or until golden brown. Cool before cutting.
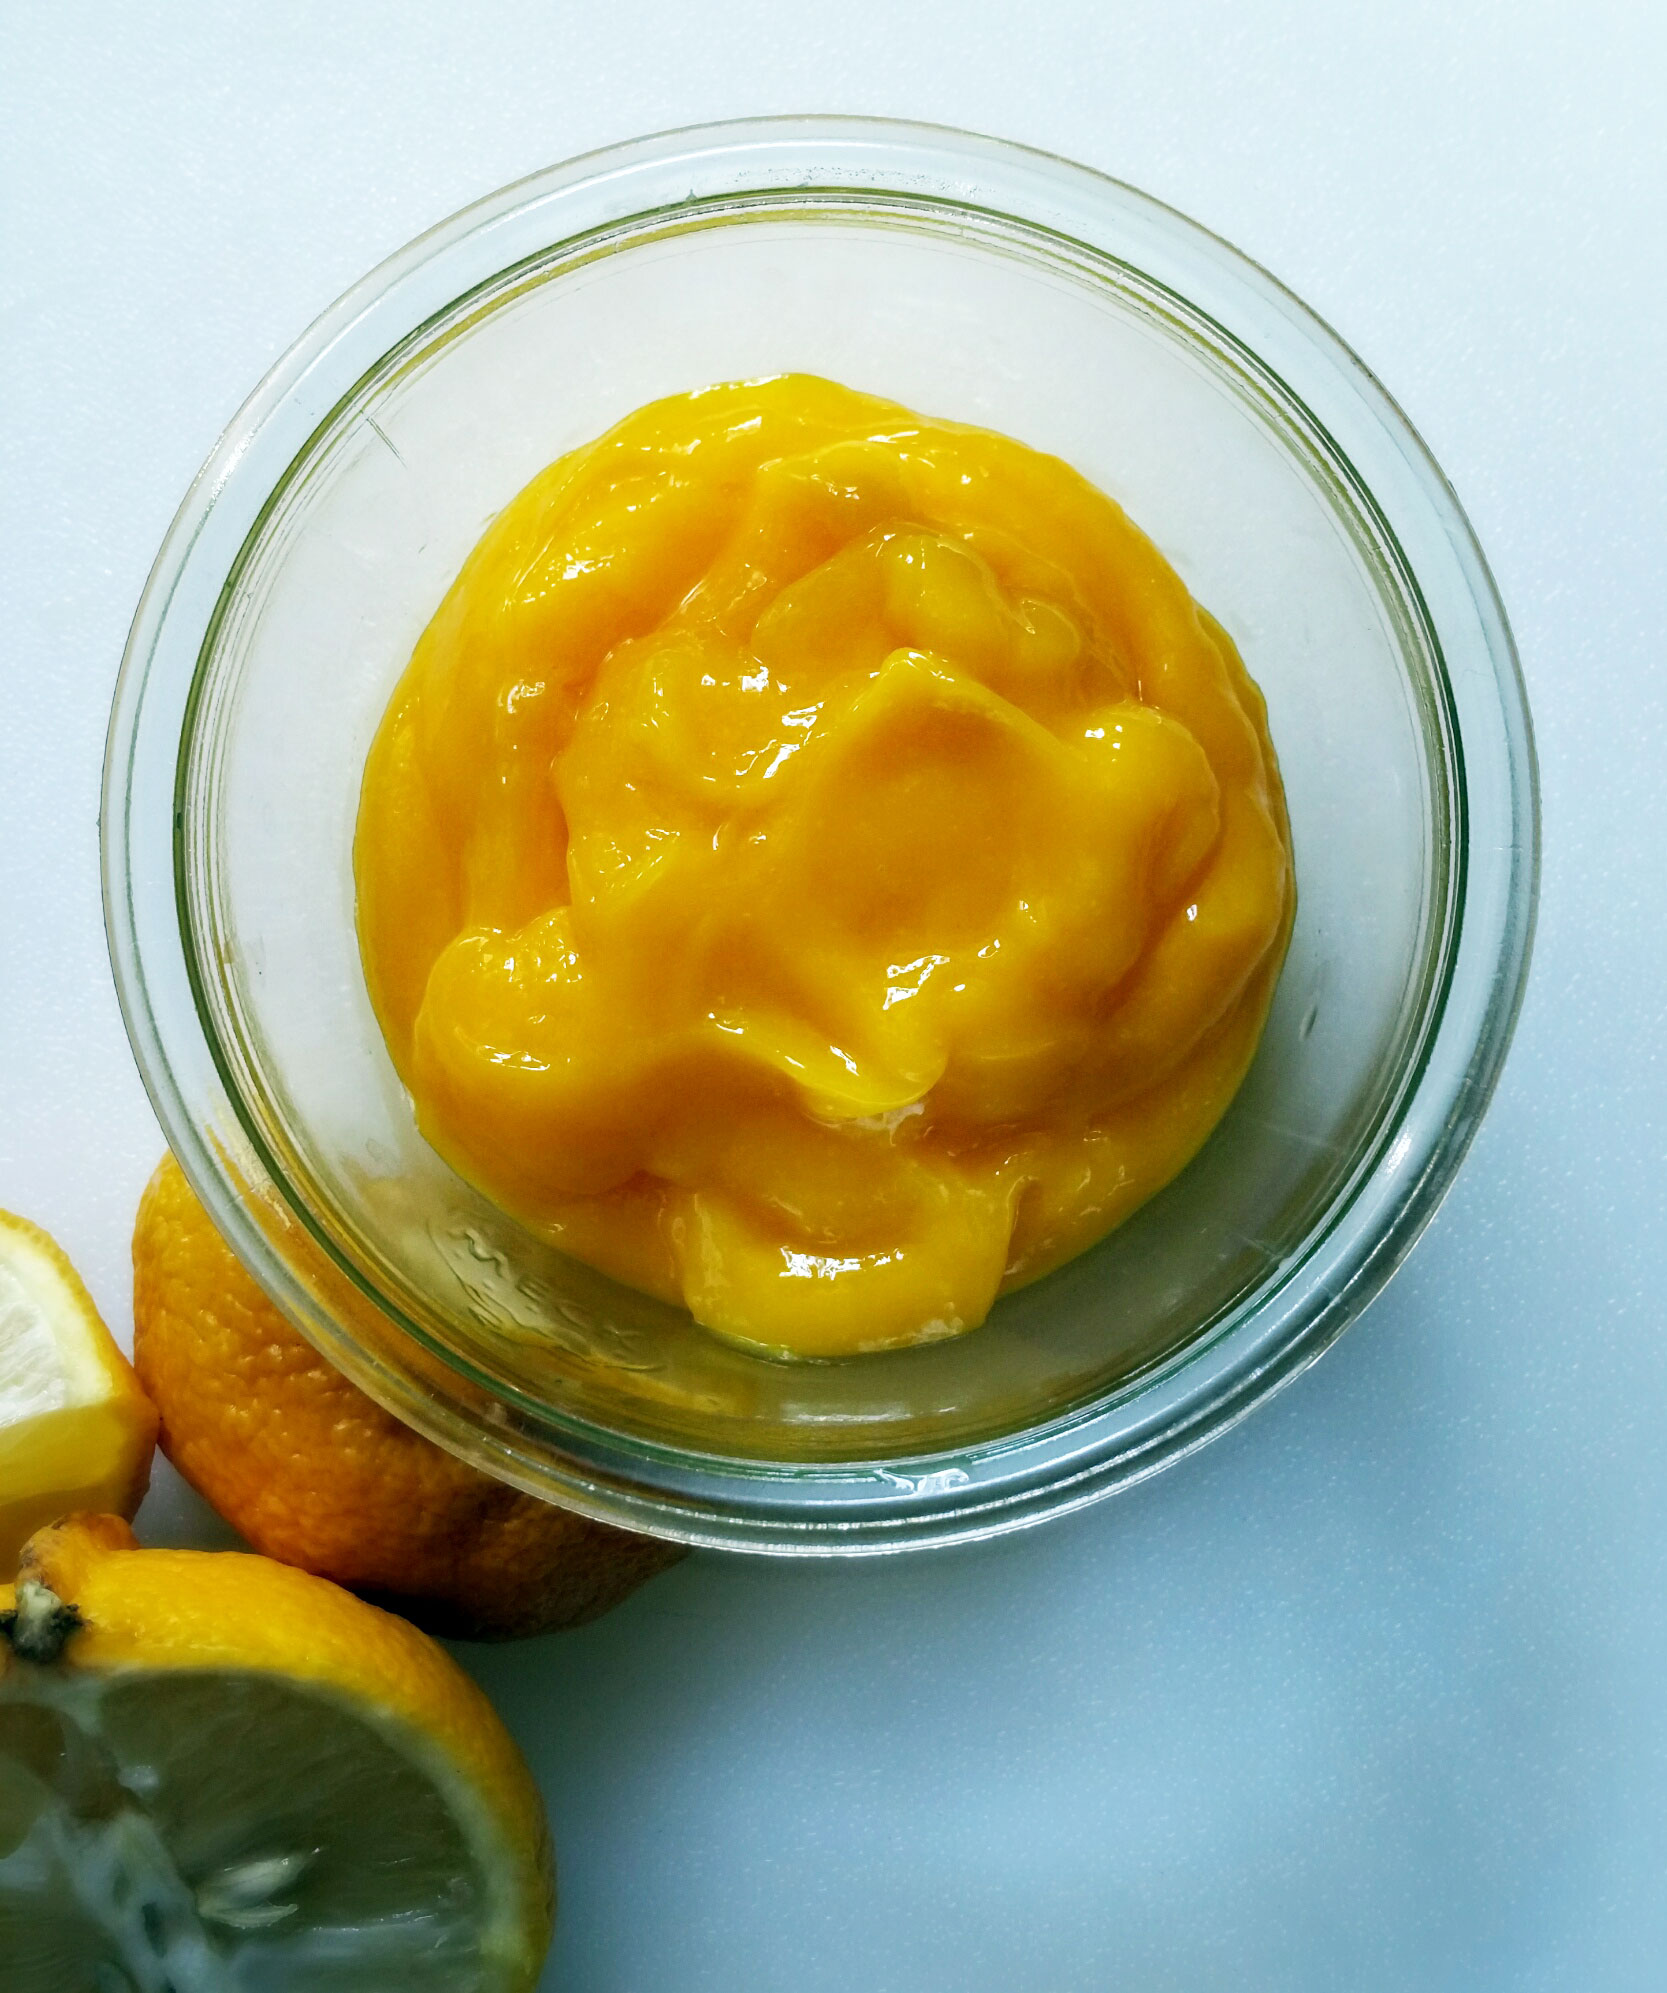
Lemon Curd
On March 30, 2015 by sixtyacrebakerI have been waxing lyrical about lemon curd for days. Finally, the desire had become so overwhelming, I took matters into my own hand. It was time. My counter top had become over-run with duck eggs, a basket of lemons was prepping for it siren song to the fruit fly migration, and I can only stand the thoughts in my head for so long. The hue of this curd is overwhelmingly beautiful and true. It is a foreshadow to the bright treat I love so much.
Lemon Curd
makes approx 3 1/2 cups
8 extra large egg yolks
1 cup granulated sugar
3/4-1 cup fresh lemon juice*
1 Tbs lemon zest
pinch kosher salt
1/2 cup unsalted butter-cut into pieces
Place the butter in a glass or ceramic bowl and set aside. Place egg yolks, sugar, lemon juice, lemon zest and salt in a med/large saucepan or high sided saute pan. Whisk to fully incorporate all ingredients. Place over low heat and stir continually with a spatula. Be mindful to scrape the sides and bottom of pan while stirring. Continue stirring until the mixture thickens enough to heavily coat the spatula, and you can easily trace a clear path through with your finger. Do not let the mixture simmer or boil, otherwise you will cook your egg yolks. Remove from heat and pour through a sieve directly into the bowl with the butter. Whisk until all of the butter is melted and incorporated into the curd. The sieve will catch any cooked particles and most of the zest. This will allow for a clear texture to your curd.
To cool, place the bowl of curd into a larger bowl of ice water (mostly ice) and stir until the temperature reduces to room temp. You may continue cooling to use immediately, or place a piece of plastic wrap directly onto the curd and allow to finish cooling in the refrigerator.
*I enjoy a very tart lemon curd as I mostly pair with sweet meringue, shortbread, or ice cream. If you like it a bit more tame, use 3/4 cup of lemon juice, if you are like me, use 1 cup.
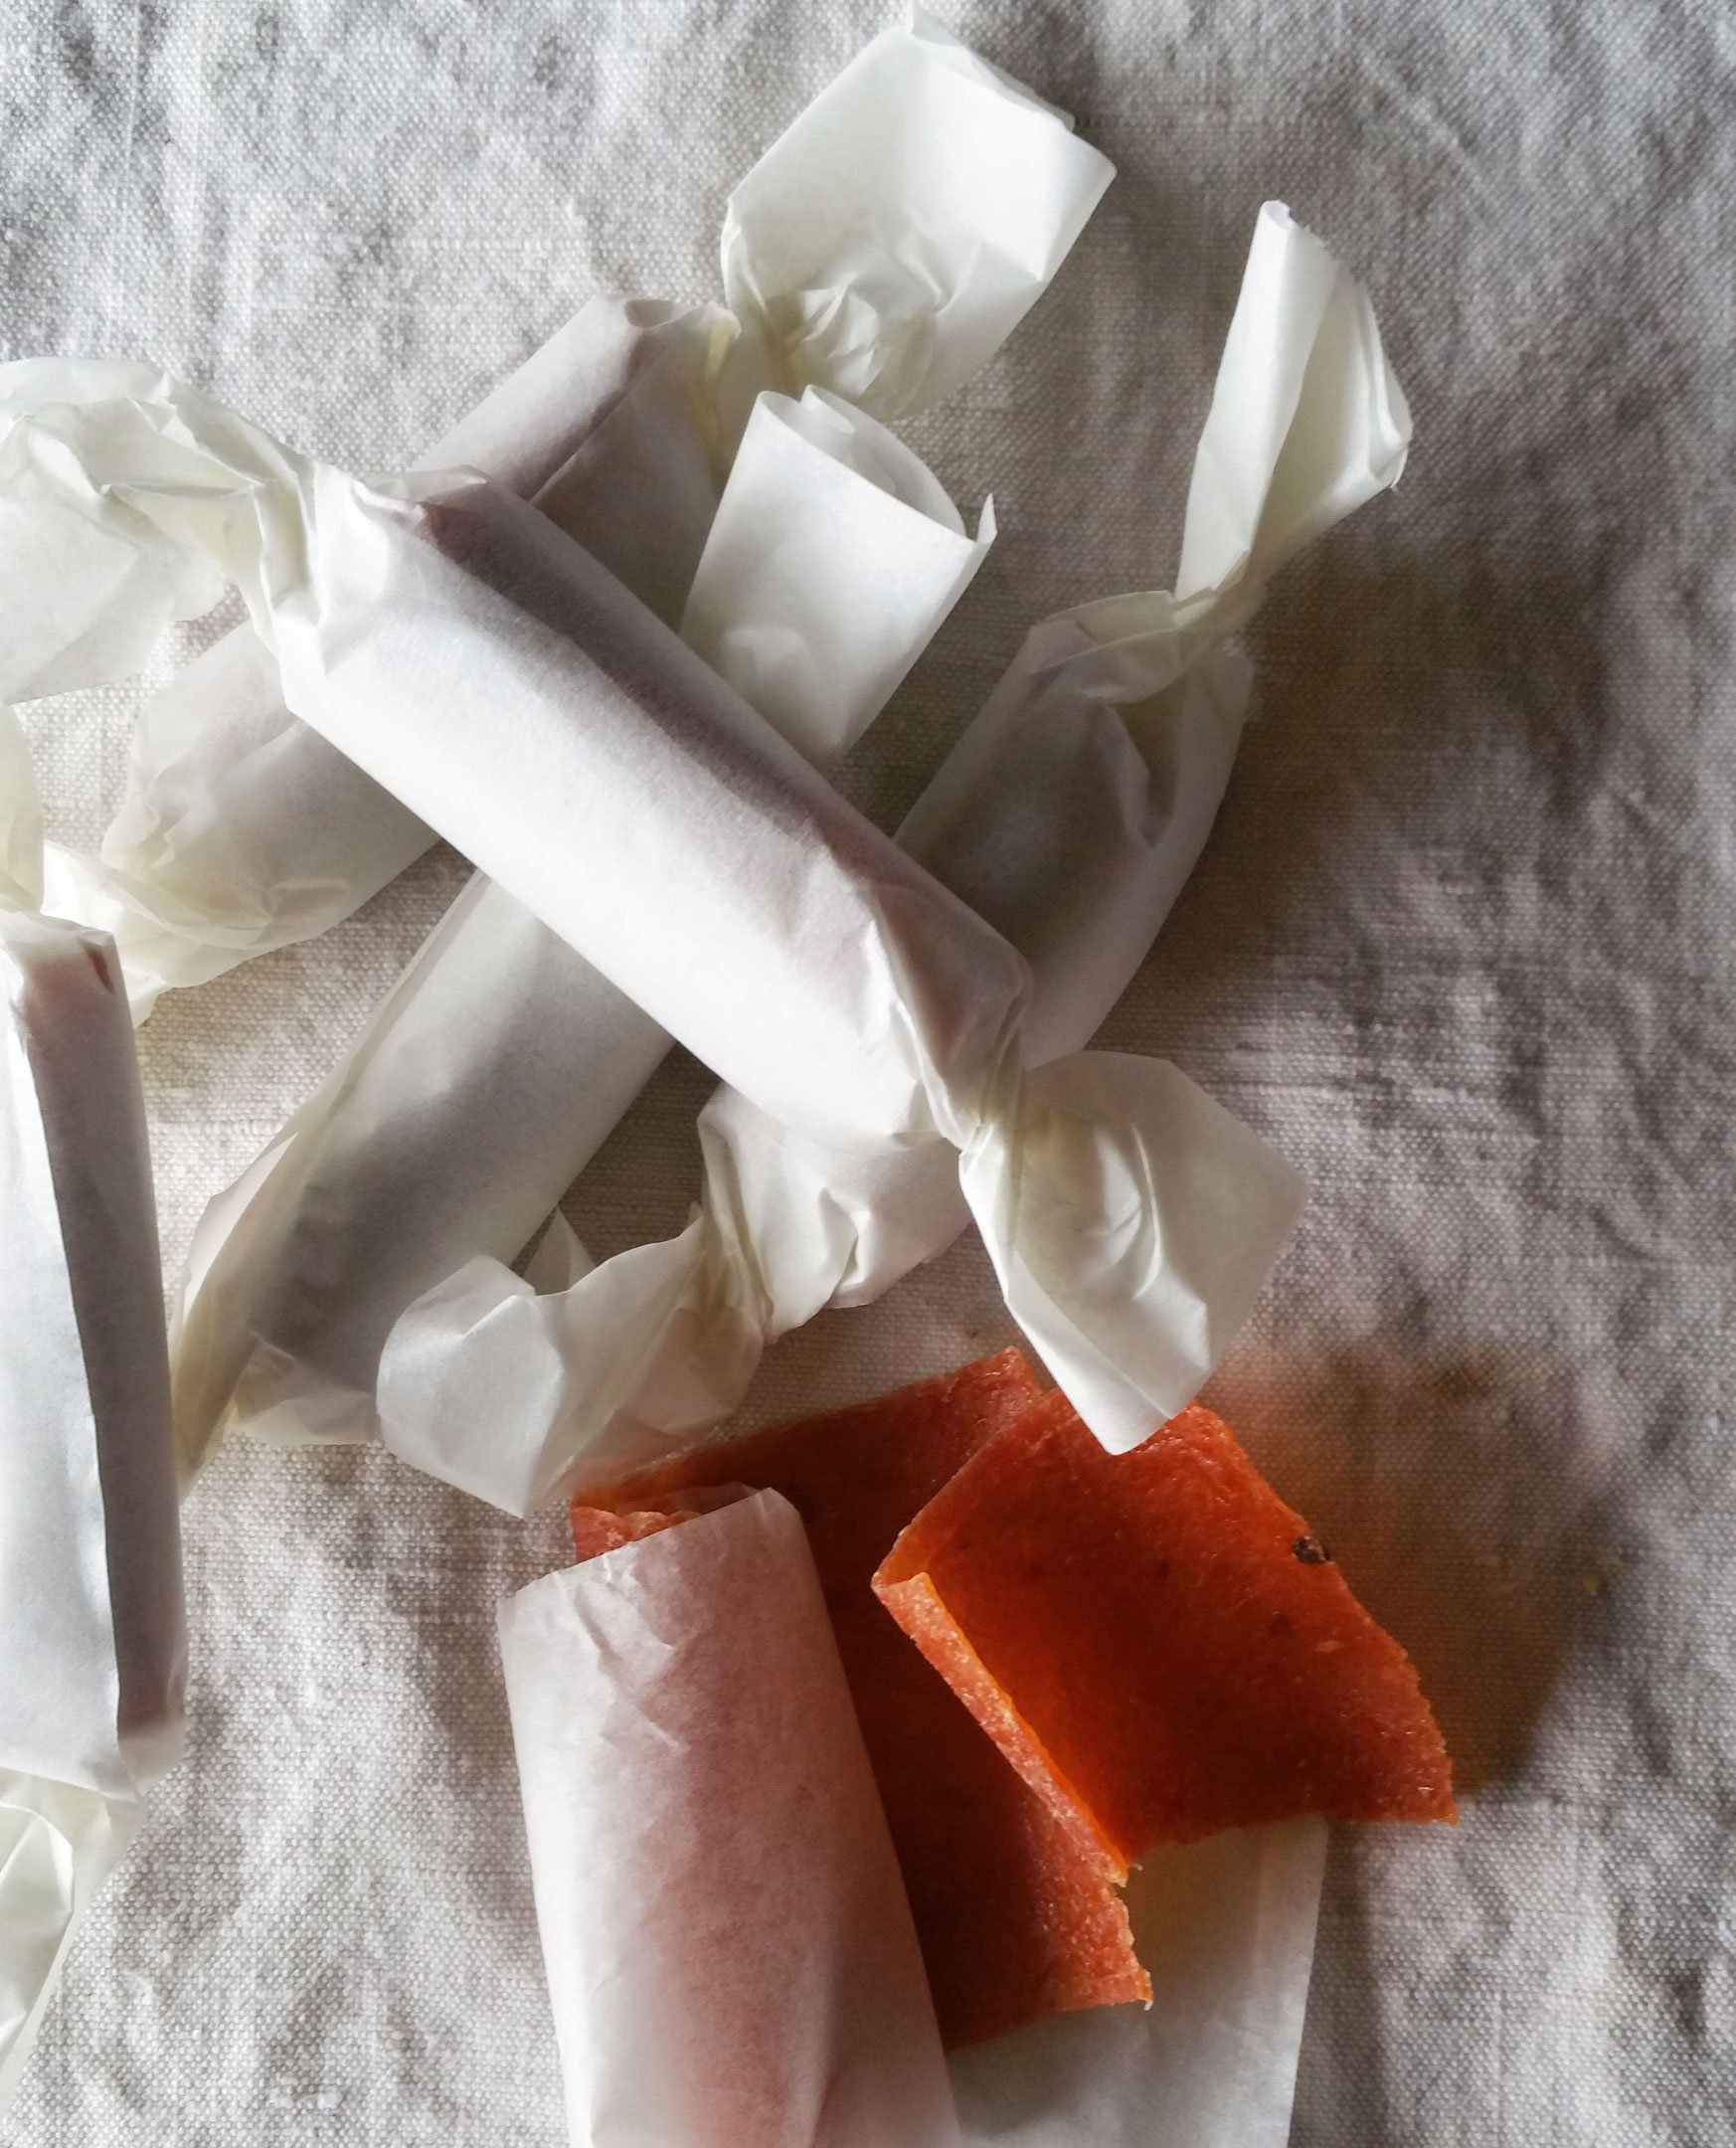
Quince Fruit Leather
On December 5, 2014 by sixtyacrebakerAs a kid, I brought a sack lunch to school every day…as did most of my classmates. What I would never find packed in my lunch were modern day snack foods. I was always trying to trade up for fruit roll-ups. Oh how I loved them. The whole thing…the sound the leather made while being ripped off its backing. Eating it piece by piece…or better yet…making a dense chewy mini roll-up which would burst with flavor at every gnash. Apricot was always my favorite. I would trade my best halloween candy for a roll of apricot.
I learned to make fruit leather in fancy french culinary school. It was a bit of a production; mostly because it was fancy culinary school. Making fruit leather is simple and easy, and extremely satisfying. I love it because it gives a use for the “dregs” from another product: the pulp from jelly making, juicing, and simple syrups. I made a lovely quince sorbet as a palate cleanser for our Thanksgiving dinner {recipe coming soon}. I boiled down the beautiful fruit and extracted a lovely pink elixir. At the end of it all, I was left with a bundle of fruit. It was a bit chunky, and was lacking sweetness. With just a little bit of flavor tweaking, and a good dry out in the dehydrator, I was able to make a roll-up that was better than the memory of my youth and cheaper than culinary school tuition. Once you have the method down, you can make leather with all your favorite flavors. You also will be glad to know that having a fancy dehydrator, while a great convenience, is not required to make this tasty treat.
Quince Fruit Leather
2-3 lbs quince
juice of 1/2 lemon
seeds from 3 cardamom pods
1″ ginger root, peeled and smashed
1/2 cup granulated sugar (optional: I find that it helps bring out the pink color of the quince when cooking)
piece of parchment paper
additional sweetener (sugar, brown sugar, honey, agave; your choice)
ground cardamom, ground ginger
Wash fruit well and scrub off all fuzz from exterior. Chop quince into chunks (about 2″ each). Place in a heavy bottom pot and cover with water. Add lemon juice, cardamom seeds, ginger root. Cut your parchment paper into a round large enough to cover your pot Cut a small hole in the middle of the parchment round for venting. Place the parchment snugly on top of the quince. The purpose of the parchment is to keep the fruit submerged under the liquid. Cook until the fruit is very soft and falling apart and the color has changed from yellow to pinkish. The longer you cook, the more color you will get from the fruit. Blend everything together using an immersion blender, blender, food processor or food mill. Drain using a cheesecloth lined sieve or jelly bag. If you don’t want to drain the liquid out, toss the whole mess back into the pot and cook off most of the liquid. You don’t want the mixture to be completely dry, but you don’t want it to be so liquidy that you can drink it. Whether you drain or don’t drain, place the mixture you will turn into leather back onto the pot and taste for sweetness and spice. Don’t over sweeten. You will be dehydrating, which will make the flavor extra bold. Add enough sweetness and spice to highlight the flavor. You may want to add a bit more lemon juice at this point as well. Just cook long enough for the sugar to melt into the mixture.
You can use the drained for cocktails, homemade sodas, sorbet, over fruit, soaked in pound cake…
Prepare your dehydrator or sheet pans. If you have a dehydrator, line the mesh sheets with plastic wrap. If using oven, line with silpat or heavy plastic wrap. Using an offset spatula spread an even 1/8″ thick layer of fruit paste onto your prepared surface. If using a dehydrator or oven use a setting of 135-140F. It can take anywhere from 6-12 hours. Start checking up on it at 6 hours. The paste should have lost its stickiness, but not be hard. If it is hard, while still warm, it will be fruit crackle when it cools (which is still edible and yummy). I like to turn the dehydrator off at maximum of 8 hours and let the leather sit for a few hours or overnight.
Store in an airtight container…or fancy wrap them like the gift they are.
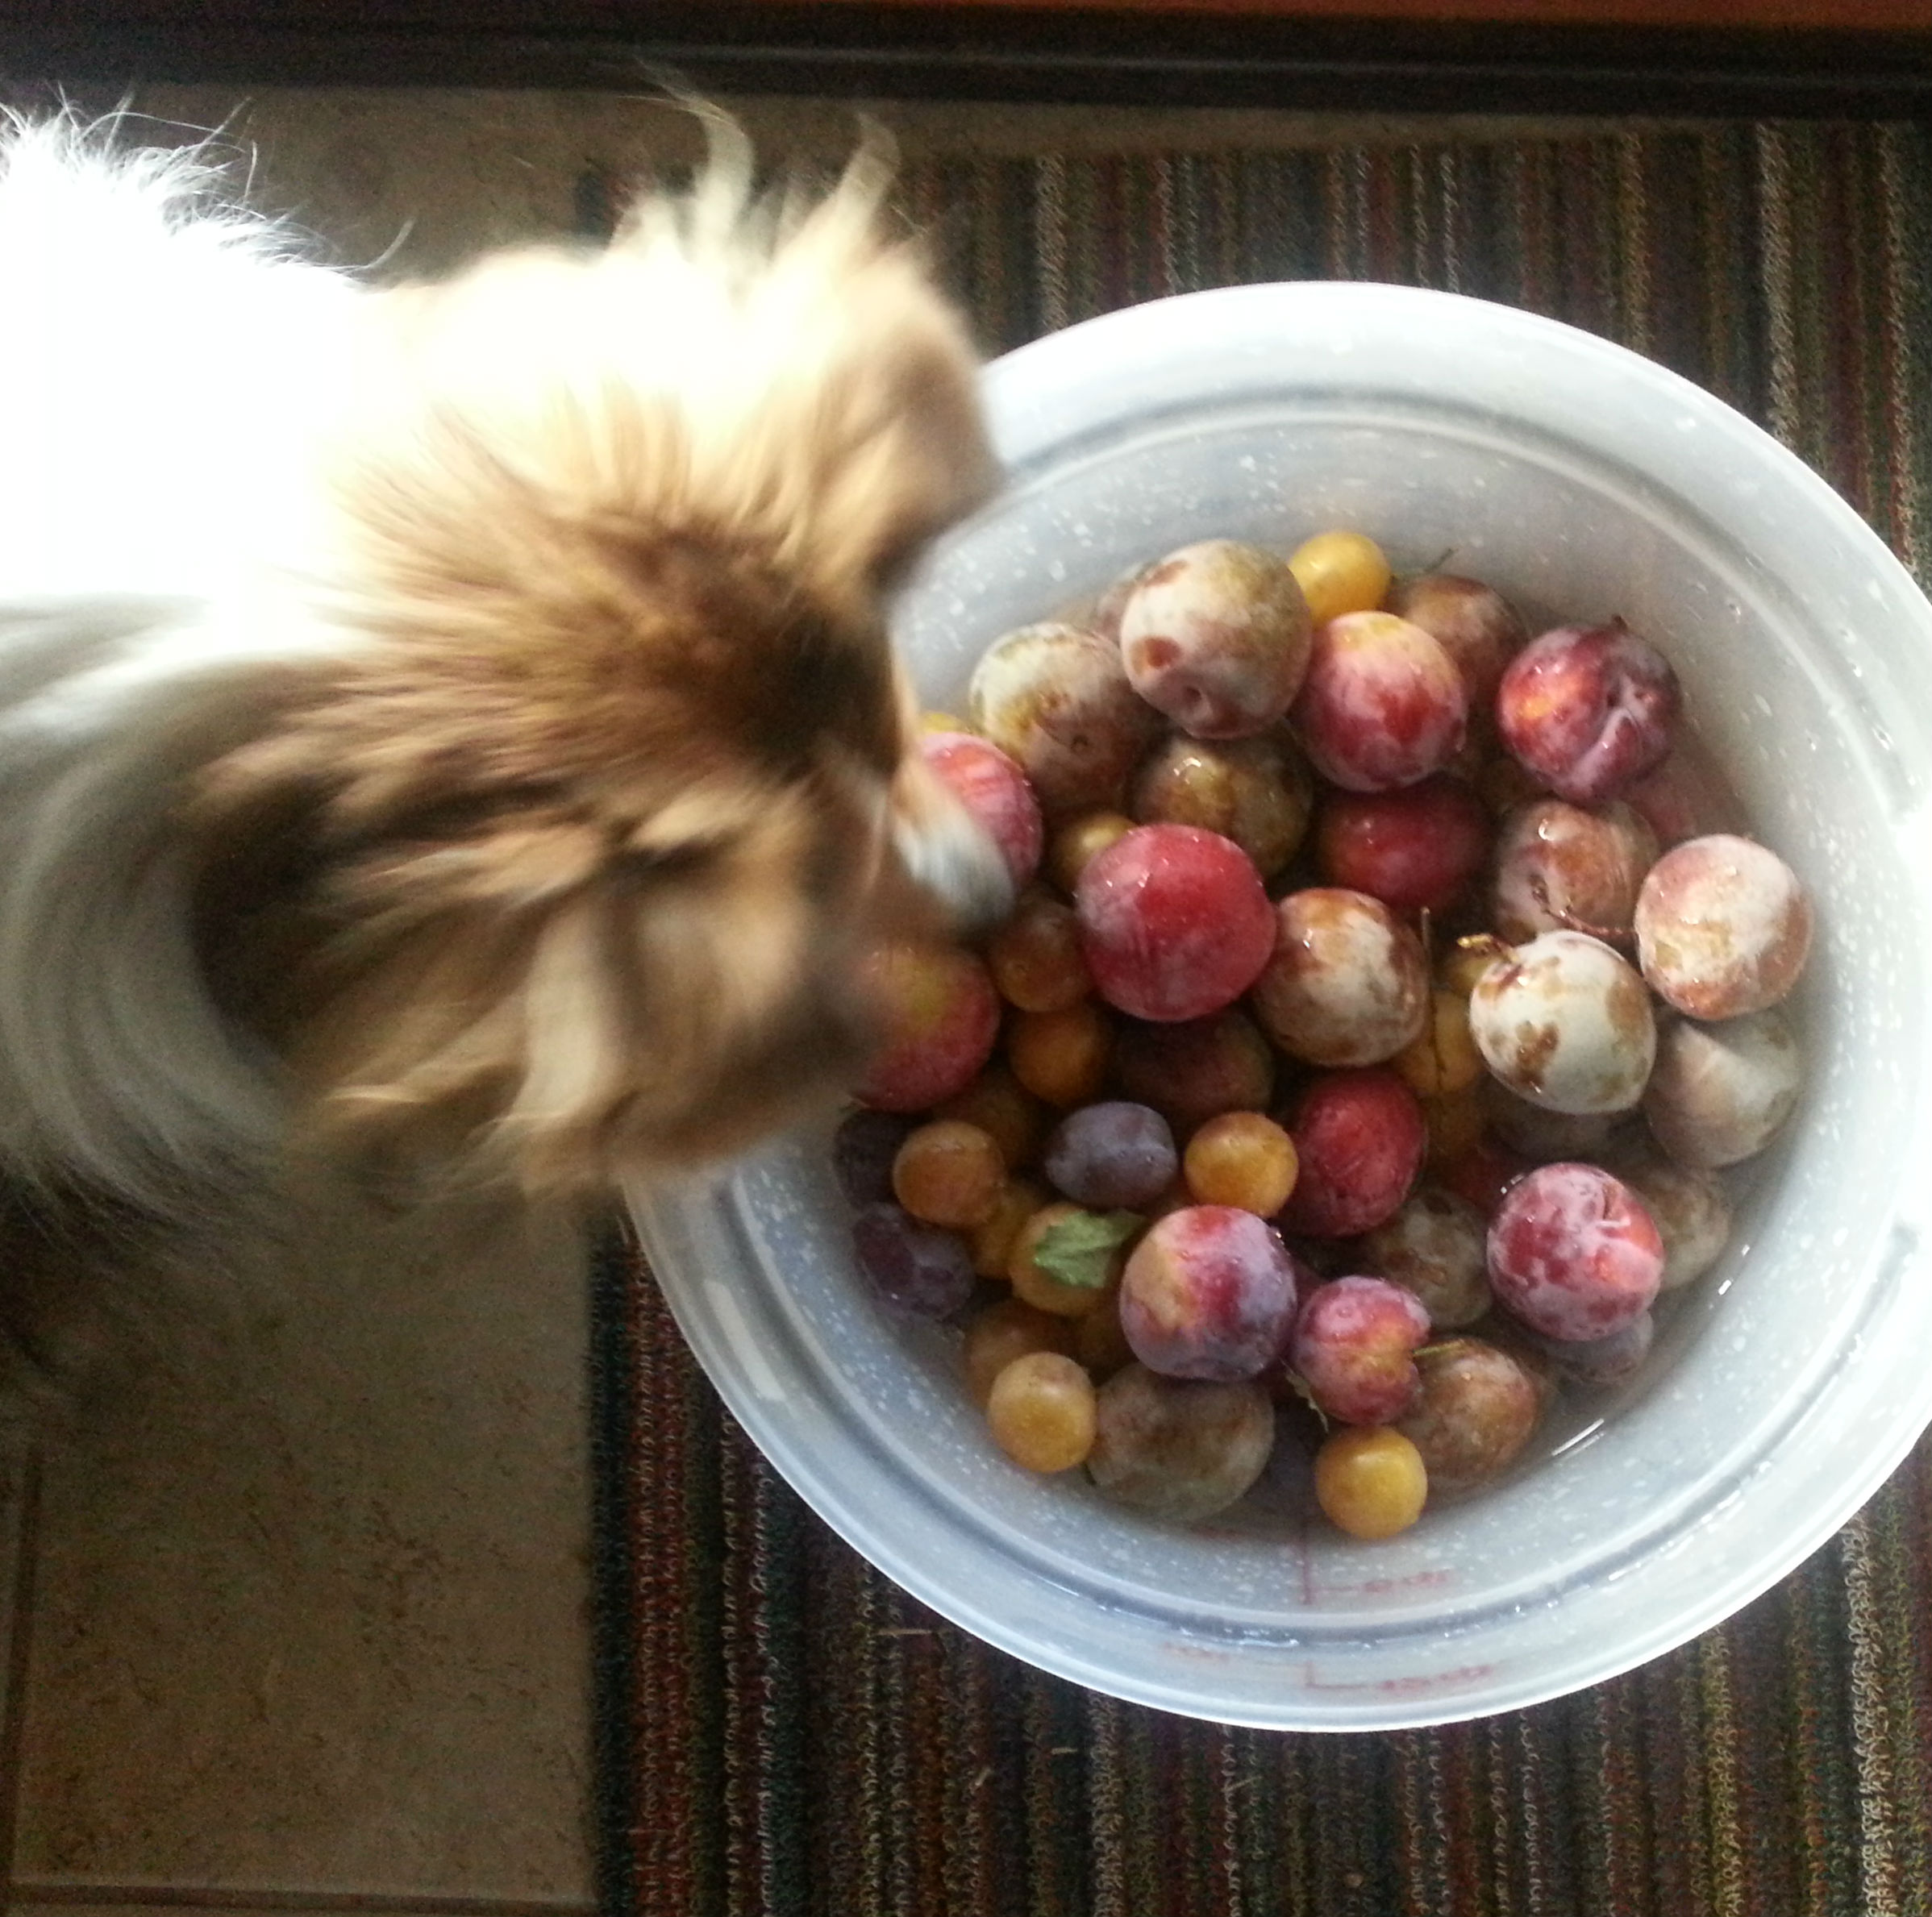
Plums
On September 27, 2014 by sixtyacrebakerThe weather is turning. This morning we picked the almost last bit of plums. Scout is a good early morning companion; she loves fruit as a treat. These bright little orbs, appear to her, to be a bucket of balls. She is very attentive her inspection flawless
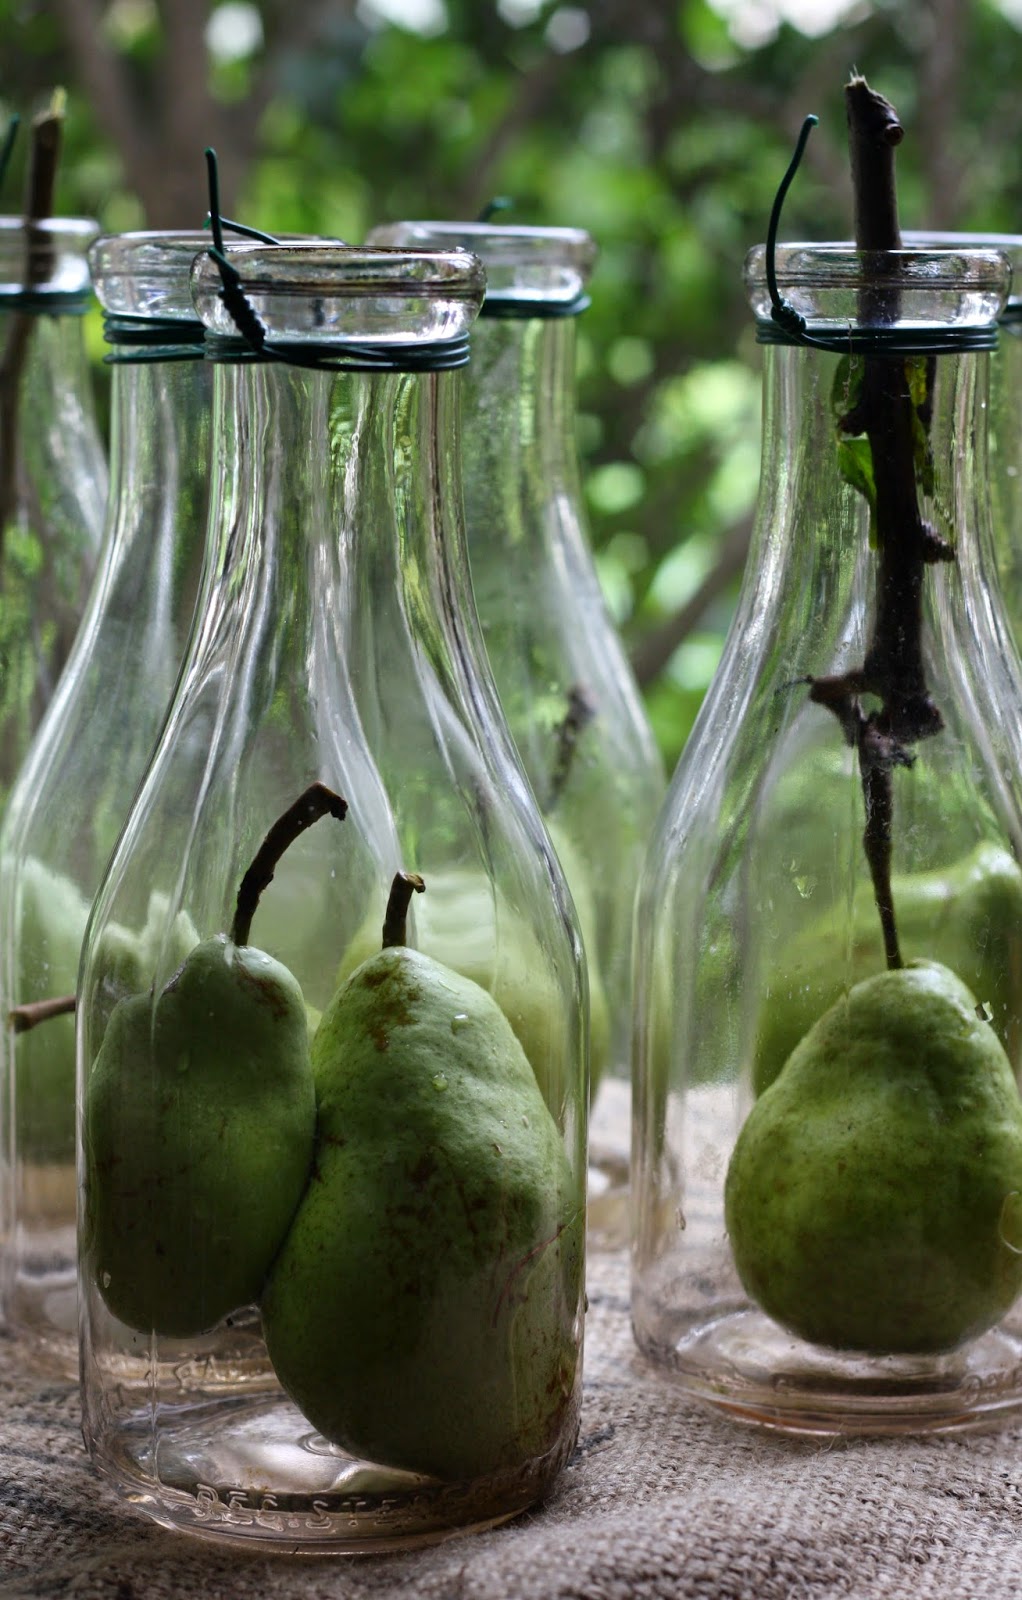
message in a bottle
On September 25, 2014 by sixtyacrebakerSpring arrives and we run in full sprint preparing and tending. Summer has us watching, patiently waiting. Fall arrives with a prize: fruit grown in.the. bottle. Almost complete, almost. Large jars of ripe pears; bathing in brandy, infuse for months, monitored sip after sip after sip. When the time comes, the brandy pours; briefly veiling the pear. Bottles corked, ready for night capping and mood enhancing, hold secrets of the garden and whispers of the trees.
brandied apricots
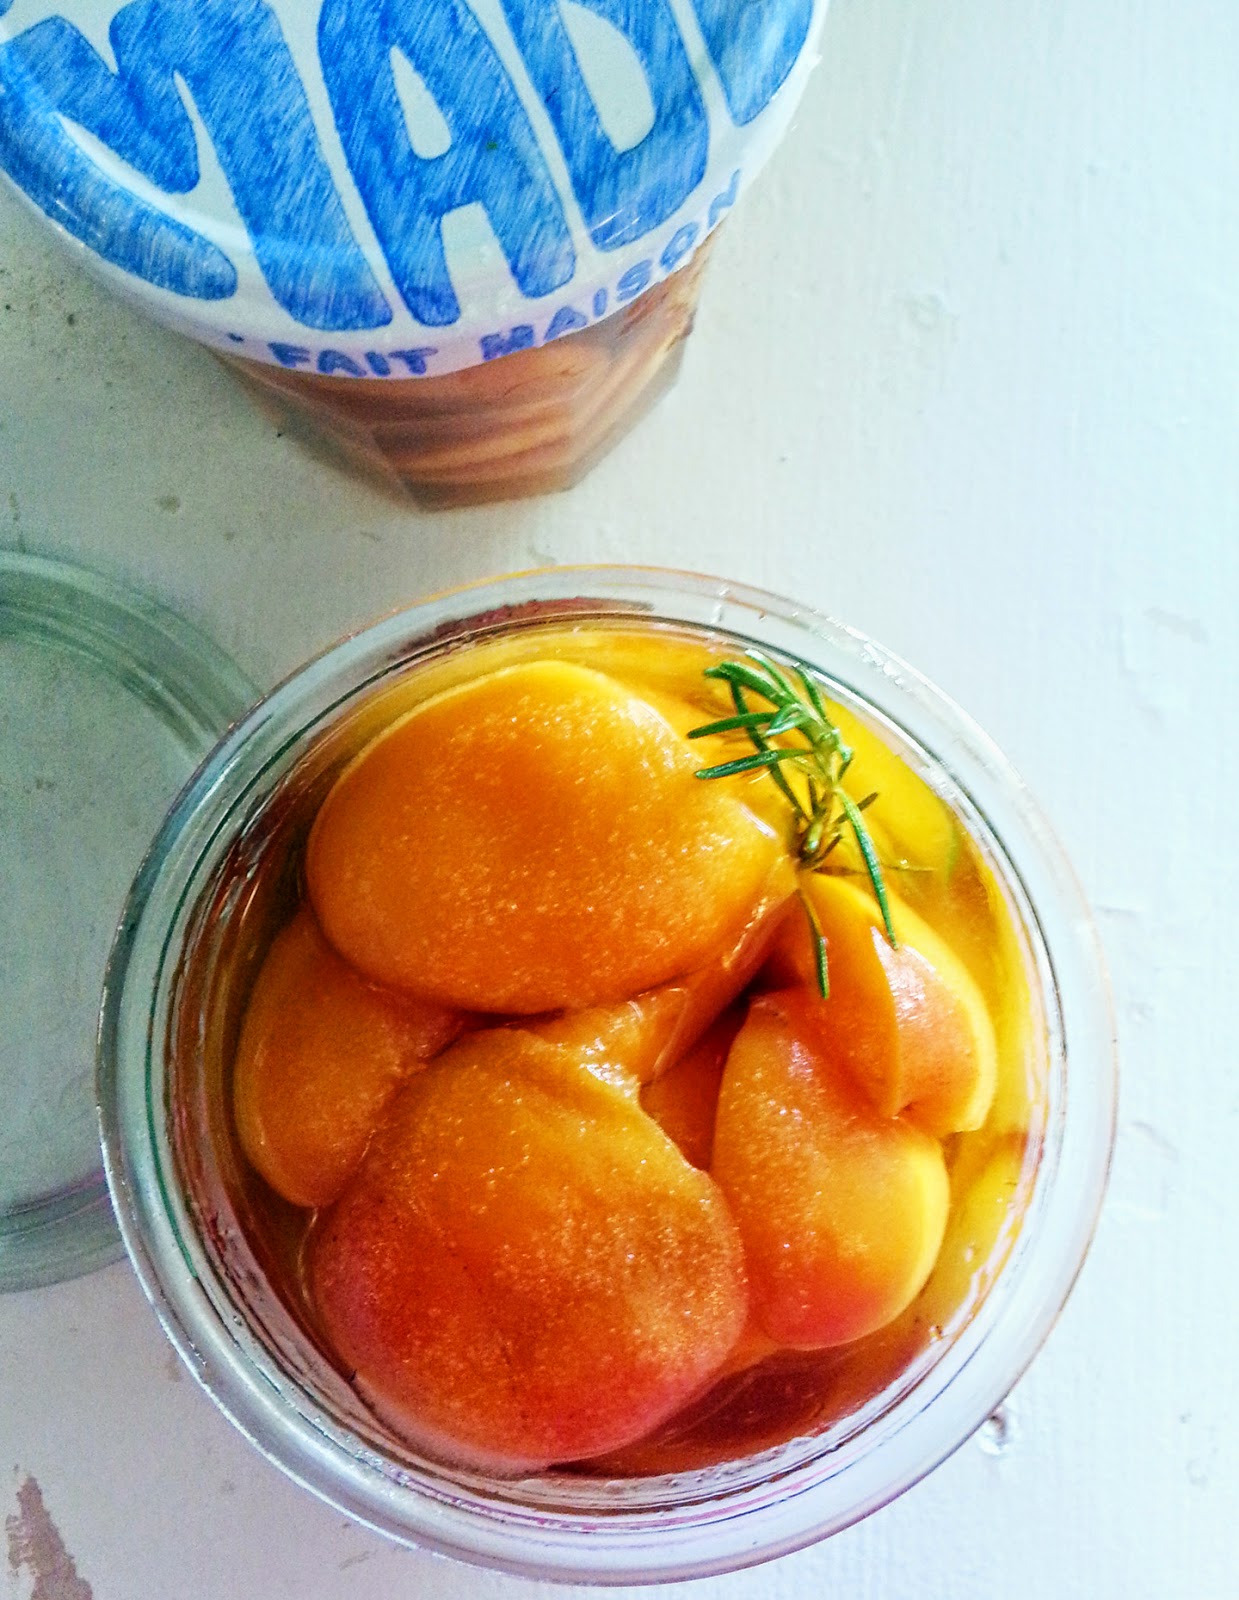
On June 21, 2014 by sixtyacrebakerWe picked a bucket load of apricots the other day, and i have been working to preserve them for our winter larder. This year I have decided to brandy some. Which is a fancy way of saying,infusing with brandy. I’ve loaded my jars with freshly washed fruit (sliced in half and pitted), a sprinkle of sugar (about a tablespoon per jar),and poured on the brandy. In some i added a few extra bits, rosemary in one, cinnamon stick in another, vanilla bean in a third. There are so many lovely combinations to try. I am popping these onto a shelf, in a cool pantry. The fridge would be a great place too-if only i had room in the fridge
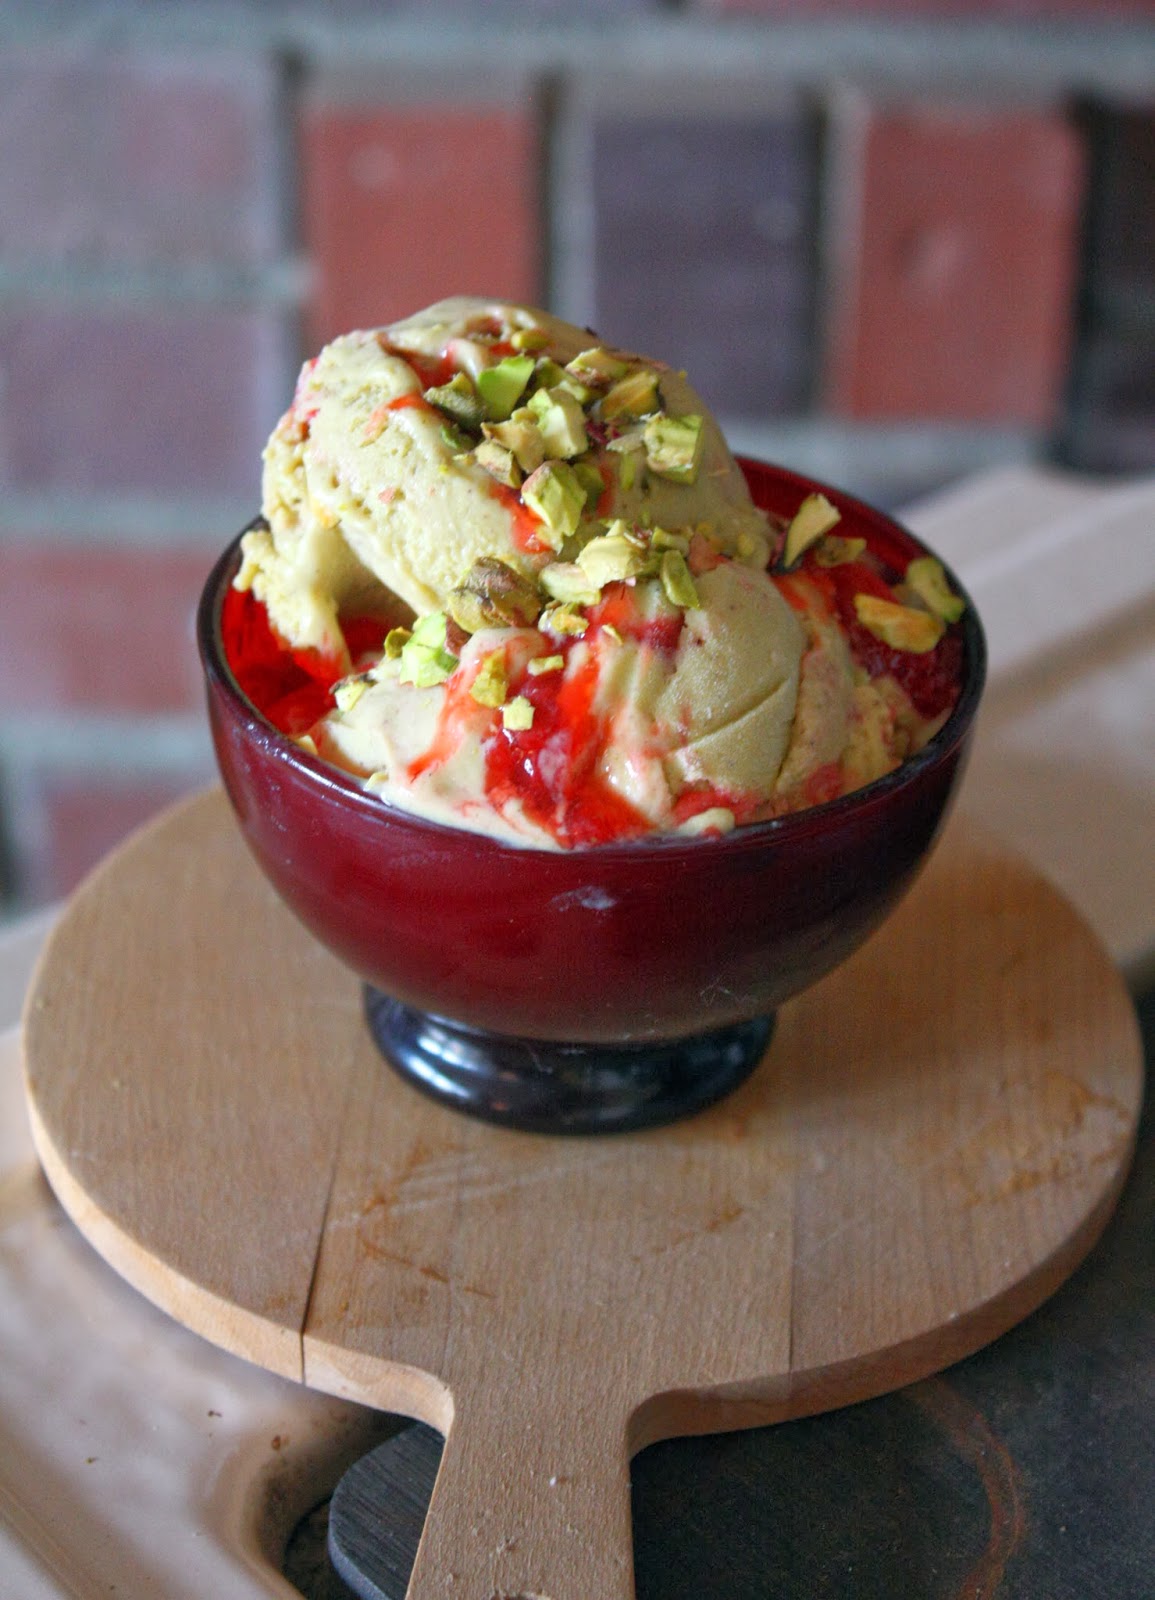
Pistachio-Strawberry Ice Cream
On March 12, 2014 by sixtyacrebakerA warm winter makes way for an early harvest of strawberries. Meandering down a country road this weekend past, i happened across a roadside stand loaded with berries and heaps of pistachios,locally grown. To keep up with our highly productive flock, I find myself dreaming up custards.
frozen custards
Frozen custards made from backyard eggs, fresh milk, and farmstand goodies.
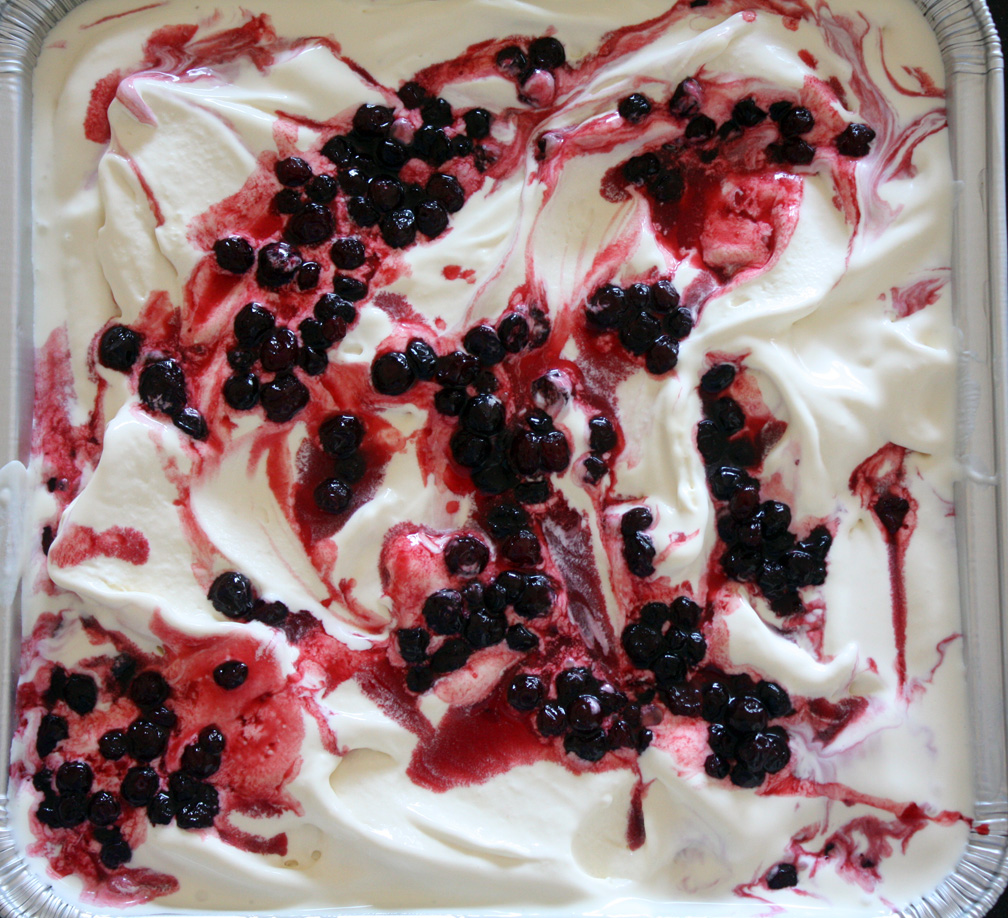
pistachio-strawberry swirl ice cream
1 cup unsalted (roasted and shelled) pistachios
1 1/2 cups milk
1 1/4 cup granulated sugar
7 large eggs yolks
pinch salt (sea or kosher)
2 cups heavy cream
1 tsp vanilla
1 cup strawberry preserves
1/2 cup chopped pistachios (optional)
whisk the egg yolks, salt, and 3/4 cup sugar. place milk and the pistachios in a blender and puree until the nuts are completely liquid and smooth. add 3/4 cup sugar and place over low heat. warm to a simmer. remove from heat and whisk into the eggs and sugar mixture. tip back into the saucepan and cook over very low heat, stirring continually with a rubber spatula. do not allow to boil, and cook until it just begins to thicken to nappe. remove from heat and pour through a sieve into a clean bowl. stir in vanilla and heavy cream. refrigerate fromr 6 hours to overnight. freeze according to ice cream manufacturer instructions.
once the custard is frozen, transfer it to a freezer-safe container. swirl in the strawberry preserves and the chopped pistachios (if using)
*if you choose to make your strawberry preserves, simply place 2 cups of roughly chopped strawberries in a saucepan. taste for sweetness. squeeze the juice of 1/2 lemon. add sugar according to sweetness. add up to 1 1/2 cups of sugar (less if sweet strawberries, more if not sweet). cook at a simmer until strawberries break down and soften and they sit in a thick glaze.
refrigerate until needed
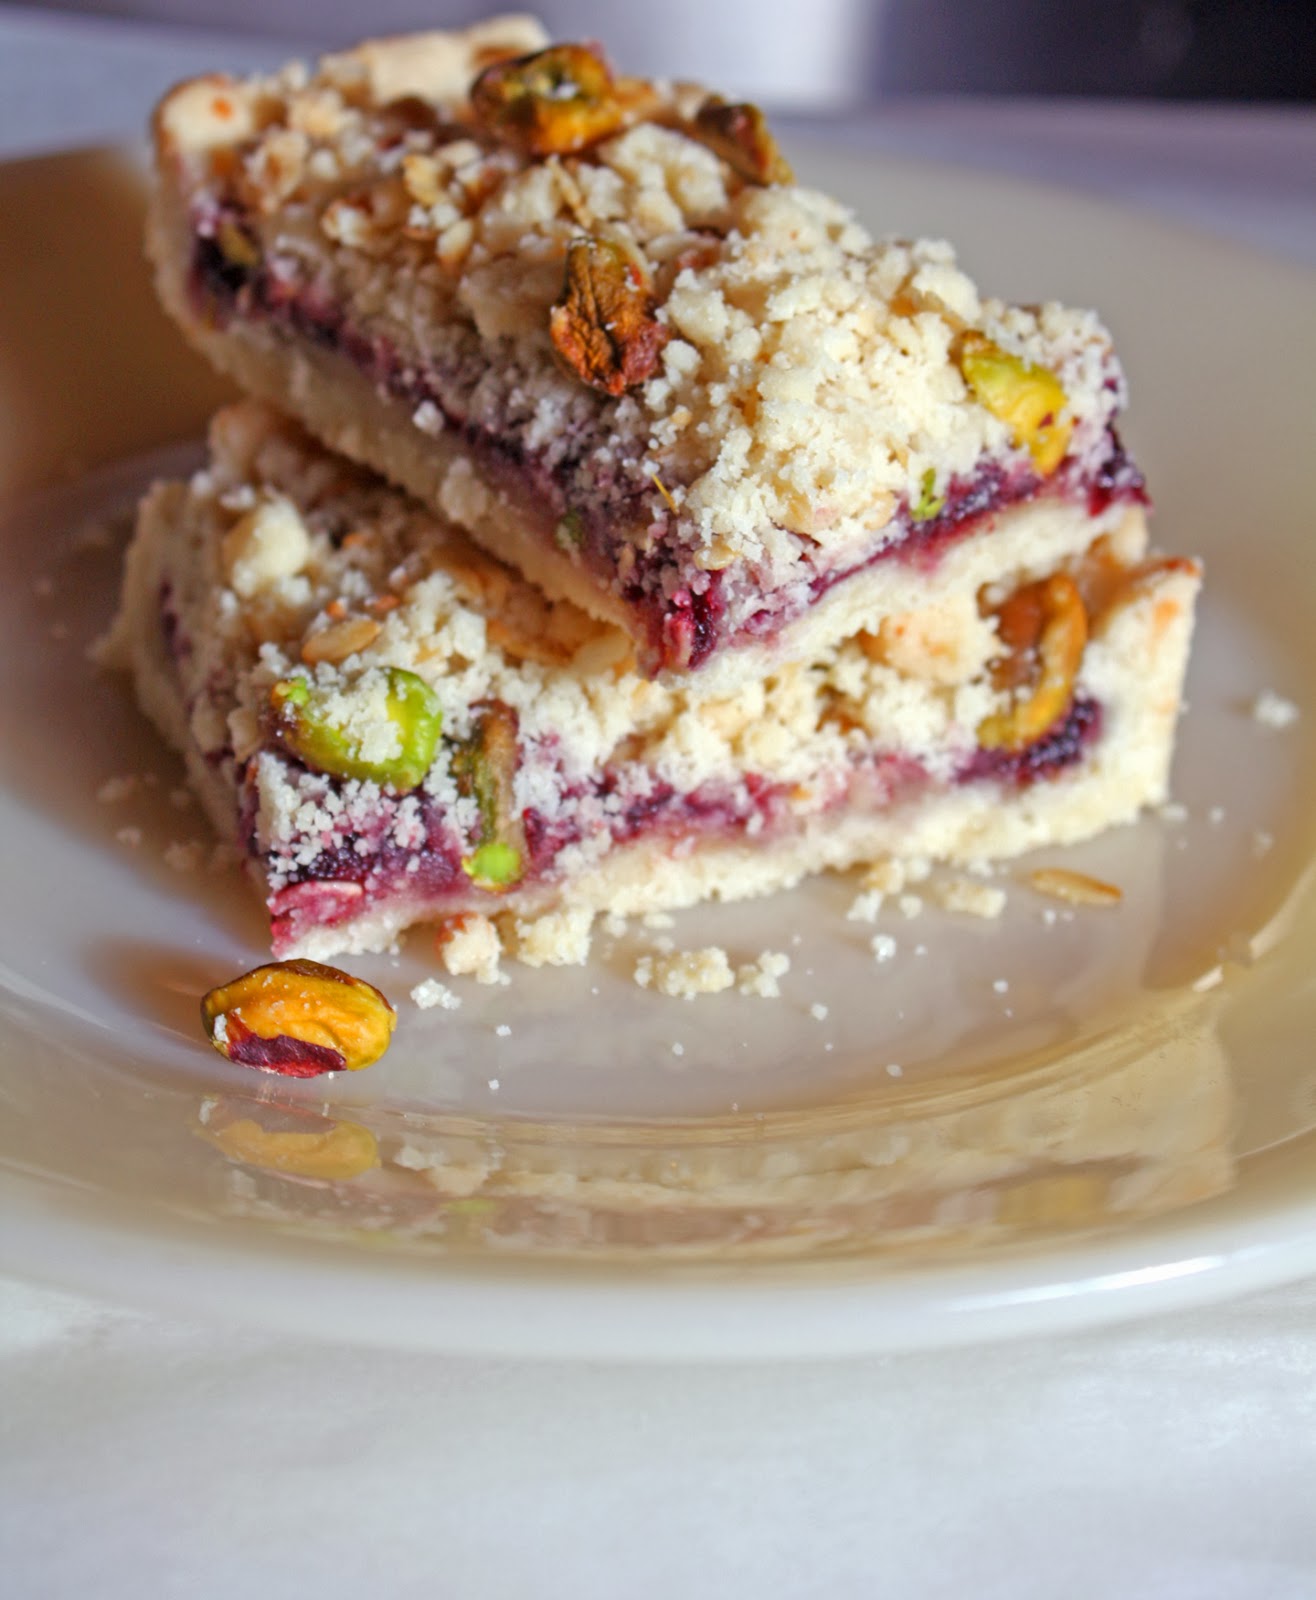
Jammy Almond Crumb Bars
On January 12, 2014 by sixtyacrebakerWe live in the country. Not the county of estates and tag sales; but the country of pastures and dairy sheep. So when someone stops by; we wave them in, take their coat and sit them down with a hot cup of coffee and a sweet.These bars are a twist on the common crumble bar. I use whatever jam i have on hand. {usually something not too sweet loaded with bits of fruit}
The twist comes in the form of almond paste. It finds its way into these cookies, at every bite.
Jammy Almond Crumb Bars
2 sticks unsalted butter–room temperature
3/4 cup granulated sugar
7 oz almond paste (divided)
2 1/2 cups all purpose flour
1/2 tsp kosher salt
3/4 cup high quality-not too sweet jam (ollalaberry, raspberry, blackberry, fruits of the forest, etc)
1/4 cup toasted pistachio nuts
Place sugar, flour and 1/3 of the almond paste in a bowl. By hand, work in the almond paste so that it is in small bits throughout the flour. Add the butter and work by hand until you get a crumble that will stick when pressed together.
Press about 2/3 of the dough into the bottom and up the sides of a 9″x9″ fluted tart pan*. Take remaining almond paste and lightly press a thin layer on top of the crust. You may not use all of the paste. spread evenly with jam.
Mix the pistachio nuts in with remaining dough. Evenly distribute remaining dough by crumbling on top of jam. (i like a thick layer of topping)
Bake at 350 for approximately 40-45 minutes. You want the crust and crumble to be slightly colored, but not over-browned.
*if you do not have a fluted tart pan, this works fine in a standard 9×9 cake pan, just be sure to bring the crust 1/4-1/2″ up the sides.
Browned Butter Berry Bars
On August 15, 2013 by sixtyacrebakerThis weekend past, we took a long drive with no real agenda. Except to explore. As we drove north i began to obsess. A cookbook was given to me about a year ago called Big Sur Bakery. While getting lost in its pages, I fell in love with the place, and began imagining each bite. While big sur is coastal, we were on an inland route a little jot west, wasn’t too far off course.
{it wasn’t like we had anywhere to be}
An hour, and ten white knuckles later, we arrived in Big Sur. Unfortunately, the bakery was hosting a wedding; which meant, it was closed. Double dip dang-nabbit ugh. Instead, we stopped at a half bad restaurant for nourishment not enjoyment planning our return. When we got home, I promptly made these. These are a variation of the brown butter rhubarb bars from The Big Sur Bakery Cookbook using berries we picked that morning.
Brown Butter Berry Bars
adapted from the big sur bakery cookbook
jam
2 cups blackberries and mulberries {or berries of your choice}
juice of 1/2 lemon
1 cup sugar
place all ingredients in a heavy bottomed saucepan. cook on low heat until it begins to bubble and thicken. watch closely and cook until it is thick and jammy. set aside to cool
crust
1 cup unsalted butter–melted
1/2 cup powdered sugar
1/2 tsp kosher salt
1 1/2 cups flour{whole wheat or all-purpose}
whisk together the flour, powdered sugar and salt. stir in butter. press into a 9″x 13″ pan. bake in a 375^ oven until it just begins to brown(15-18 minutes). remove from oven and allow to cool.
brown butter filling
3 large eggs
1 1/4 cup sugar
1/2 tsp salt
grated zest of 1 lemon
juice of 1/2 lemon
1/2 cup + 2 Tbs unsalted butter
3/4 cup + 2 Tbs flour {whole wheat or all purpose}
1 teaspoon vanilla
place the butter in a saucepan and cook on low heat until it becomes brown and nutty, careful not to burn. whisk together the eggs, sugar, salt, lemon zest, lemon juice, flour and vanilla. carefully stir in the browned butter.
to assemble
spread about half of the browned butter mixture on the prepared crust. dollop about 3/4 of the jam on top. spread the remaining browned butter filling and then dollop the remaining jam. bake for about 25 to 30 minutes, until the edges just begin to turn brown. do not overbake, (allowing the filling to souffle). allow to cool before cutting into bars.
delicious room temperature or directly from refrigerator.
Huckleberry Ice Cream
On July 5, 2013 by sixtyacrebakerHuckleberries are hard to come by. Competing with bears after a long hilly hike, just ain’t my thing. Luckily, those whom are “into it” are willing to share; with one little caveat, my dealer, is 1200 miles away. Traveling for a case of berries. Now, that is my thing. Huckleberries are a bit like blueberries, with more punch of flavor. Sweet with a tinge of sour, no pucker. Just enough to wet your whistle. This gorgeous purple berry cuts rich vanilla ice cream perfectly.
Huckleberry Ice Cream
(vanilla base recipe adapted from David Lebovitz)
vanilla custard
1 cup whole milk
generous pinch kosher salt
3/4 cup granulated sugar
2 cups heavy cream
7 large egg yolks
4 tsp good vanilla extract
huckleberry swirl
1 1/2 cups huckleberries
1/2 cup granulated sugar
1 Tbs lemon juice
Heat whole milk with 1/2 cup of sugar, and kosher salt. Meanwhile whisk egg yolks with remaining 1/4 cup of sugar. Once milk comes to a simmer, slowly pour into the egg yolk mixture, whisking constantly. Quickly rinse the milk saucepan to remove any dried or burnt milk. Transfer warm egg mixture back into the saucepan and cook on low heat, constantly stirring with a spatula. Watch carefully, as to not overcook the eggs. Cook and stir just until the mixture coats the spatula (consistency of a light crepe batter). Remove from heat and run through a sieve into a clean bowl. Stir in heavy cream and vanilla. Place entire bowl into another bowl filled with ice and cool water. Stir until it is cooled to room temperature. Pour mixture into a covered container and refrigerate at least 4 hours, but preferably overnight.
make huckleberry swirl
In a small saucepan, place berries, sugar and lemon juice. cook until the berries throw off juice and all of the sugar has melted, then cook for about 10 minutes more..keep the heat low, you don’t want to burn the sugars. Mash the berries slightly (you will want some whole, some mashed). Allow to cool and refrigerate until ready to freeze the ice cream.
when ready to freeze
Place vanilla base into the bowl of your freezer. Freeze according to manufacturer’s directions. When your ice cream is finished…remove into your freezer container. As you scoop into your freezer container, layer with your huckleberry swirl. This will allow you to have a true swirl. If you put the huckleberry swirl into the mixer, it will completely mix in. Continue to layer adding as much huckleberries and juice as you wish.