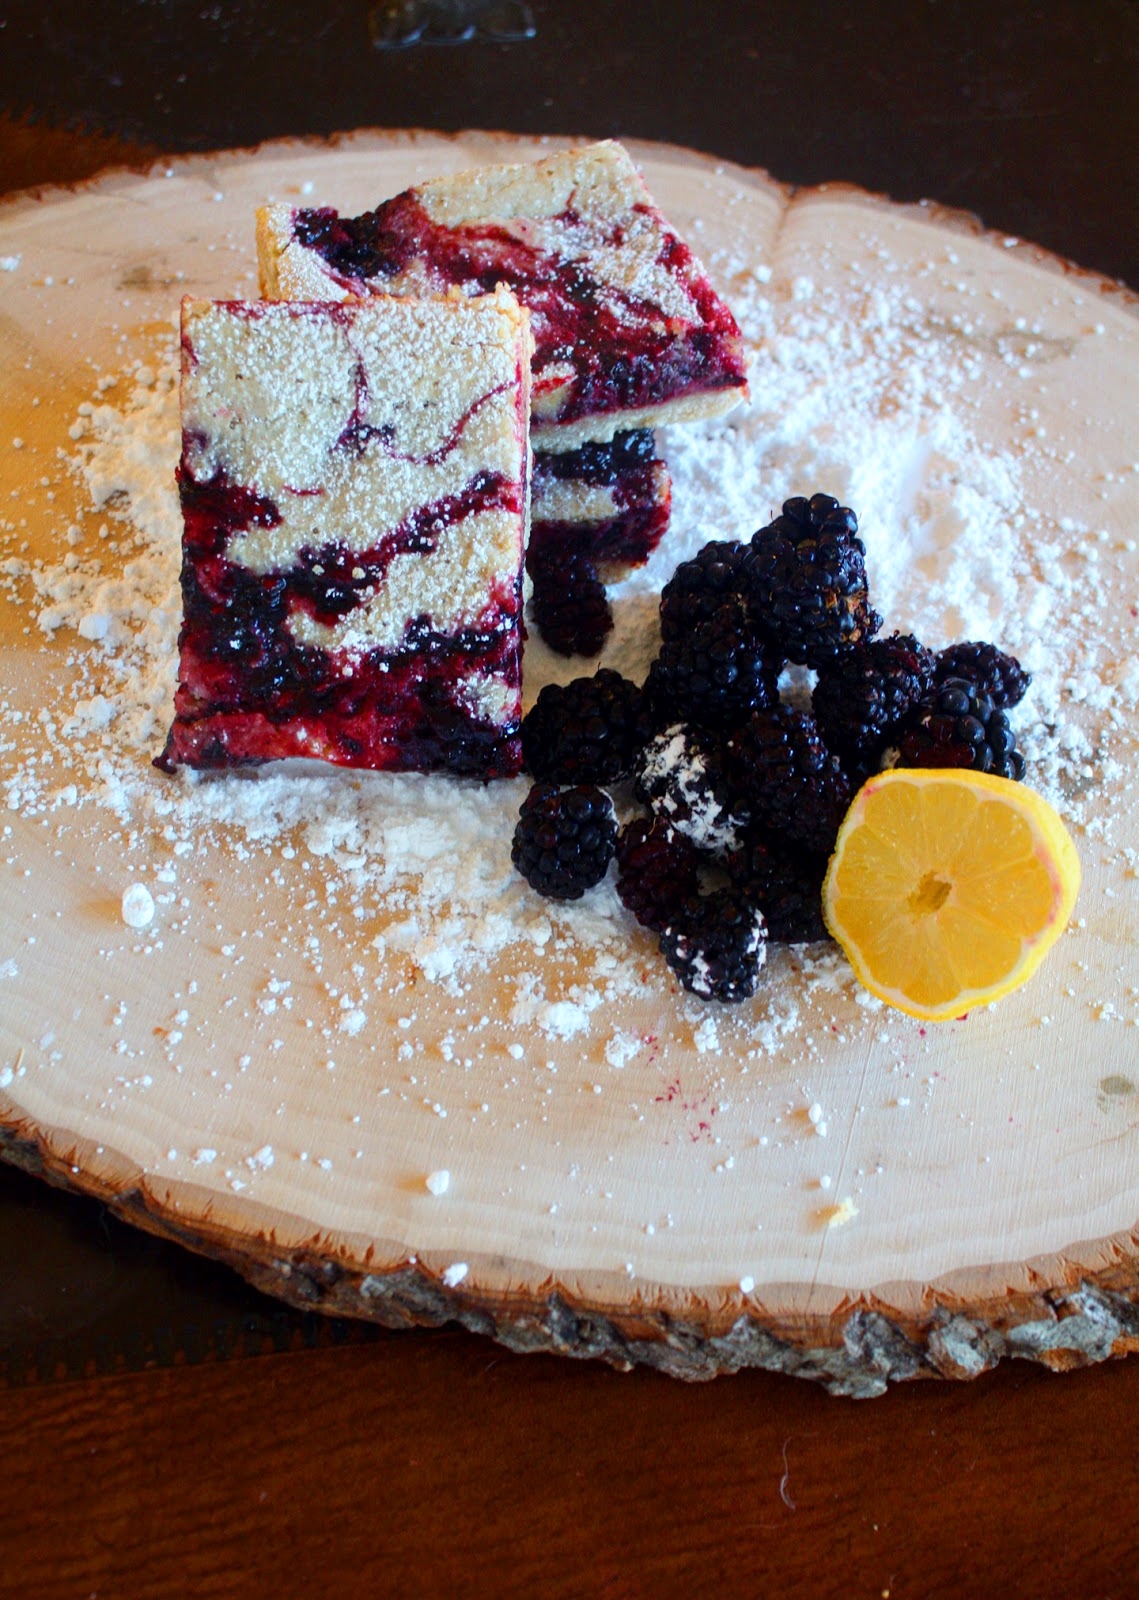
Browned Butter Berry Bars
On August 15, 2013 by sixtyacrebakerThis weekend past, we took a long drive with no real agenda. Except to explore. As we drove north i began to obsess. A cookbook was given to me about a year ago called Big Sur Bakery. While getting lost in its pages, I fell in love with the place, and began imagining each bite. While big sur is coastal, we were on an inland route a little jot west, wasn’t too far off course.
{it wasn’t like we had anywhere to be}
An hour, and ten white knuckles later, we arrived in Big Sur. Unfortunately, the bakery was hosting a wedding; which meant, it was closed. Double dip dang-nabbit ugh. Instead, we stopped at a half bad restaurant for nourishment not enjoyment planning our return. When we got home, I promptly made these. These are a variation of the brown butter rhubarb bars from The Big Sur Bakery Cookbook using berries we picked that morning.
Brown Butter Berry Bars
adapted from the big sur bakery cookbook
jam
2 cups blackberries and mulberries {or berries of your choice}
juice of 1/2 lemon
1 cup sugar
place all ingredients in a heavy bottomed saucepan. cook on low heat until it begins to bubble and thicken. watch closely and cook until it is thick and jammy. set aside to cool
crust
1 cup unsalted butter–melted
1/2 cup powdered sugar
1/2 tsp kosher salt
1 1/2 cups flour{whole wheat or all-purpose}
whisk together the flour, powdered sugar and salt. stir in butter. press into a 9″x 13″ pan. bake in a 375^ oven until it just begins to brown(15-18 minutes). remove from oven and allow to cool.
brown butter filling
3 large eggs
1 1/4 cup sugar
1/2 tsp salt
grated zest of 1 lemon
juice of 1/2 lemon
1/2 cup + 2 Tbs unsalted butter
3/4 cup + 2 Tbs flour {whole wheat or all purpose}
1 teaspoon vanilla
place the butter in a saucepan and cook on low heat until it becomes brown and nutty, careful not to burn. whisk together the eggs, sugar, salt, lemon zest, lemon juice, flour and vanilla. carefully stir in the browned butter.
to assemble
spread about half of the browned butter mixture on the prepared crust. dollop about 3/4 of the jam on top. spread the remaining browned butter filling and then dollop the remaining jam. bake for about 25 to 30 minutes, until the edges just begin to turn brown. do not overbake, (allowing the filling to souffle). allow to cool before cutting into bars.
delicious room temperature or directly from refrigerator.
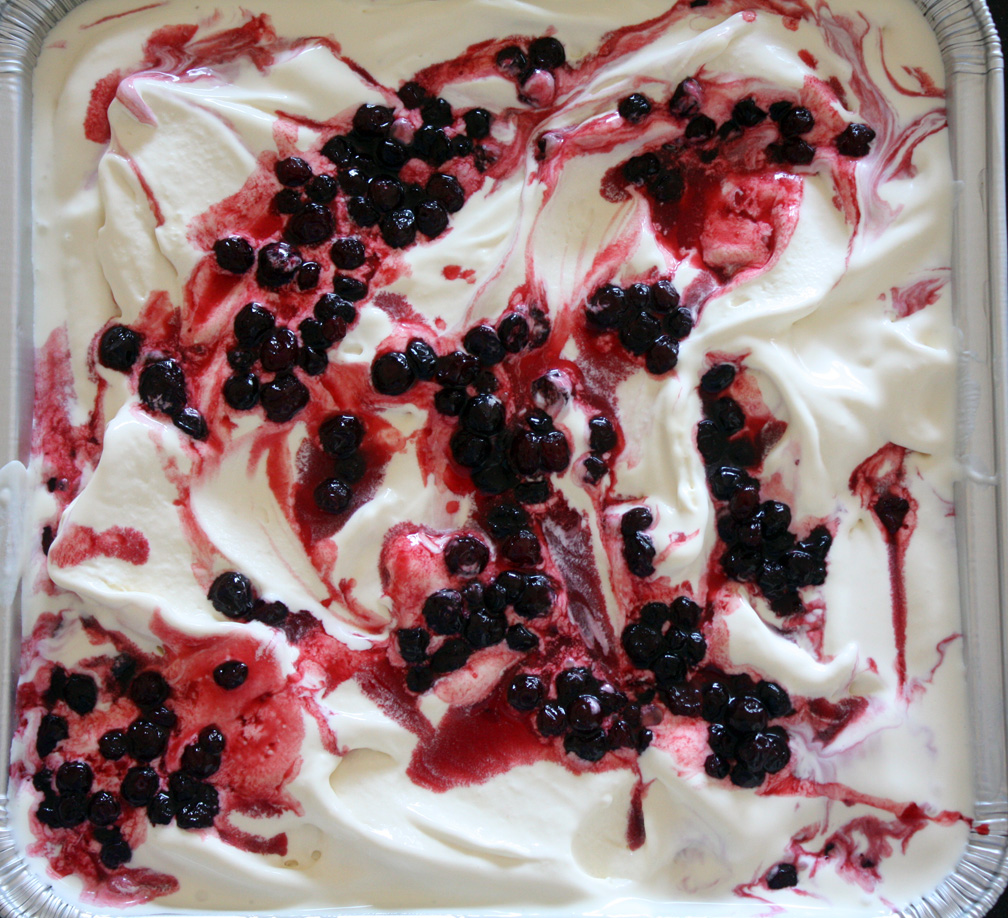
Huckleberry Ice Cream
On July 5, 2013 by sixtyacrebakerHuckleberries are hard to come by. Competing with bears after a long hilly hike, just ain’t my thing. Luckily, those whom are “into it” are willing to share; with one little caveat, my dealer, is 1200 miles away. Traveling for a case of berries. Now, that is my thing. Huckleberries are a bit like blueberries, with more punch of flavor. Sweet with a tinge of sour, no pucker. Just enough to wet your whistle. This gorgeous purple berry cuts rich vanilla ice cream perfectly.
Huckleberry Ice Cream
(vanilla base recipe adapted from David Lebovitz)
vanilla custard
1 cup whole milk
generous pinch kosher salt
3/4 cup granulated sugar
2 cups heavy cream
7 large egg yolks
4 tsp good vanilla extract
huckleberry swirl
1 1/2 cups huckleberries
1/2 cup granulated sugar
1 Tbs lemon juice
Heat whole milk with 1/2 cup of sugar, and kosher salt. Meanwhile whisk egg yolks with remaining 1/4 cup of sugar. Once milk comes to a simmer, slowly pour into the egg yolk mixture, whisking constantly. Quickly rinse the milk saucepan to remove any dried or burnt milk. Transfer warm egg mixture back into the saucepan and cook on low heat, constantly stirring with a spatula. Watch carefully, as to not overcook the eggs. Cook and stir just until the mixture coats the spatula (consistency of a light crepe batter). Remove from heat and run through a sieve into a clean bowl. Stir in heavy cream and vanilla. Place entire bowl into another bowl filled with ice and cool water. Stir until it is cooled to room temperature. Pour mixture into a covered container and refrigerate at least 4 hours, but preferably overnight.
make huckleberry swirl
In a small saucepan, place berries, sugar and lemon juice. cook until the berries throw off juice and all of the sugar has melted, then cook for about 10 minutes more..keep the heat low, you don’t want to burn the sugars. Mash the berries slightly (you will want some whole, some mashed). Allow to cool and refrigerate until ready to freeze the ice cream.
when ready to freeze
Place vanilla base into the bowl of your freezer. Freeze according to manufacturer’s directions. When your ice cream is finished…remove into your freezer container. As you scoop into your freezer container, layer with your huckleberry swirl. This will allow you to have a true swirl. If you put the huckleberry swirl into the mixer, it will completely mix in. Continue to layer adding as much huckleberries and juice as you wish.
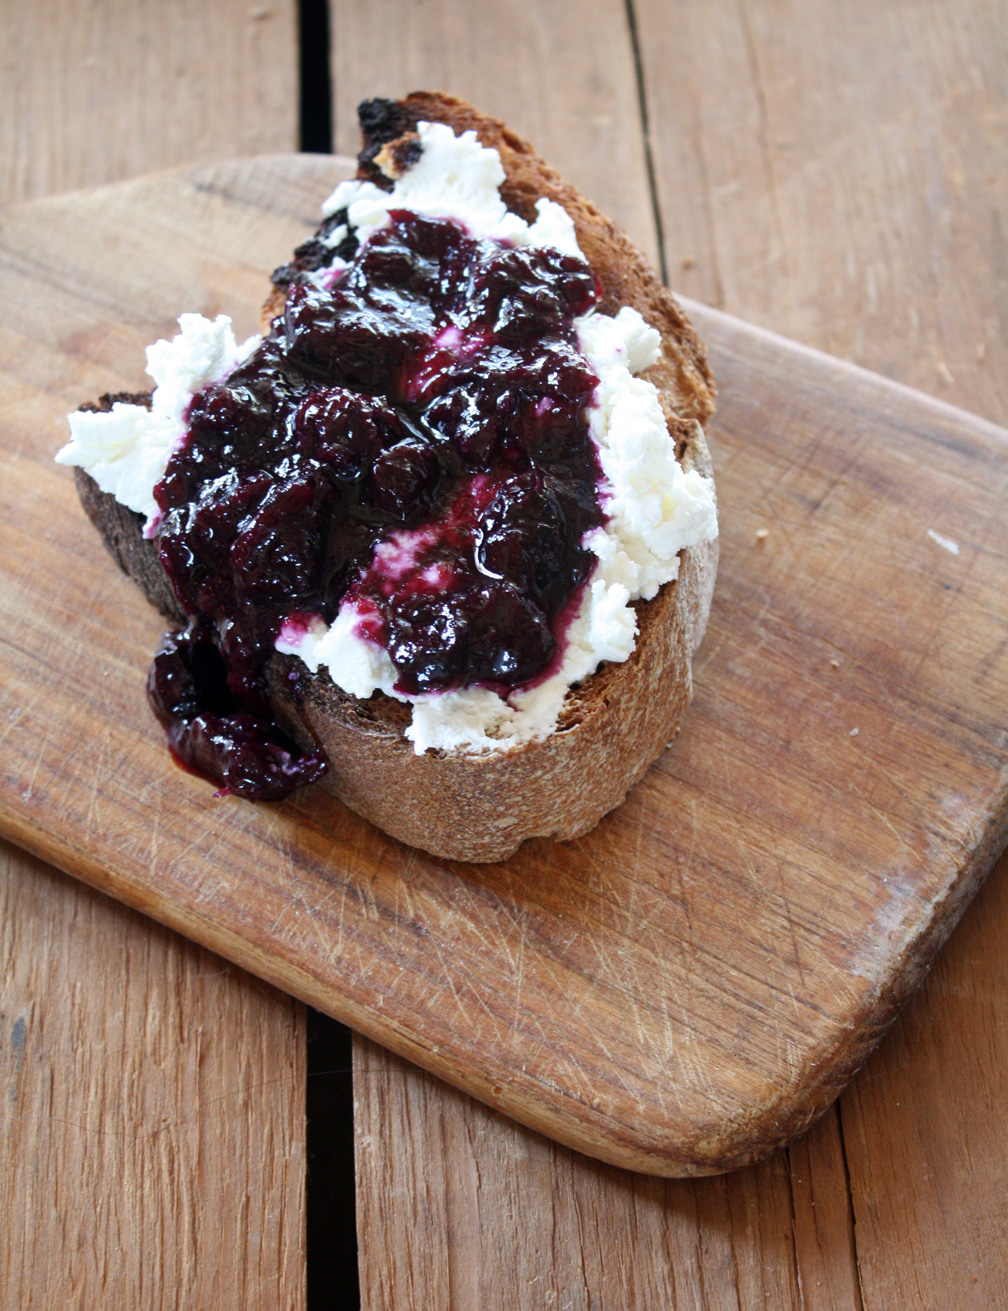
Blueberry-Rhubarb Margarita Jam
On June 16, 2013 by sixtyacrebakerWeekly, I drive past a blueberry farm. Most days, wishing for the season. Some days, mourning the end of summer. The day the open sign pops up, on our little stretch of highway, I stop in. I continue this routine, each week, until blueberries are no more. I hoard more berries than our small family can eat, out of hand. But not more than we can eat, prepared. I love to pair sweet blueberries with rhubarb from our garden for this delicious not too sweet jam.
Blueberry Rhubarb Margarita Jam
3 pints blueberries
8 oz rhubarb–chopped
2 cups granulated sugar
juice of 10 key limes
1/2 tsp kosher salt
1/4 tsp ginger
juice of 1/2 grapefruit (plus/minus)
1 oz tequila (can add up to 2 oz)
Dump blueberries rhubarb, sugar, key lime juice, salt and ginger into your jam pot. Cook on med-low heat, stirring occasionally, until you have a nice jam consistency (about 25-30 minutes). Taste for sweetness. Add at least 1/4 grapefruit juice to both adjust sweetness and for flavor. Cook for 5 more minutes and check again for sweetness. add more grapefruit if desired. pour in tequila and cook at least 5 minutes more. Test jam for firmness on a frozen plate. **i like my jam to be a bit runny. You do not need pectin for this jam to firm up. You can cook it to come out firmer, but be careful not to caramelize it. Place in sterilized jars and refrigerate or if you are a seasoned canner, process for longer storage.
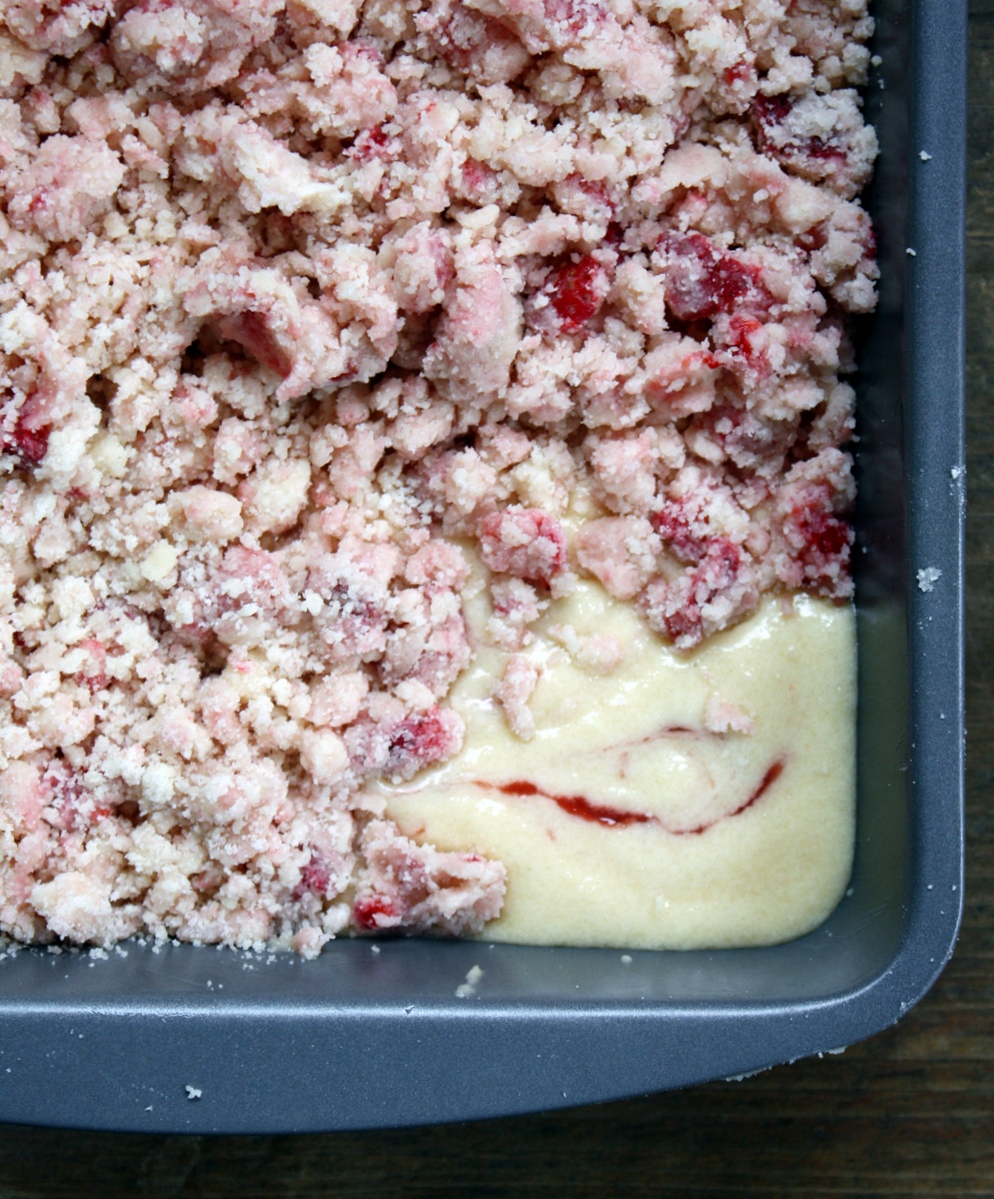
Strawberry Crumb Cake
On May 29, 2013 by sixtyacrebakerStrawberries are ripe, ripe, ripe in my neck of the woods. Every farm stand along my tuesday evening route, touts the sweetest and freshest, organic berries. I can’t resist. Particularly because i make a really great strawberry-rhubarb jam, that disappears faster than anything else in the pantry. I grab loads of the juicy red fruit whenever i find it. Being as we spend most days at the ranch counting idle minutes on one hand, it feels less guilty to indulge in a bit of sweet at day’s close. When i have a moment, I bake a cake like this one. It is a simple twist on a classic crumb cake, using the sweet ripe fruit of the season in its crumb.
Strawberry Crumb Cake
cake
1 1/4 cup cake flour (sifted, then measured)
1/2 cup granulated sugar
1/4 tsp baking soda
1/4 tsp kosher salt
3/4 cup unsalted butter (room temperature–cut into cubes)
1 large egg
1 large egg yolk
1 tsp vanilla
1/3 cup buttermilk
4 tsp of your favorite strawberry (or strawberry-rhubarb) jam
Place the flour, sugar, baking soda and salt in a stand mixer fitted with paddle attachment. Quickly give it a few turns to incorporate everything together. Add the butter. *the butter should be softened, but not warm and creamy. You want it to mix into the flour mixture making more of a clumpy sand consistency, then a creamed. Mix the ingredients until the butter is finely incorporated into the flour mixture. Meanwhile, combine the buttermilk and vanilla. Add the whole egg and the egg yolk to the flour mixture and mix until incorporated. Use a spatula to scrape down the sides and bottom of bowl to ensure there are no dry spots. With the mixer on low speed, add the buttermilk/vanilla mixture and mix until just incorporated. Do not over mix pour into a 8×8 buttered square cake pan. Strategically plop the 4 tsp of jam you can add a bit more if you like in the batter. Run the back of a butter knife through the cake batter to swirl the jam through evenly. Set aside while you prepare the crumble.
crumble
3/4 cup granulated sugar
1/2 tsp kosher salt
2 cups all purpose flour
10 Tbs unsalted butter–fairly cold–cut into 1/2″ pieces
1 cup fresh ripe strawberries–cut into 1/4″ dice
Mix together the sugar, salt and flour by hand in a large bowl. Drop in butter and either work in by hand, or use pastry knives/fork/blender to make fairly large crumble. Tip in the strawberries and work in by hand, using a bit of a firm hand, to get them mixed up well in the flour mixture. Don’t squeeze and knead, you do not want to warm the butter, but allow the strawberries to fully incorporate into the crumb. Gently pile on top of the cake. Some of the crumbs will sink into the cake as it bakes, which is why i make SO MUCH CRUMB!
Bake in a 375F oven for about 35-45 minutes. Check after 30 minutes and keep an eye on it. The cake is moist, so it can tolerate a bit of over baking, but don’t forget to keep an eye on it. Check by using a toothpick or wooden skewer to see if it is done baking. Allow to cool completely before eating
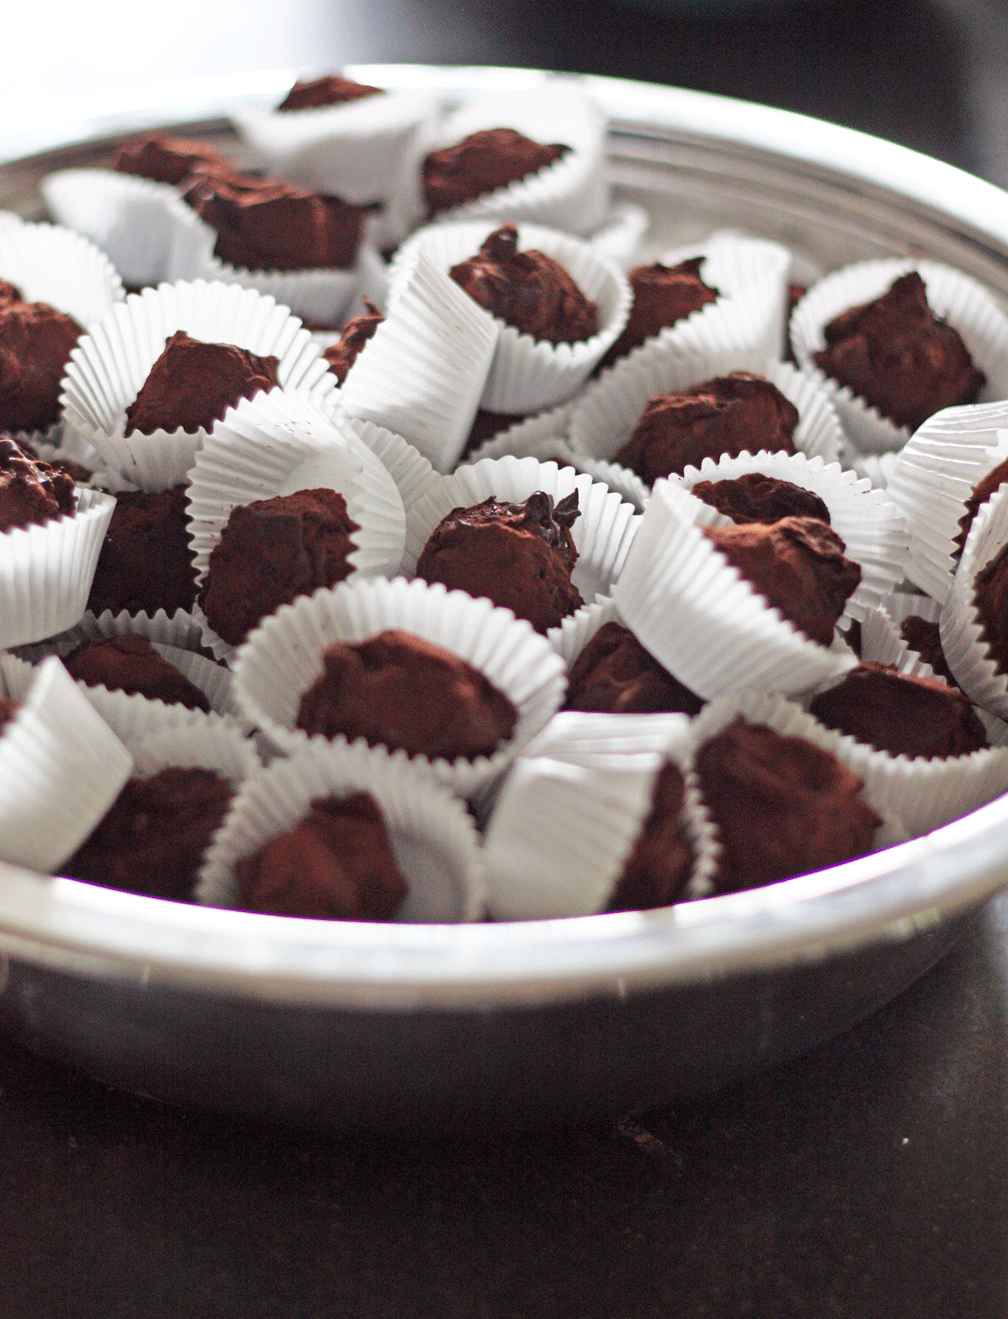
The French Truffle
On March 16, 2013 by sixtyacrebakerI do love the simplicity of a unfussed truffle. No gild or frill. Just quality chocolate, a bit of cream, a splash of cognac, a wisp of sea salt, and butter dipped and dusted.
The French Truffle
9 oz bittersweet chocolate (min 65%)
6 oz heavy cream
pinch sea salt
1 Tbs unsalted butter
2 Tbs cognac
*chocolate for coating and cocoa powder (or powdered sugar) for dusting
Bring heavy cream and sea salt to a simmer over low heat. Place chocolate bits in a large bowl. Cut the butter into small pieces and place in bowl with chocolate. Remove cream from heat and swirl in cognac until incorporated. pour over the chocolate bits and allow to sit 1 minute before stirring. Stir until the chocolate and butter is melted and fully incorporated into the cream. The mixture should be thick. Allow to sit at room temperature until it hardens enough to form into balls. Using a small ice cream scoop, or melon baller, form filling into balls. Roll them between your palms until they are perfectly round. Allow to sit out (or place in the refrigerator) until they harden up again. if you put in the fridge, allow to come to room temperature. At this point, you may roll them directly into the cocoa powder or powdered sugar. I like to enrobe mine in chocolate. It gives them the rough exterior as well as helps preserve the delicate filling.
To enrobe:
It is not required to use tempered chocolate for this particular truffle because you will be rolling it immediately in cocoa powder. It is however, important that you do not heat your chocolate to too high a temperature otherwise it will not harden back up properly. Using a microwave safe bowl, cook about 8 oz of chocolate pieces 30 seconds at a time in the microwave. After the first 30 seconds, check the heat of the bowl. if it is really hot, you can melt the chocolate in its residual heat. Remove the bowl from the microwave and stir the chocolate. If it melts completely, then you are done. If it doesn’t melt at all…cook for another 30 seconds…if it is almost melted, go down to 10 second increments and watch to make sure that it doesn’t get too hot. When you are ready, place a shallow bowl of cocoa powder next to your bowl of melted chocolate. Dip each truffle in the melted chocolate, then immediately drop into the cocoa powder. Coat it completely, then remove to a lined baking sheet to cool. I do not recommend putting the truffles in the refrigerator before or after dipping (to harden) because it can cause the filling to expand and contract, and break through the coating. They should do fine at room temperature to firm up. I do however, recommend refrigeration for longer term storage.
You can also freeze the filling (once you have them formed into balls) well sealed for up to a month. Remove them and allow them to defrost in the refrigerator, then come to room temperature before dipping, being careful to remove any condensation.
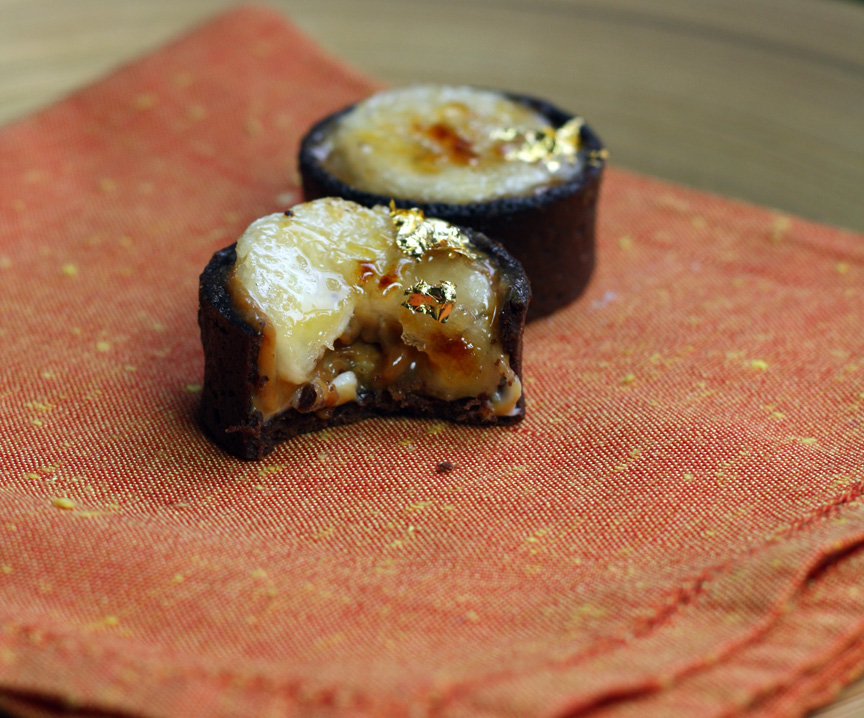
Banoffee Brulee Bites
On February 8, 2013 by sixtyacrebakerI can’t resist this perfect little bite. It is decadence in a shot. With a crackly pop of burnt sugar crust, they are irresistible. Fix a few for the person you love; especially, if it is you.
Banoffee Brulee Bites
1 recipe chocolate sable recipe here
1/4 cup semi-sweet chocolate-melted
dulce due leche prepared or 1 can sweetened condensed milk
small tub mascarpone
bananas
sugar
freshly grated nutmeg
edible gold leaf (optional)
If you are making your own dulce de leche, you need to start a day in advance. Pour the sweetened condensed milk into a pie or cake pan at least 8″ in diameter. Place in a larger cake tin or oven safe pan that will leave at least a 1″ (moat) around the pan. Fill the larger pan with water, half way up the rim of the smaller pan (making a bain marie). cover the smaller pan with foil. Place in a 425F oven for about 1 1/2 hours. Check after about 45-50 minutes to make sure the water does not evaporate completely. Add more water if you see it getting low. after 1 1/2 hours the milk should be caramelized. remove it from the water and stir until it is smooth. allow to cool before using. will last in the refrigerator about a week.
bake off the chocolate sable in small tart tins (about 1- 1/2″). A mini muffin tin is a good mold for these. let cool and remove from tin. Using a small paint brush, cover the inside of each shell with a thin layer of melted chocolate. Allow to harden.
to assemble
Spread about 1/4 tsp of mascarpone in the bottom of each tart shell, allowing it to come up the sides. Top with a thin layer (about 1/4tsp) of dulce de leche. Top with a thin slice of banana (1/16″), spread just a whisp of dulce de leche on top of the banana, then top with another banana slice, a bit thicker (1/8″). Sprinkle a bit of sugar on top, and a light dust of freshly grated nutmeg. Using a torch, caramelize the sugar. for a thicker sugar crust, add a bit more sugar and caramelize with the torch again. Top with a bit of edible gold as an option
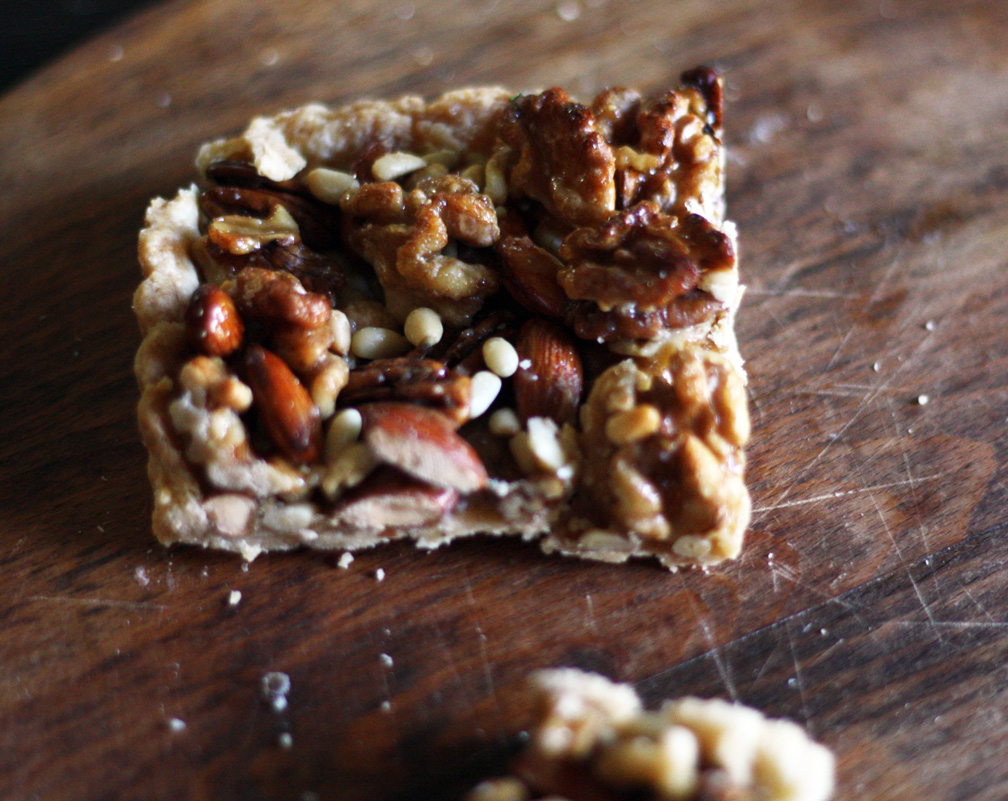
Simple Nut Tart
On November 10, 2012 by sixtyacrebakerDinner parties stump me sometimes. Being that I am trained in pastry, there is a certain expectation that dessert will be served. Andit will be from scratch. Normally not a problem, but i don’t always want to finish
with a substantial & heavy dessert. Sometimes a simple nut tart served with strong coffee and paired with a bowl of clementines, is just the trick.
Simple Nut Tart
1 pastry crust, pressed into an 8″ square tart tin–baked blind
1 cups walnut–toasted
1 1/2 cups pecans–toasted
1 cup almonds–toasted
1/2 cup pine nuts–toasted
1/2 cup dark brown sugar
1/4 cup granulated sugar
2 Tbs honey
1/2 tsp kosher salt
1/4 cup water
1 oz whiskey
preheat oven to 350. place all nuts in a large bowl and mix until well combined. put brown sugar, granulated sugar, honey salt and water in a heavy saucepan. stir well, place on medium heat and bring to a simmer. allow to boil for about 3 minutes. carefully add the whiskey and bring back to a boil. boil for 2 more minutes. the sugar should get a bit syrupy, but should not smoke or turn excessively dark. keep a constant eye on the sugar. remove the sugar from heat and tip in the nuts. stir well, giving each nut a coat of syrup. immediately tip into the baked crust, gently and spreading to cover the entire crust. pop into the oven for 5-7 minutes. remove from oven and allow to cool before serving.
variations
-add orange juice in place of some water in caramel; a pinch of orange zest & a sprinkle of cinnamon to the nuts
-the addition of fresh rosemary when stirring the nuts into the caramel (light hand) make for a beautiful winter tart
–drizzle with bittersweet chocolate or drench in dark ganache
-substitute vanilla for whiskey
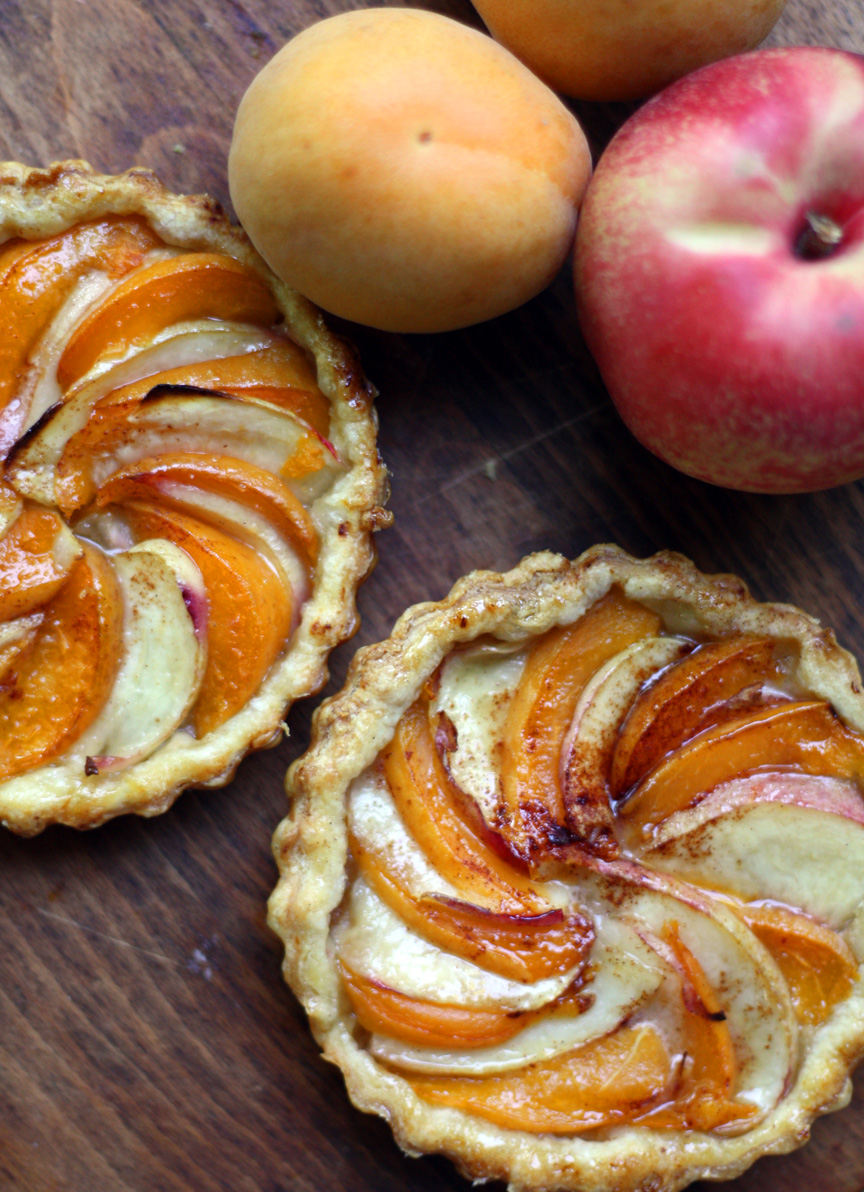
Simple Summer Tartlets
On August 13, 2012 by sixtyacrebakerThis is not a recipe. It’s more an idea of what can be done with fresh, peak of the season, fruit.
Simple Summer Tartlettes
nectarines
apricots
marzipan
puff pastry
sugar
cinnamon
Line tartlette pan with puff pastry, rolled to 1/8th inch thickness. Place in the refrigerator to get nice and cold. Meanwhile, thinly slice fruit, keeping skin on. Roll out marzipan to an 1/8th inch sheet and gently lay a round into the bottom of the pastry lined tin. Arrange fruit in a thin layer on top. Sprinkle a bit of sugar and cinnamon on top (like you would salt and pepper…do not be heavy handed). Bake at 400 until the pastry is browned and crisp (about 15-20 min). Serve with vanilla ice cream or a dollop of creme fraiche.
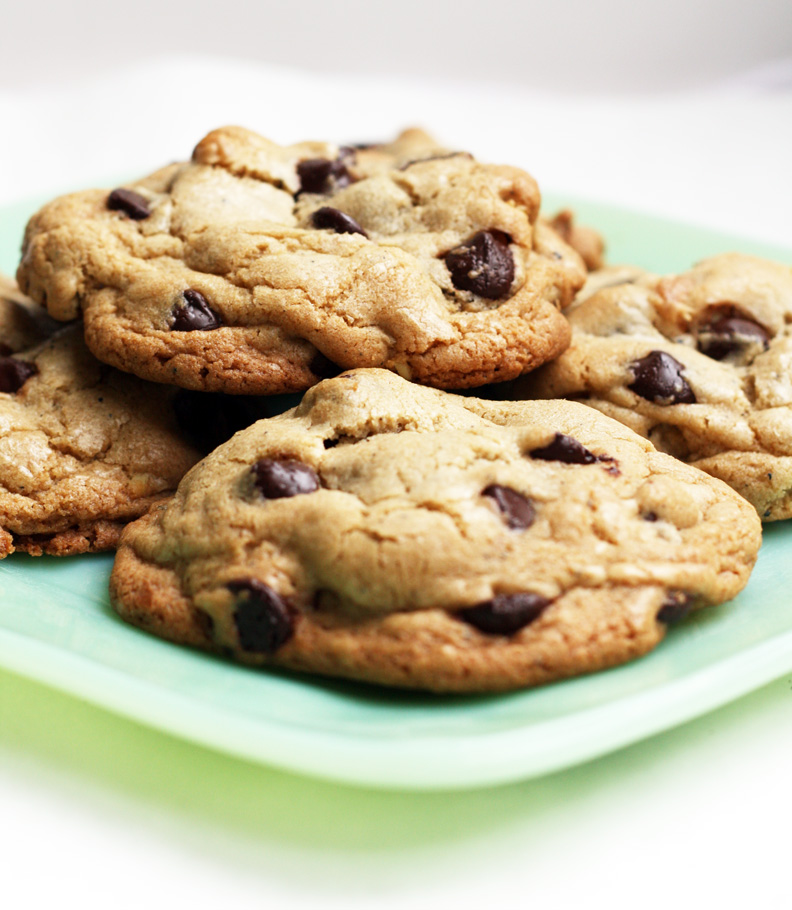
Browned Butter Chocolate Chip Cookies
On January 30, 2012 by sixtyacrebakerMayberry-esque after school tales of warm cookies and cold milk, aren’t mine. In my world cookies were for Christmas; fruit, yogurt, and cheese were snacks. I never quite developed a sensory memory for the ubiquitous toll house. Instead of invoking memories of backyard tag, championship games, and mom with flour dusted apron, I’ve been a bit bored by them. >em>Until Now. This is not my recipe. It came to me by way of a third-party. I have been told it was created by Cook’s Illustrated. It doesn’t surprise me in the least bit. This cookie is filled with notes of toffee, enough salt to tease your palate, the bite of bitter chocolate and manages to be both soft and crispy. The recipe is a bit fussy, but worth it. trust me….
Browned Butter Chocolate Chip Cookies
makes 16
from cook’s illustrated and only v.slightly changed
1 3/4 cups all purpose flour
1/2 tsp baking soda
14 Tbs unsalted butter–divided
1/2 cup granulated sugar
3/4 cup dark brown sugar-firmly packed
1 tsp kosher salt
2 tsp vanilla extract
1 large egg
1 large egg yolk
1 1/4 cup bittersweet chocolate chips
3/4 cups toasted walnut halves
Heat oven to 375F. Line baking sheets with parchment paper. Whisk flour and baking soda in a bowl and set aside. Heat 10 Tbs of butter in a skillet over medium heat, swirling continually, until it becomes a dark golden brown and it smells a bit toffee like. This should take about 3-5 minutes…the larger the skillet, the quicker the reaction. Remove from heat and pour butter into mixing bowl. Add the remaining butter and stir until it is melted. Add the sugars, salt and vanilla to the bowl and hand-whisk until mixed well. Add egg and egg yolk and whisk until smooth and begins to lighten in color a bit. Let rest for 3 minutes. whisk again for 30 seconds and let rest for 3 minutes. Do this procedure 2 more times. Use a wooden spoon or spatula to stir in the flour mixture so that it is just combined–do not over-mix. Stir in chocolate and nuts. Scoop out large balls (about 3 Tbs) onto to the parchment, placing about 2″ apart. Bake for about 10-14 minutes or until the edges are slightly browned. Cool on wire rack.
*the original recipe calls for table salt, semi -sweet chips or chunks and chopped pecans or walnuts. i prefer kosher salt, bittersweet (60-70% cocoa solids) and large pieces of walnut which is why i inserted them into the recipe. try it both ways and decide for yourself!
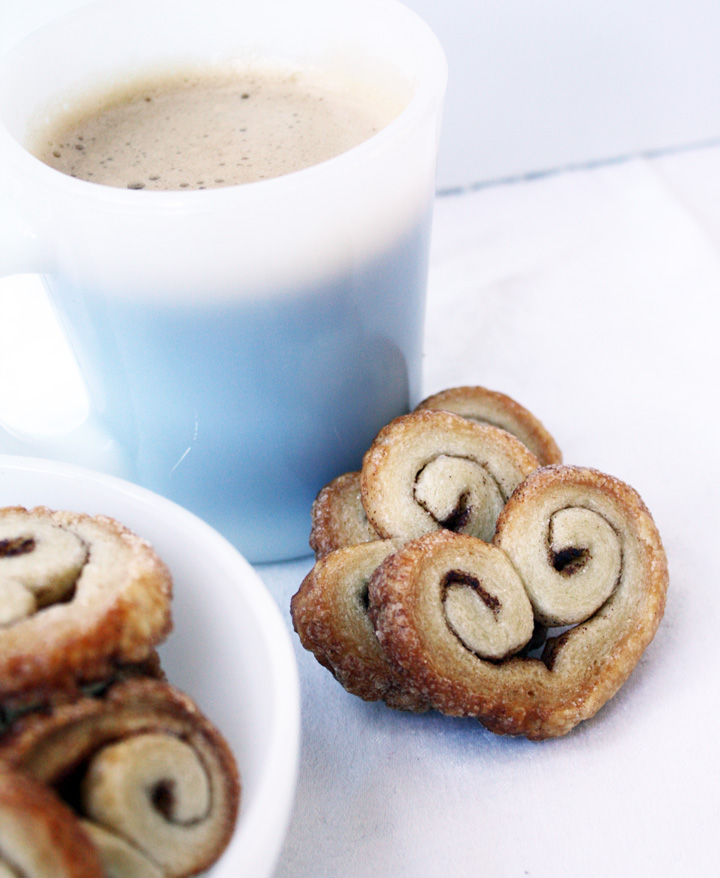
Heart Palmiers
On January 11, 2012 by sixtyacrebakerWe have neighbors with fabulous taste. Crown molding, silver service, art gallery lighting kind of taste. I almost wonder if Mike and I are their pro-bono friends. While residing in California, we rang in London’s new year together. Complete with champagne, caviar, and crown roast. Imagine my horror, as I catch from the corner of my eye, Mike, in all his glory with hands full of palmiers. With flaky crumbs falling to his beard and a smile as broad as his shoulders he was complimenting the hostess on her fabulous dessert. Turning to me, he gave a grand wink and said “you should make these”. So I did.
Simple Easy Heart Palmiers
1 sheet puff pastry–cold but not frozen
2 Tbs unsalted butter–melted
2 Tbs granulated sugar
1 1/2 tsp cinnamon
1/4 cup granulated sugar for dipping
Place puff pastry on a sheet of parchment. In a small bowl, mix together the 2 Tbs granulated sugar and 1 1/2 tsp cinnamon. Using a pastry brush, brush the butter evenly covering the entire piece of pastry. Evenly and liberally sprinkle the cinnamon sugar on top of the butter. Measure or eye the center of the puff pastry and gently score with the dull end of a knife (do not cut through). Starting on one end, tightly roll the dough to the center. Roll the opposite end to the center, forming what looks like a scroll. Gently press together, and if you would like an exaggerated heart shape, pinch the bottom to a point. Wrap in parchment and/or plastic wrap and place in the refrigerator to chill. After 1 hour and up to 24 hours, preheat the oven to 375F. Line a cookie sheet with parchment paper. Place the remaining 1/4 cup sugar in a saucer or shallow bowl. Remove the dough from the refrigerator and slice crosswise in 1/4″ sections. Reshape as necessary, then dip both sides in the sugar. Place on parchment paper approximately 1″ apart. bake for 12-15 minutes or until golden brown and crispy. Allow to cool a bit, but not fully before removing from the parchment. The sugar will cause them to stick if they cool too much. Allow to finish cooling on a wire rack.