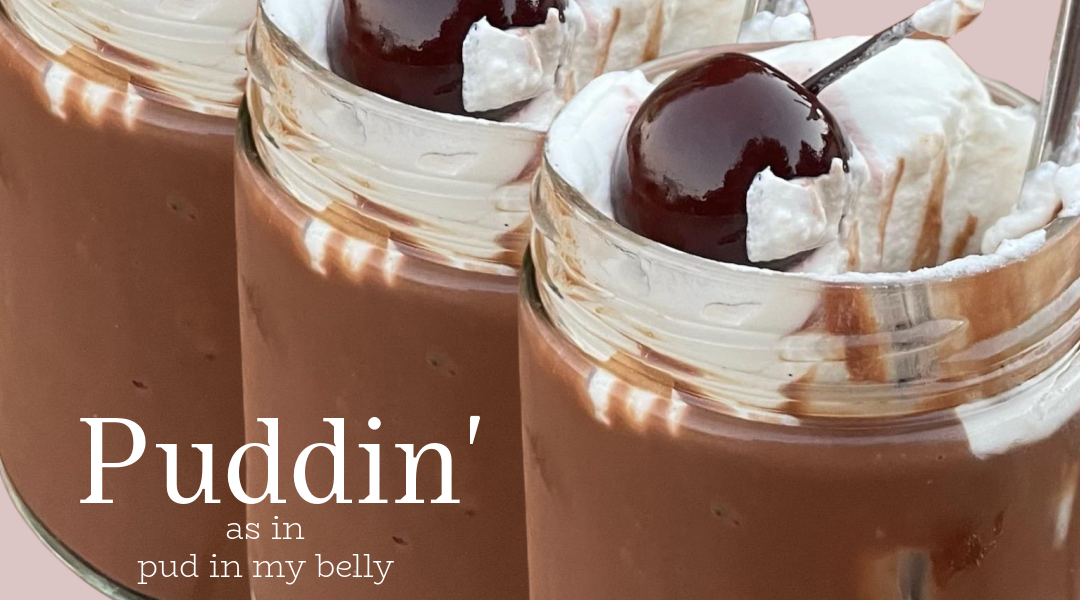
Chocolate Pastry Cream
On February 16, 2024 by Christy Larsenaka puddin’
I came a little late to the pudding game. If you have been following along for any amount of time, you know that I grew up in a only homemade, no convenience food home. Pudding stayed in its box, on the shelf of the grocery store. And…to be honest…whenever I had it a friend’s house, I kinda didn’t see the allure. Don’t even get me started on banana pudding–talk about gaslighting.
I knew pastry cream, because my mom would make it to put in her eclairs, but it took me a while to realize that pastry cream and pudding are basically the same. Except pastry cream uses whole milk enriched with egg yolks and butter, rather than only relying on cornstarch to thicken.
This recipe is very easy and will have you whipping up puddin’ on the daily. It is basically breakfast food
try and convince me otherwise
I enjoy it topped with gently whipped {unsweetened} cream or creme fraiche and a brandied or Amarena cherry for further indulgence
Ingredients
3 cups full-fat milk
3 duck egg yolks, or 5 large chicken egg yolks
1/2 cup granulated sugar
1/4 cup cornstarch
1/2 tsp kosher salt
1 tsp vanilla extract
7 oz bittersweet chocolate chips or chopped bar (63-70%)
1 oz unsalted butter at room temperature
Directions
- Whisk the egg yolks, cornstarch, and salt in a bowl until they are well incorporated
- Heat the milk with the sugar over low heat until it comes to a simmer
- Meanwhile place the chocolate, butter and vanilla in a separate bowl
- When the milk has simmered, use it to temper the eggs. This is done by slowly whisking the milk into the egg mixture to slowly warm the eggs.
- Turn the milk and egg mixture back into the saucepan and heat on low, while continually whisking, as it thickens quite a bit. Once you start to see bubbles forming, remove it from the heat
- Pour hot custard into sieve that is held over the bowl of chocolate/butter/vanilla and allow to fall over and melt the chocolate and butter. Discard any clumps of egg white remaining in the bowl of the sieve. Wait a few minutes, then whisk until butter, vanilla and chocolate are fully melted and incorporated.
- Enjoy warm with a bit of cold cream, or place bowl over a larger bowl of ice water and stir to bring temperature down to room temperature. Place a bit of plastic wrap directly on top to keep a skin from forming. If you like the skin, skip that part. Place in the refrigerator for several hours or overnight to chill completely.
- Serve cold with gobs of cream; cultured or whipped
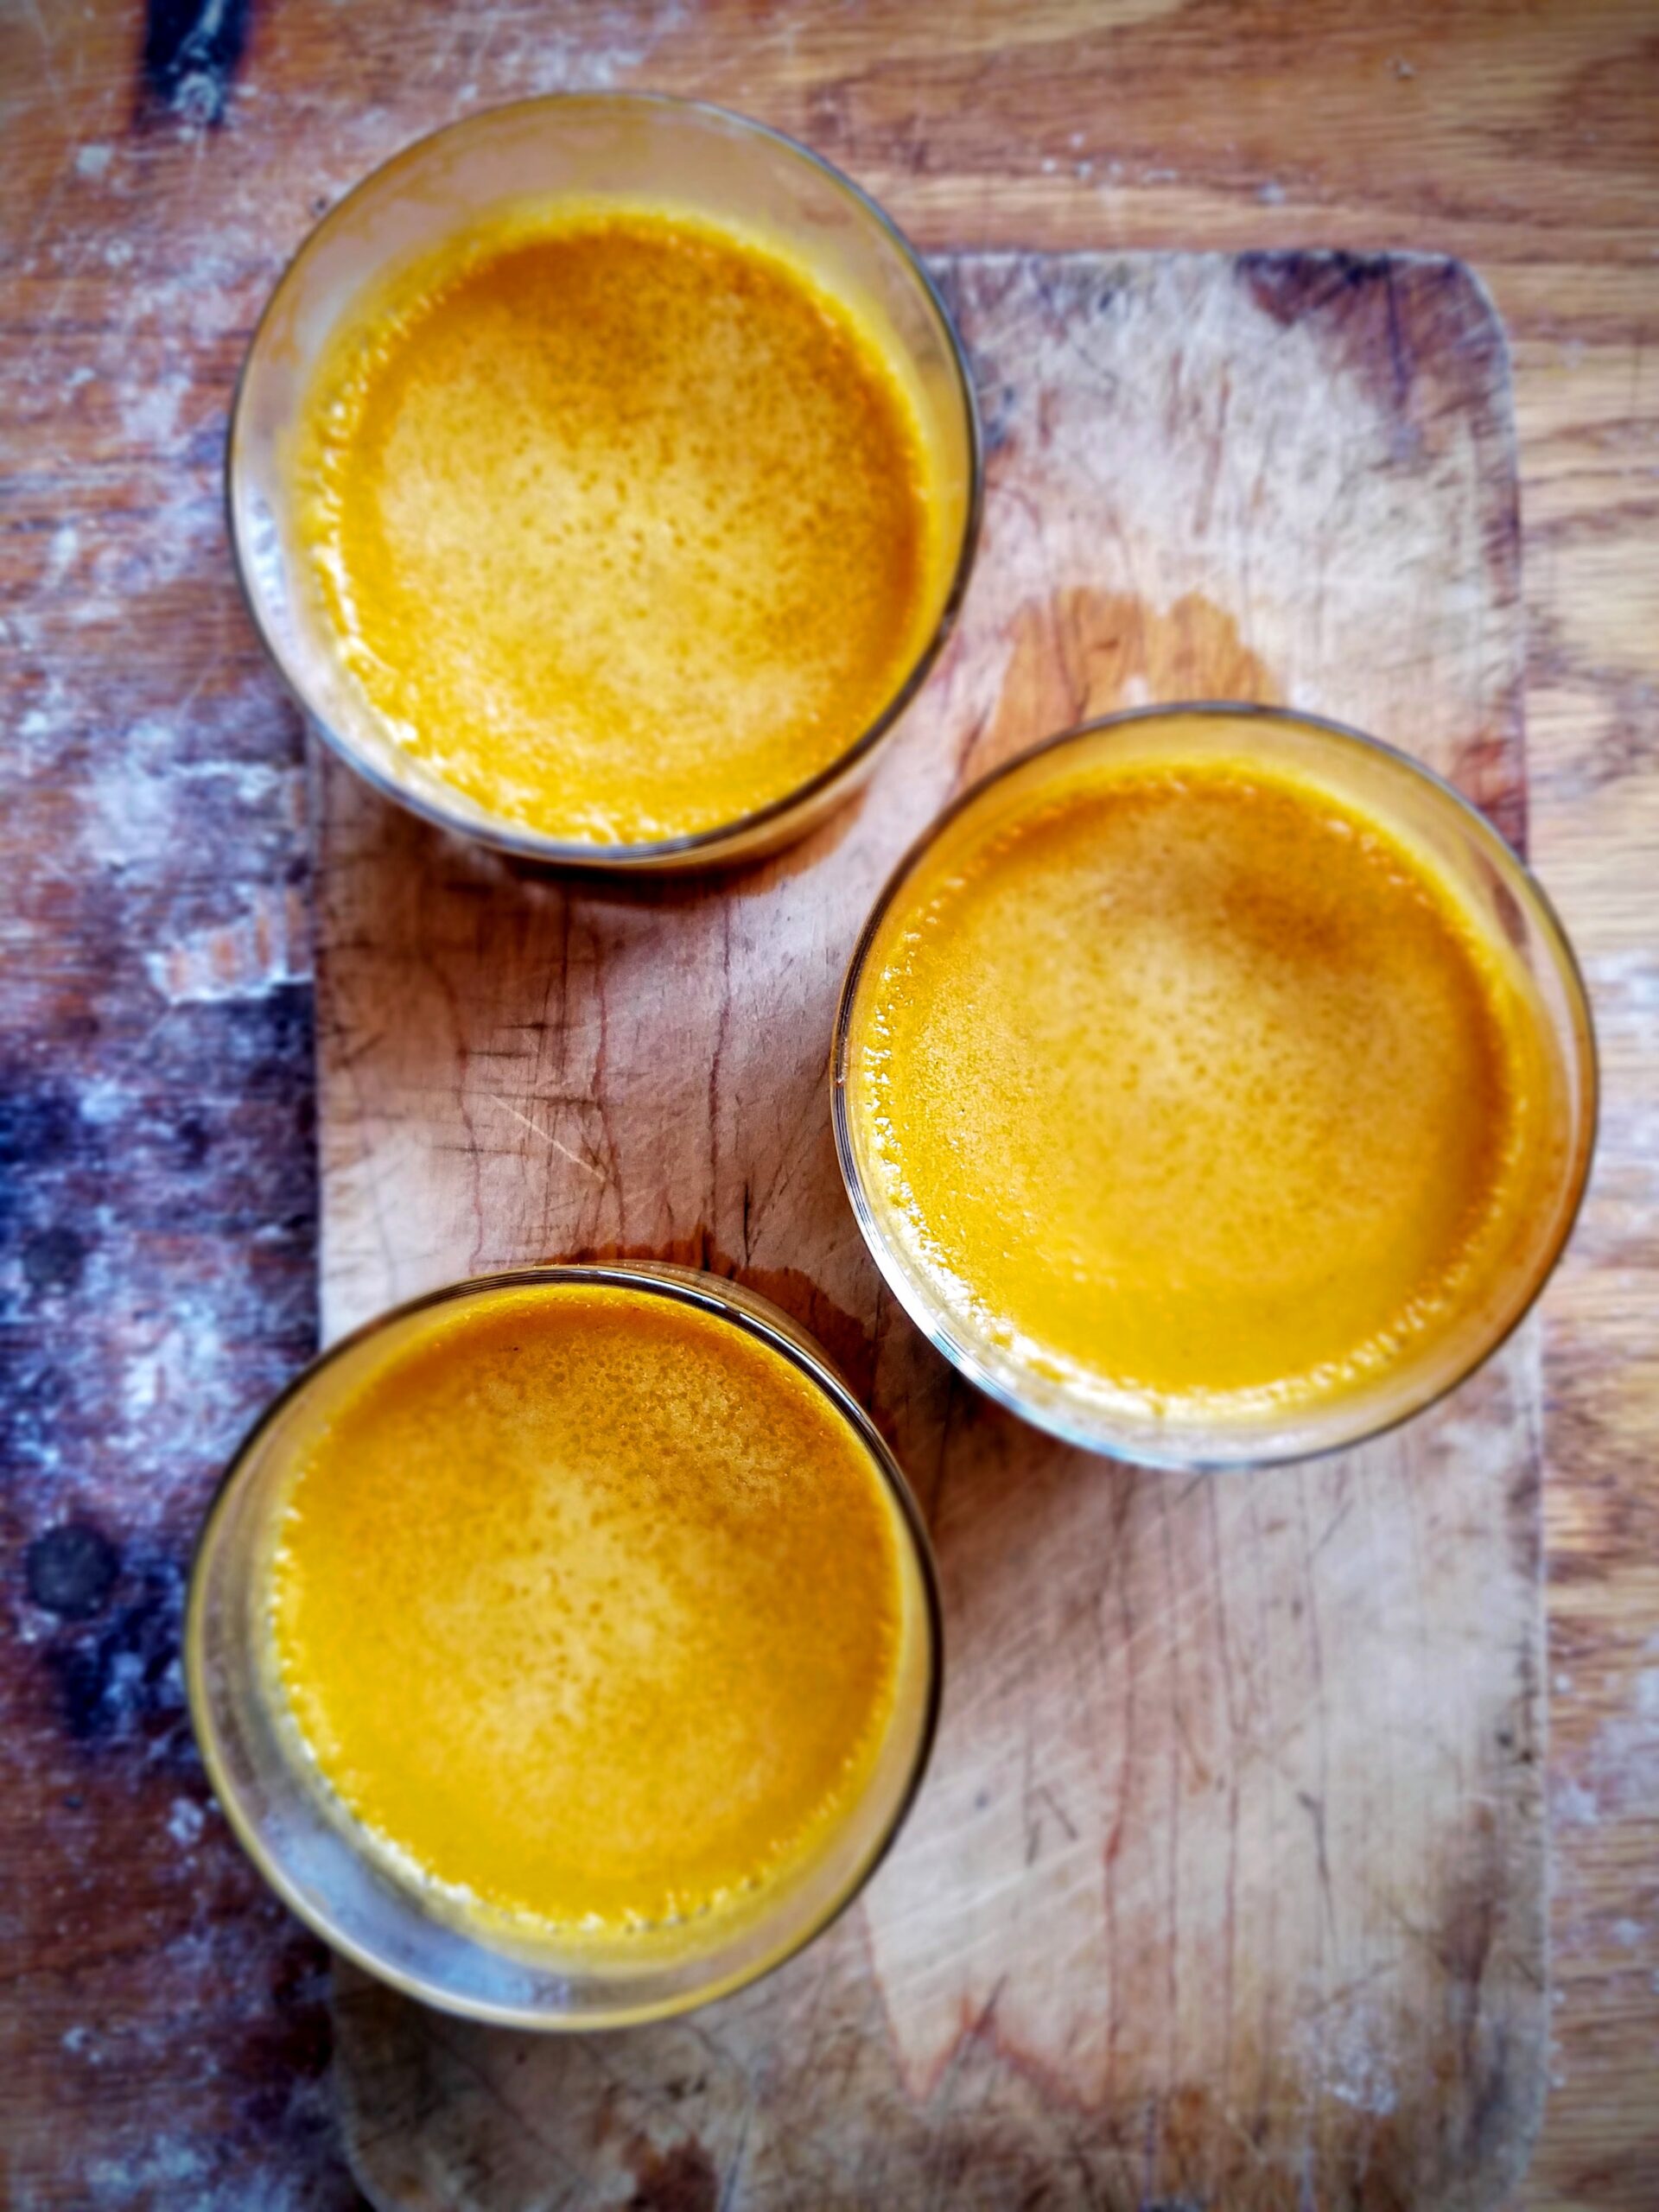
Pumpkin Pots de Creme
On September 11, 2016 by Christy LarsenI’m not much for the pumpkin spice hype that comes in play at the first sign of frost. I am however, a pumpkin fiend. I love it sweet, I love it savory. With butter, as butter, warm and spicy; it brings me joy. While we have ripe pumpkins coming off the vine this early September, I’m not quite ready to jump head first into pie mode. This time of year, when it is warm during the day, but the sunrise and set are accompanied by a slight chill, I make custard. Not quite a pudding, pots de creme are a perfect spotlight for a delicate blend of spices and rich pumpkin puree. Something quite important when making these….you must not overcook. Pull these out of the oven before they are fully set.
Pots de Creme
(makes 5-6)
1 cup pumpkin puree
5 egg yolks
1/2 cup + 2 Tbs dark brown sugar
1 cup heavy cream
1/2 cup whole milk {i use goat milk}
generous pinch kosher salt
1/4 tsp ground ginger
generous pinch cardamom, allspice, cinnamon, fresh nutmeg
whipped cream -for serving
If using fresh pumpkin puree, make sure it is very smooth. Set aside. Whisk {either by hand or with electric mixer} eggs and brown sugar until the sugar is completely melted and the eggs seem lighten in color and thicken a bit. Heat the milk, cream and salt in a saucepan until bubbles just start to form. Slowly whisk the hot milk into the egg until well incorporated. You are tempering the eggs with the hot milk. Whisk in the pumpkin puree and the spices. Run through a sieve into a spouted measuring cup. Use a spatula to scrape as many pumpkin solids as possible through the sieve. Give a good stir.
Pour into oven safe cups or small ramekins. This is meant to be served and eaten in small portions; think demitasse cups, tea cups, small bowls or ramekins. 4-6 ounces each.
Allow any air bubbles or foam to subside. Remove any remaining foam by skimming with a spoon.
Place in a cake pan or casserole dish. Place in an preheated 325F oven. Once in the oven, prepare a bain marie: pour enough hot water in the pan {careful to avoid getting water into the custard} to reach about halfway up the side of your custard cups. The bain marie will help to keep a constant temperature on the custard.
The length of time in the oven depends on the size of your baking vessel. Begin checking at 12 minutes. Tap the cup or bowl and look for gentle ripple (like that of a pebble in a pond). If you have a gentle ripple, then go ahead and remove from oven and allow to cool to warm in the water bath. If the custard isn’t quite done, continue to check every few minutes. If you check on them and they are completely firm, remove from the water bath immediately.
Do not put in the refrigerator hot, but place in the fridge once only slightly warm. Allow to chill completely and serve with a generous dollop of whipped cream
A properly cooked pots de creme is creamy, almost mousse like and silky. Once overcooked it can be a bit grainy and have an eggy flavor to it. Undercooked will result in a runny custard.
My Cheesy Manifesto
On January 15, 2015 by sixtyacrebakerThere is a huge difference between following a recipe and understanding why the recipe follows the path it does. Cheese making is a blend of science and art. I have been making cheese for quite sometime. I have success, and I have failure. The problem was that I didn’t really understand why; if following the same process time and time again, the results would prove different. The variables in cheese making are complex. There are ways to nurture the natural bacteria in milk and ways to try and beat them at their own game. But until I understood the difference between; morning milk and afternoon milk, winter milk and spring milk, high fat milk breeds and low fat milk breeds, raw and pasteurized milk, acceptable coliform and scary coliform, my experiments in cheese making would continue to be hit or miss. I took a short-course this past week that help me discern the difference. I came away with an understanding of the need to be flexible, while adhering to strict protocol. Sound confusing? Well that is because it kinda sorta is.
I’m going to be painfully honest. I don’t really even like cheese that much. As I write this, I am averting my eyes from the gaze of those words. I am ashamed. Let me clarify. I don’t hate cheese, I like it in small amounts and when it has good flavor. I’m into a good sharp cheddar, or truffled chevre, even a nice chunk of parmesan lights my world. However, I’m that girl that, when ordering french onion soup, asks them to go light (or not at all) on the gooey cheese top. I’m also the one that sneers at the over-cheesed pizza and grated cheese on a side salad. Rather humorous that I’m working so hard to get our goat herd up to level, so I can milk them to make cheese, no?
No.
I want to make good cheese. Cheese that makes its impression in small amounts. Cheese that you don’t have to eat an entire wheel of to realize you just ate cheese. Cheese from beautiful animals raised on quality grass and feed, with a nice life. I’d say happy. But I’m not sure how to measure happy in a ruminant. They aren’t miserable…that I know.
To make good cheese, so much has to happen even before the milk hits the creamery. Cheese making is the truth in “farm to fork” manufacturing. The most valuable thing I have learned, and it sounds really hippy dippy, is to let the milk tell me what kind of cheese to make. Yes, I can force and manipulate to get a facsimile of a type of cheese I like. That is the science. However, right now my plan is, to let the milk tell me what kind of cheese it should be. I’m going to sit with that for a while, as I make my plans for our little dairy business.
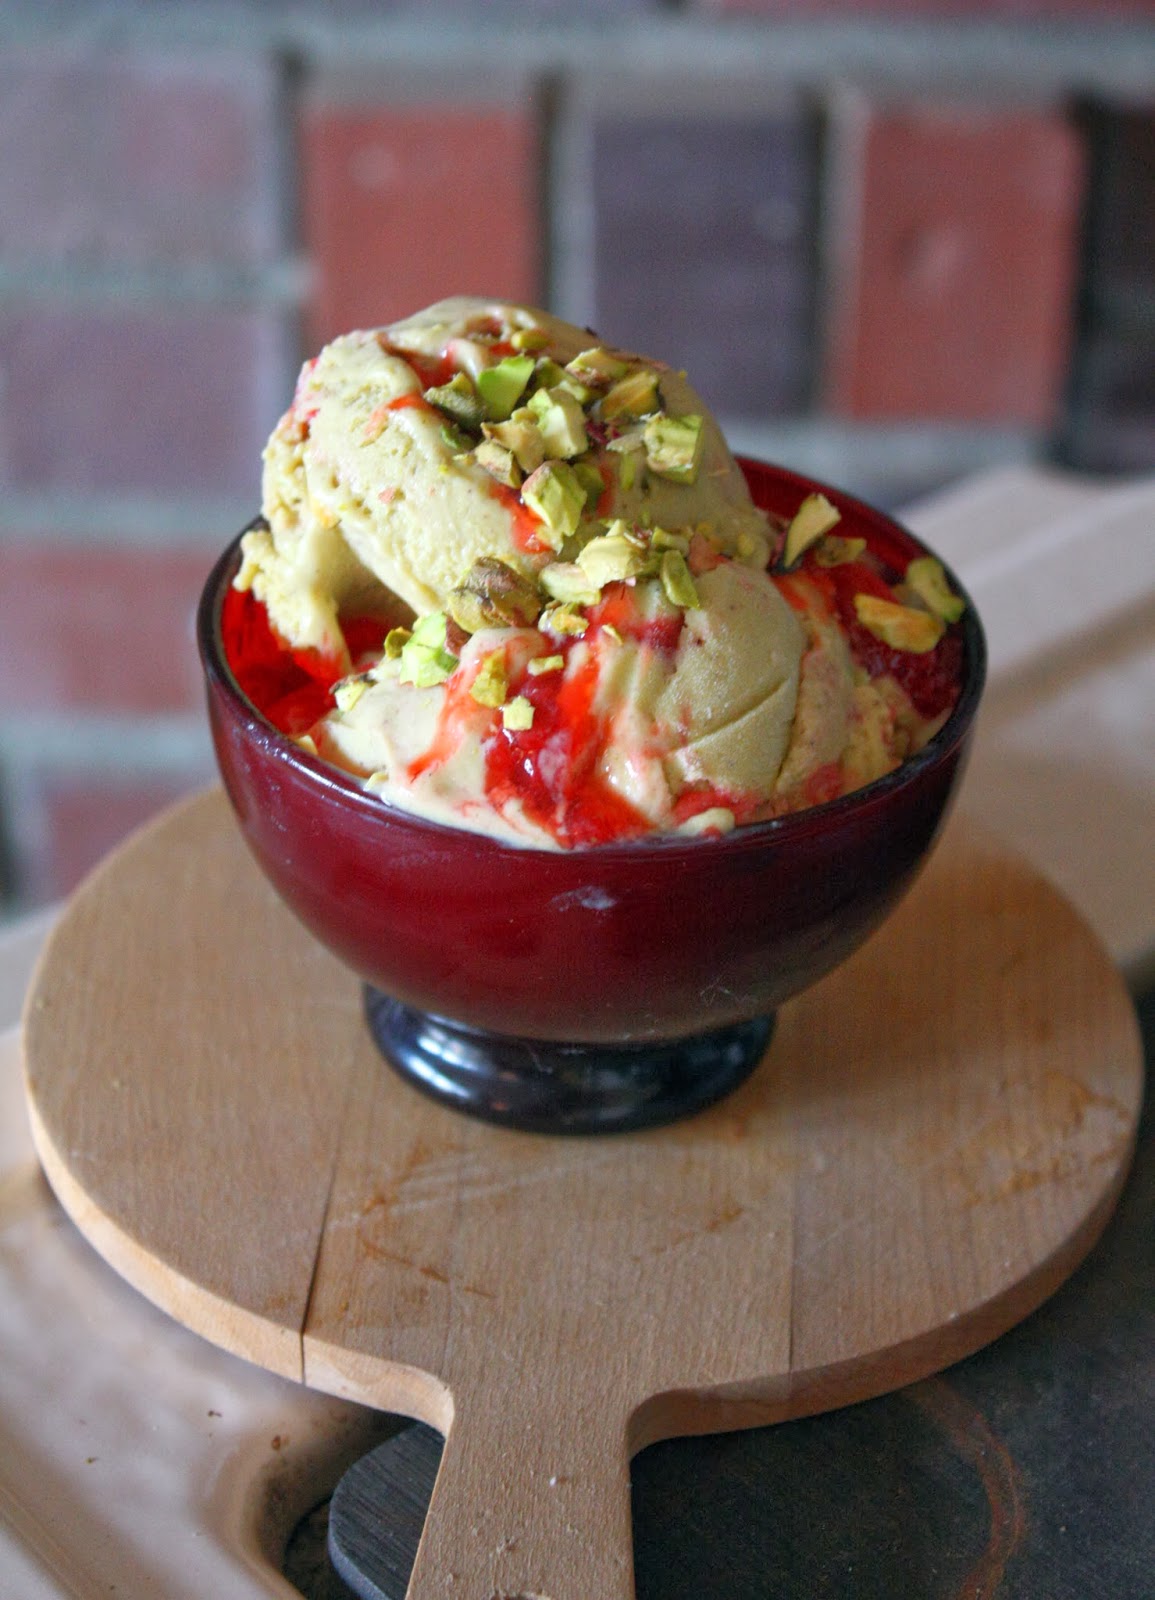
Pistachio-Strawberry Ice Cream
On March 12, 2014 by sixtyacrebakerA warm winter makes way for an early harvest of strawberries. Meandering down a country road this weekend past, i happened across a roadside stand loaded with berries and heaps of pistachios,locally grown. To keep up with our highly productive flock, I find myself dreaming up custards.
frozen custards
Frozen custards made from backyard eggs, fresh milk, and farmstand goodies.
pistachio-strawberry swirl ice cream
1 cup unsalted (roasted and shelled) pistachios
1 1/2 cups milk
1 1/4 cup granulated sugar
7 large eggs yolks
pinch salt (sea or kosher)
2 cups heavy cream
1 tsp vanilla
1 cup strawberry preserves
1/2 cup chopped pistachios (optional)
whisk the egg yolks, salt, and 3/4 cup sugar. place milk and the pistachios in a blender and puree until the nuts are completely liquid and smooth. add 3/4 cup sugar and place over low heat. warm to a simmer. remove from heat and whisk into the eggs and sugar mixture. tip back into the saucepan and cook over very low heat, stirring continually with a rubber spatula. do not allow to boil, and cook until it just begins to thicken to nappe. remove from heat and pour through a sieve into a clean bowl. stir in vanilla and heavy cream. refrigerate fromr 6 hours to overnight. freeze according to ice cream manufacturer instructions.
once the custard is frozen, transfer it to a freezer-safe container. swirl in the strawberry preserves and the chopped pistachios (if using)
*if you choose to make your strawberry preserves, simply place 2 cups of roughly chopped strawberries in a saucepan. taste for sweetness. squeeze the juice of 1/2 lemon. add sugar according to sweetness. add up to 1 1/2 cups of sugar (less if sweet strawberries, more if not sweet). cook at a simmer until strawberries break down and soften and they sit in a thick glaze.
refrigerate until needed
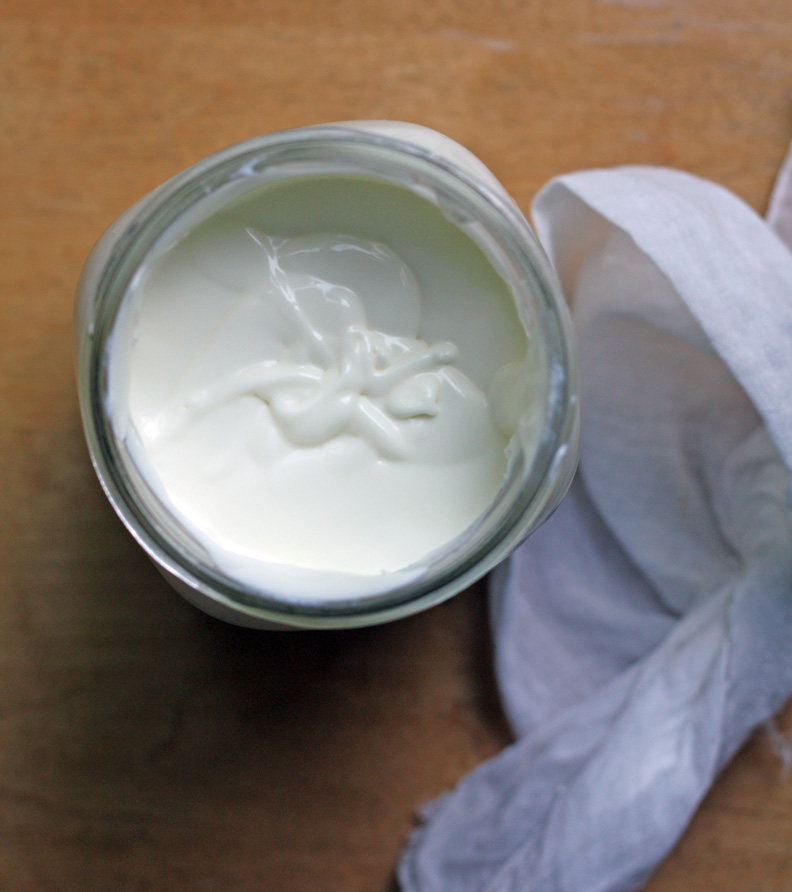
Creme Fraiche
On April 30, 2012 by sixtyacrebakerNo story. No fancy words. Just a simple plea. make.your.own. and use.it.liberally.
Creme Fraiche
3 cups heavy cream–room temperature
6 Tbs plain greek yogurt–room temperature
Stir the yogurt into the heavy cream. Put into a glass jar and cover with a bit of cheesecloth (to keep out bugs and dust, but allow for airflow). Let sit draft free at room temperature for at least 12 hours and up to 36 hours. The longer you leave it out, the more tangy it will become. Give it a good stir, it will thicken right before your eyes. Tightly cover and pop in the fridge.
enjoy where you would otherwise enjoy cream or sour cream
mix with a bit of brown sugar and pour over berries
stir into warm soup
create a calvados cream sauce for roast pork
pour over warm peas, carrots
or
cold beets
just for starters….
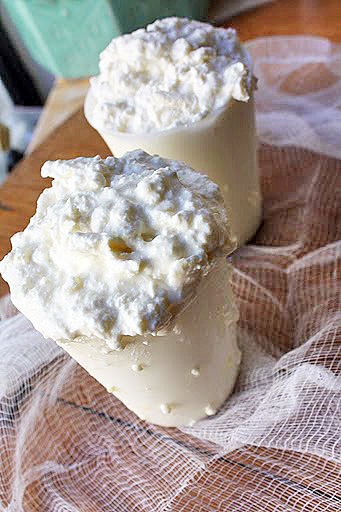
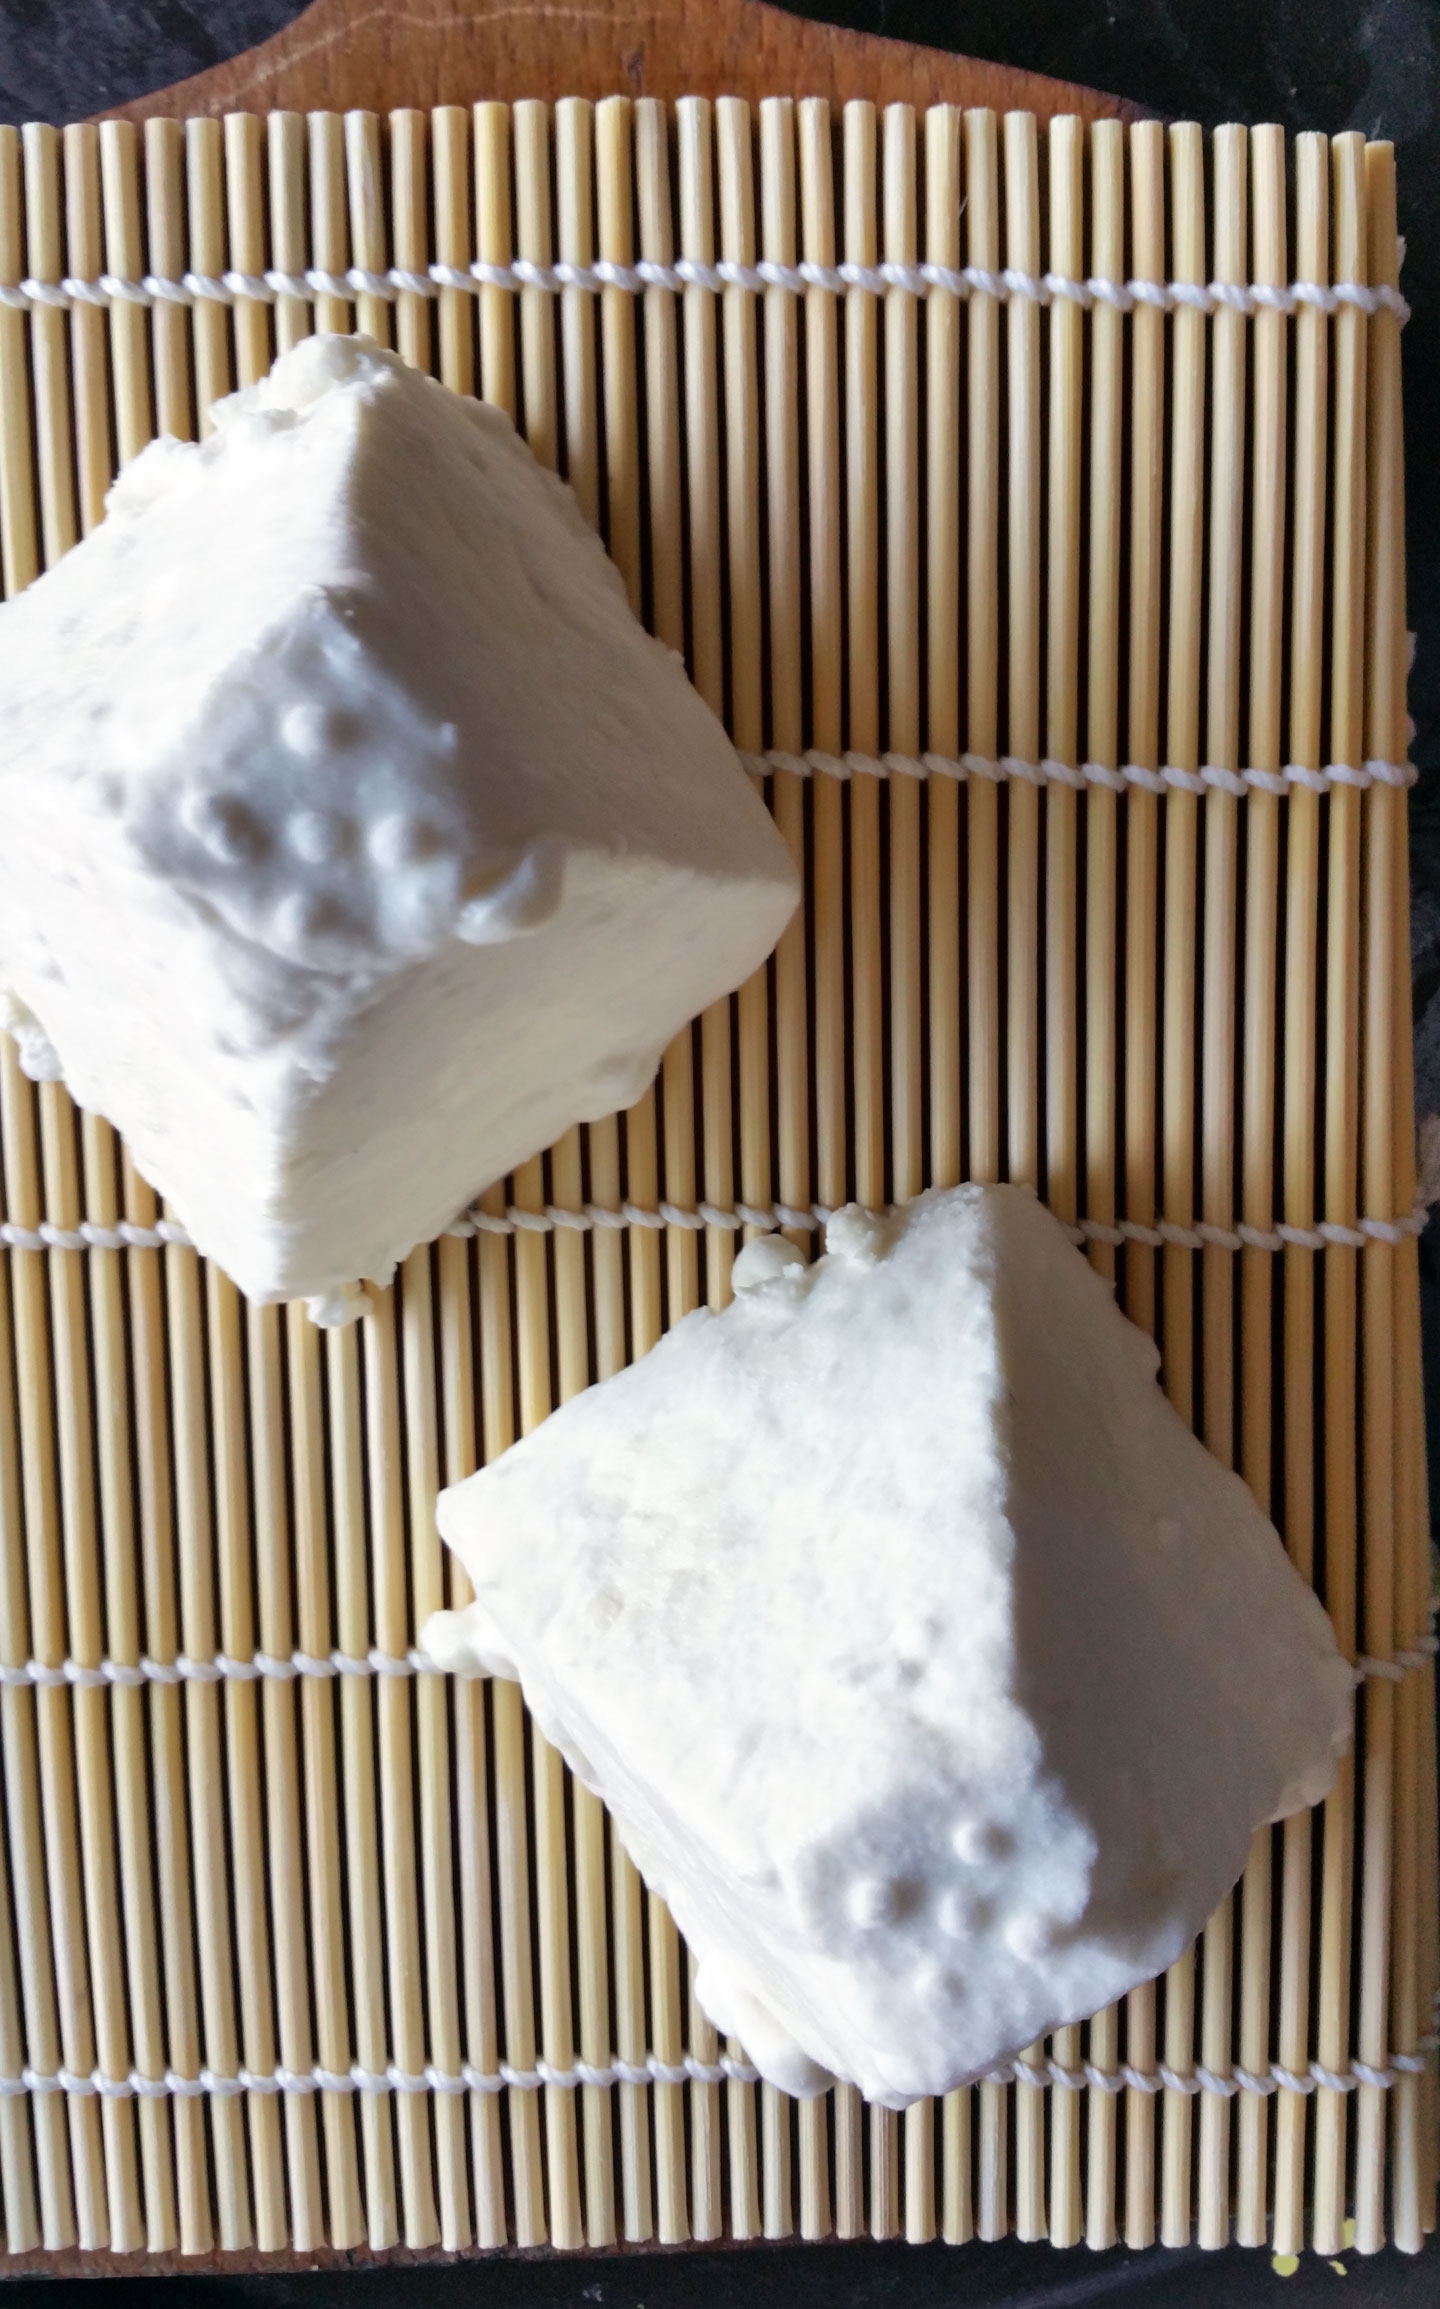
Fresh Ricotta
On March 24, 2011 by sixtyacrebakerHomemade ricotta is nothing like what you find in the supermarket; packed tightly into tubs with expiry dates a month long. It is naturally sweet with creamy curds and only lasts a few days. That is the good news. It is a bit time consuming,uses quite a bit of milk, and can be a bit of a mess. Last week cannoli was on my mind so I whipped up a pot of fresh ricotta. And when I say whipped, I mean spent an entire day preparing, cooking, skimming and draining. For my birthday, my friend gave me a beautiful cookbook
“my calabria” by rosetta costantino. Rosetta shares a family recipe for ricotta using a combination of milk and cream. It produces a large yield perfect for eating with a spoon, whipped into lemon pancakes,stuffed into cannoli shells, or sharing with friends.
Ricotta
*from my calabria
1 gallon whole milk
3/4 cup cream
2 tsp kosher salt
1 tsp rennet
1/4 cup cold water
Place the milk and cream in heavy pan and stir to mix well. warm over heat to 200-210F. Remove from heat and add the salt. stir to dissolve. Let the milk to cool to 100F. skim any foam or skin that forms on top of the milk. In a small bowl, mix the rennet with cold water. Stir the diluted rennet into the pot of milk, then leave undisturbed until the milk has visibly thickened, about 10 minutes. Cut a large “cross” in the milk. Stir quickly with a wooden spoon for 15-20 seconds to break up the coagulated milk. Using a perforated metal skimmer immersed in the milk,slowly and gently stir in one direction, so slowly that it takes about 20 seconds to make one revolution. Milk will begin to separate into curds and whey. Slowly pour off the whey through a cheesecloth lined colander, set over a bowl to drain. Let stand at room temperature until whey stops dripping from the sieve. Alternately, if you have ricotta baskets, you can use those to drain the curds. The ricotta should be covered with plastic wrap and stored in the refrigerator. It is best used within 2-3 days. This makes about 2 lbs
* I don’t throw the whey out…I use it. Mike and I use it in our smoothies and I give the dogs a bit of it in their kibble. It helps with a shiny coat. I can’t say the same for us humans.
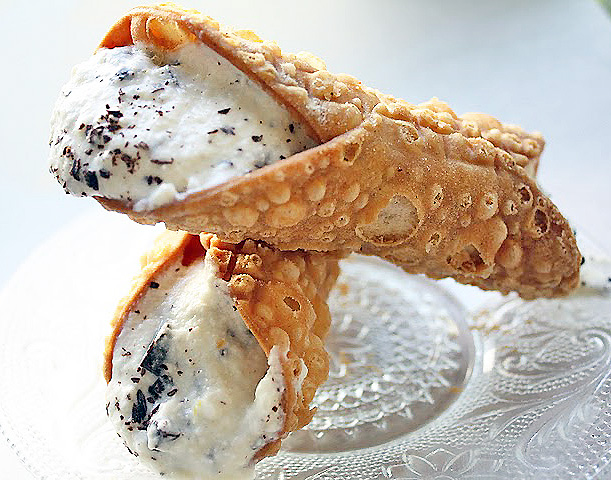
Cannoli
On March 19, 2011 by sixtyacrebakerOn March 19th Italians celebrate St. Joseph in gratitude. During a drought and subsequent famine, in Sicily, the faithful prayed to St. Joseph in hopes he would intervene. When the prayers were answered with rain and a successful harvest, the people of Sicily vowed to give thanks. Yearly. For eternity. Today, you may find Italians wearing red, praying in churches, preparing the altar and abstaining from meat. You will also find this Italian enjoying sweets. This is a day of reverence and joy. Last year I dispensed sage advice <em?if you want to read it, click here. This year you get a recipe.
Cannoli
shells
(you can buy them..there isn’t a prize for the person who slaves over hot oil all day making these)
2 cups all purpose flour
2 Tbs crisco or lard
1 tsp granulated sugar
1/4 tsp salt
3/4 cup marsala wine
1 egg–whisked with a bit of water
Combine the flour, sugar, salt and lard together. Slowly add the marsala while kneading the dough. Continue working the dough until it is well mixed and a rather hard dough is formed. Cover with plastic wrap and let sit an hour and up to 3 hours. Roll the dough out to 1/4″ sheet and cut with a 4-5″ round cutter. Quickly run a rolling pin over the rounds in 1 direction to form the rounds into ovals. Place a metal tube in the center of the oval and bring the sides up, overlapping enough to form the shell. Brush seams with a bit of egg wash to seal.
Heat oil in a pot. Drop the shells a few at a time into the hot oil and fry until they are light brown and bubbly. Remove from oil and place on greaseproof paper. Allow to cool long enough to handle, then slide the tube out and allow the shells to fully cool.
filling
1 1/2 lbs ricotta–drained to remove excess moisture
1/2 cup powdered sugar
pinch kosher salt
1/2 tsp vanilla
1 Tbs finely grated lemon peel
1 tsp fresh lemon juice
1/2 cup mini semi-sweet chocolate chips or chopped bittersweet chocolate
Mix all ingredients together and let sit in the refrigerator for a few hours for the flavors to meld. Filled cannoli shells tend to get a bit soft after time. If you want your shells to remain crispy, wait until you are ready to serve before filling them.