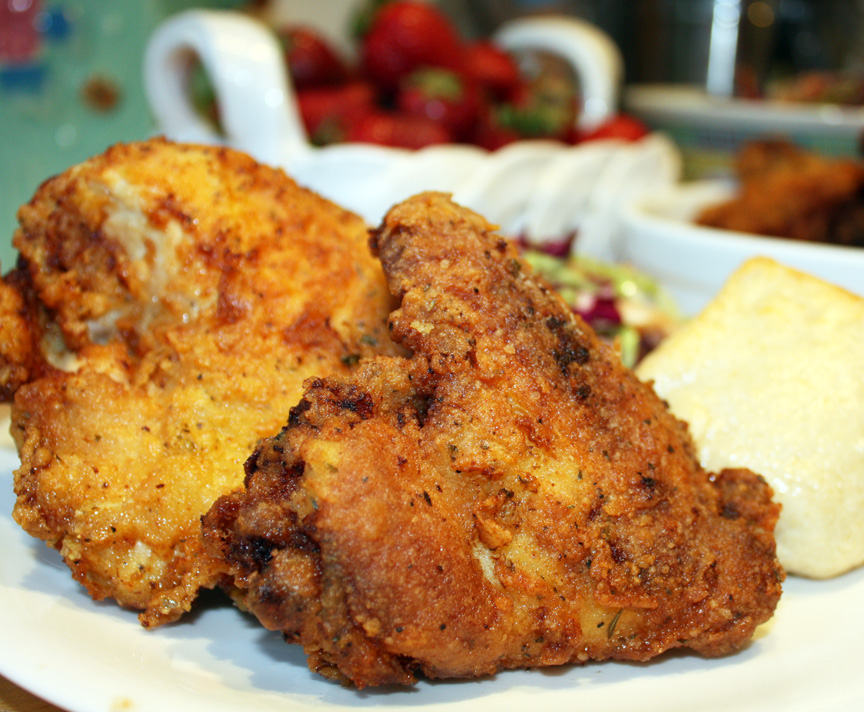
Buttermilk Fried Chicken
On August 24, 2012 by sixtyacrebakerMy last meal would definitely include fried chicken. To me, it invokes warm summer nights, picnic loaded convertibles driven by dapper gents, and running barefooted at the shore. Grand times and a happy childhood. Forget the trimmings. Serve me up a crispy breast, a slather of honey & leave me in my memories.
Buttermilk Fried Chicken
1 whole fryer chicken–cut into parts (or 8-10 of your fave pieces)
Tabasco
buttermilk
2 cups flour
1/4 tsp turmeric
2 tsp sugar
1 tsp onion powder
1/2 tsp dried parsley flakes
1/2 tsp dried thyme leaves
1/2 tsp dried marjoram leaves
1 tsp black pepper
2 tsp kosher salt
1/4-1/2 tsp cayenne pepper
1 tsp garlic powder
peanut oil for cooking
Clean and dry the chicken pieces. Place in a large freezer/storage bag. Give the Tabasco about 5 or 6 shakes into the bag, then put enough buttermilk in the bag to coat all chicken pieces. Mix it around a bit to insure every piece gets coated with tabasco and buttermilk. Place in the fridge and let “marinate” for 4 hours or overnight. Remove chicken from fridge about an hour before cooking to bring to room temperature (if it is a very hot kitchen, use your judgement on this). You do not want to put ice cold chicken into the hot pan, but you also do not want it to sit out for more than 1 hour. Heat peanut oil in a heavy bottomed pan (i use a cast iron skillet), to about half-way up the sides. Meanwhile, prepare the flour. Mix the flour, turmeric, sugar, onion powder, parsley flakes, thyme, marjoram, pepper, salt, cayenne, and garlic powder in a shallow dish. Remove chicken pieces from the buttermilk and immediately drop into the flour mixture. Coat evenly and generously. Drop into the hot oil and be patient. Do not crowd the pan…do it in several batches if necessary. The chicken will take about 10-13 minutes per side depending on the size of each piece. Dark meat takes a bit longer, so put it in the oil first. Turn each piece only once…and keep the oil below 375..but at or above 350. Remove from oil and drain on brown paper or other kitchen paper

Simple Summer Tartlets
On August 13, 2012 by sixtyacrebakerThis is not a recipe. It’s more an idea of what can be done with fresh, peak of the season, fruit.
Simple Summer Tartlettes
nectarines
apricots
marzipan
puff pastry
sugar
cinnamon
Line tartlette pan with puff pastry, rolled to 1/8th inch thickness. Place in the refrigerator to get nice and cold. Meanwhile, thinly slice fruit, keeping skin on. Roll out marzipan to an 1/8th inch sheet and gently lay a round into the bottom of the pastry lined tin. Arrange fruit in a thin layer on top. Sprinkle a bit of sugar and cinnamon on top (like you would salt and pepper…do not be heavy handed). Bake at 400 until the pastry is browned and crisp (about 15-20 min). Serve with vanilla ice cream or a dollop of creme fraiche.
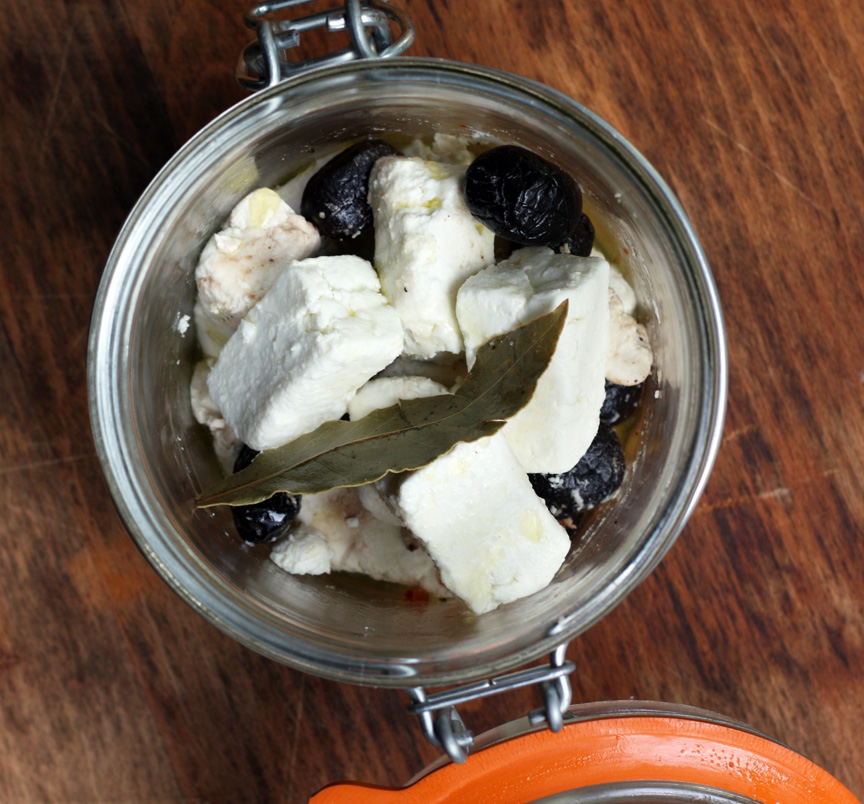
Feta Cheese
On August 4, 2012 by sixtyacrebakerMaking cheese can be labor intensive, but it is not difficult. It requires attention to detail, a super clean work area, a few specialty ingredients, and patience. Feta cheese is aged in a brine; making it salty and creamy.
Feta Cheese
1 gallon pasterized goat’s milk (do not use ultra-pasterized)
1/4 tsp aroma B mesophillic starter
4 drops (double strength*) rennet
1/4 cup non-chlorinated (bottled) water
butter muslin
flake sea salt or kosher salt
for brine
8 cups water
1/2 cup kosher salt
Heat the goat’s milk slowly in a large heavy stock pot to 74F. Remove pot from the flame and burner (but leave on stove), and gently stir in the mesophillic starter. Allow to sit for 10-15 minutes before moving on to the next step.
Meanwhile, mix the rennet into the 1/4 cup water and after the wait time, gently stir into the milk pot. Do not scrape the sides or bottom of pan, but gently stir for about 2 minutes. Cover the pot and leave on the back of the stove undisturbed for 12 hours. the objective is to keep the milk at the 74F for the entire time
After 12 hours, gently ladle the curds into a muslin lined colander (over a bowl if you wish to keep the curds). Allow it to sit uncovered for 1 hour. After 1 hour, tie the ends of the butter muslin to create a pouch that can be suspended or hung**. I tie the pouch to my sink faucet and allow the curds to drain directly into the sink. It is also easy to run a wooden spoon through the knot and suspend the pouch over a deep pot. Allow the curds to drain for a full 12 hours. Open the pouch remove the curd mass (it should be fairly stable) and flip it over. return it to the butter muslin and suspend for an additional 12 hours.
**an alternative: after you have drained the curds for the initial 1 hour, you can transfer the curds to a muslin lined plastic tomato basket, flipping every couple of hours. this will give you a more uniform shape.
remove the curd, which should now be quite firm, from the cheesecloth and place on a draining mat, or surface that has small holes (cooling rack, pizza pan, bamboo mat). Cut the curds into desired size (about 1″x1″ or larger for interesting presentation). Lightly salt all sides of the pieces and allow to dry for 3-5 days uncovered in your refrigerator. you are looking for the pieces to become a bit yellow on the edges. Prepare your brine with enough advance that it is cooled to approx 60F by the time you are ready to use it (you can store it in the refrigerator if made in advance). To prepare the brine, simply boil the water and add the salt. stir to dissolve completely.
When ready to brine, place the dried cheese pieces in a glass jar, careful not to jam and pour the brine over. cover the jar and brine the feta for 2-3 weeks before enjoying. You will notice the flavor builds as time progresses. If stored properly, this will last about 6 months (although i dare say it is so delicious, it probably won’t make it that long!)
I find the brine a bit salty, so I quickly rinse my feta in non-chlorinated water, and gently dry with a paper towel before eating. It is delicious & beautifully presented with strong black olives, a bit of hot pepper, and a drizzle of olive oil.