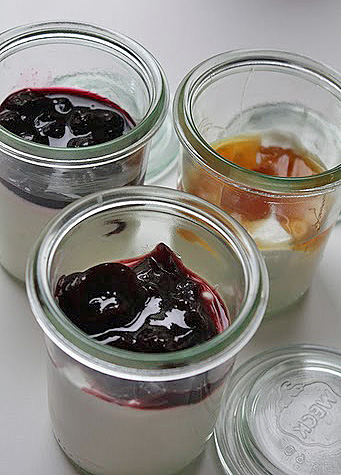
Homemade Yogurt
On April 27, 2011 by sixtyacrebakerMy mother is not a hippie. She would never be mistaken as “granola”. Birkenstocks have never graced her perfectly manicured feet. However, when I was a kid, the dogs were fed brewer’s yeast, our bread came from the health food store, red dye no. 2 was banned from the house, and our yogurt was homemade. I thought it was so lame. My friends were eating yogurt with dreamy flavors of coffee, chocolate, and lemon swirl, while I was being brainwashed. Brainwashed to believe that mine, while not sweet like pudding,was filled with acidolphilus. It would be myy best defense against turistas, if ever I found my 8 year old self in Mexico with a head of unwashed lettuce in one hand, and a tall glass of tap water in the other. Here in lies the rub. Now as an adult, I love homemade yogurt and find myself extolling the virtues of good bacteria without apology, to anyone who will listen.
Homemade Yogurt
1/2 gallon milk (i use 2%)
1/4 cup good quality plain yogurt-room temperature
jams, jellies, honey, fruit–to serve
Preheat oven to 185F. Heat milk in a pot that will best retain temperature over low heat until it reaches 185F. Once it reaches the desired temperature, pop it into the preheated oven and allow to sit for 30 minutes. Remove from oven and allow the milk to cool to 110F. When the milk has cooled to 110F add the yogurt and stir well. It is important to keep the milk at 110F for the next 7-10 hours.(i have a warming oven that i use which will keep a consistent low temperature. Other methods can be a warming pad, creating a foil tent over a electric skillet, testing the residual heat of an upper oven, while the lower oven is on, placing the pot in a water bath and keeping the water at 110F) After 7-10 hours you will see thickened milk soaking in the whey. Give this a good stir, then spoon into containers and place in the refrigerator for at least 12 hours before eating.
What I do next is not necessary, but Mike and I have different ideas about how thick yogurt should be. I like mine extra thick, he doesn’t. I place the yogurt in a sieve lined with cheesecloth over a large bowl, and let it sit for a few hours or overnight. The yogurt becomes the consistency of cream cheese, and the whey collects in the bowl. I place the yogurt in one container and the whey in another. When I make up my pots of yogurt, I whisk in enough whey to achieve the desired consistency. The extra thick yogurt is great as a spread on bread or for flavored dips.
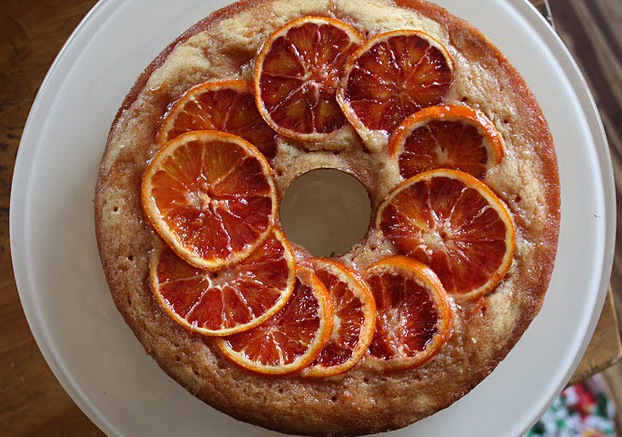
Sugared Orange Tea Cake
On April 20, 2011 by sixtyacrebakerHey. Remember those oranges that I sugared and canned? Remember how I promised to make lots of good things with them. Well, I don’t break a promise. So here is my first creation; a gorgeous and moist cake perfect with a cup of tea
Sugared Orange Tea Cake
1c + 2Tbs unsalted butter–room temp
2 cups all purpose flour
1 tsp baking powder
1/2 tsp kosher salt
1/2 cup dark brown sugar
1/2 cup granulated sugar
4 large eggs–room temperature
1 tsp vanilla
10-12 sugared oranges
orange syrup (from oranges)
Whisk together the flour, baking powder, salt and baking powder in a bowl. In a mixer fitted with a paddle attachment, beat the butter and sugars until light and fluffy. Add the eggs one by one mixing thoroughly after each one, careful to clean the sides of the bowl as you go. Add the vanilla and beat once again. Make sure the batter is thoroughly whipped before stirring in the dry ingredients. Once you add the dry ingredients, be careful not to over mix. Pour into prepared cake pan (greased and floured). Smooth the top and lay the oranges on top, overlapping a bit. Bake at 325 until a toothpick inserted in the center comes out clean, about 50 minutes. After cake is removed from the oven, but not yet cooled, pour a bit of the orange syrup on top, allowing it to completely soak in before adding more. Do not add more than 1/3 of a cup.
*you can add a bit of grand marnier to the syrup if you like. you can also make a nice icing of confectioner’s sugar with the orange syrup and drizzle for a lovely presentation.
allow to cool completely before removing from cake tin.
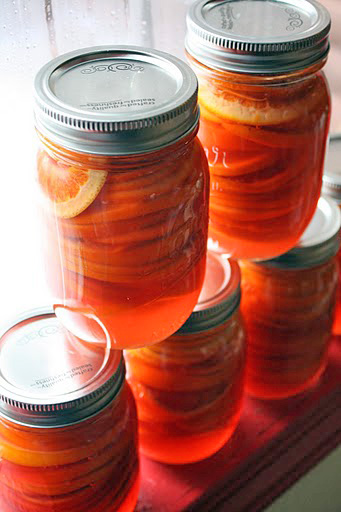
Sugared Oranges
On April 15, 2011 by sixtyacrebakerA couple of weeks ago my good friend Julie handed me two grocery bags stuffed full of blood oranges. Gobs and gobs of amazingly sweet, stunningly hued orbs of delight. Best part. They were all mine. For the past fortnight, I have been concocting
all sorts in my kitchen. First up: sugared oranges.
Sugared Oranges
*to make approx 9 pint jars
blood oranges-or thin skinned oranges
(this recipe uses about 180-200 orange slices)
granulated sugar
ground ginger (optional)
6 cups granulated sugar
3 cups water
1 cup blood orange juice
2-1″ knobs of fresh ginger
Choose your oranges carefully. Make sure they have thin skin and that they are not so large that they will not fit into the jars you are going to preserve them in. Slice the oranges in rings no thicker than 1/8″ beginning at stem end. Arrange in a casserole dish in a single layer, slightly overlapping. Once you have your first layer, sprinkle sugar to lightly cover. Lightly sprinkle ground ginger on top as well (no more than 1/8 tsp per layer). Continue with a second layer of oranges and repeat with the sugar and ginger. Continue until you have reached your desired number of orange slices. Remember to reduce the amount of syrup if you are reducing the number of oranges. Sprinkle sugar and ginger on the top layer of oranges, cover with plastic wrap and allow to sit for an hour at room temperature. After 1 hour or up to 2 (if waiting longer than 2 hours, place in refrigerator) lightly pack your oranges into sterilized jars–each pint jar will hold approximately 20 pieces.
make the syrup
Place the sugar, water, blood orange juice and ginger in a saucepan over medium heat. Add the leftover juices from your oranges as well. Bring to a boil and stir until the sugar is completely dissolved and the syrup appears clear. Remove from heat. Using a ladle, spoon the hot syrup over the oranges, making sure there are no gaps of air. Use a knife to maneuver the oranges so the syrup can seep through. Leave a 1/4″ gap at the top of the jar. Seal the jar and process in a water bath per standard canning methods.
I processed my jars for 20 minutes at high altitude, but i cannot guarantee that this method will be appropriate for your batch.
And now for the big question: what would you use these for? Well, coming soon is a cake recipe using sugared oranges. You can also use for cocktail garnish-using the syrup in the beverage. Dry them in a slow oven and dip in chocolate. Top cupcakes and cheesecakes. Sweeten your morning yogurt. Garnish grilled chicken. The list is endless…
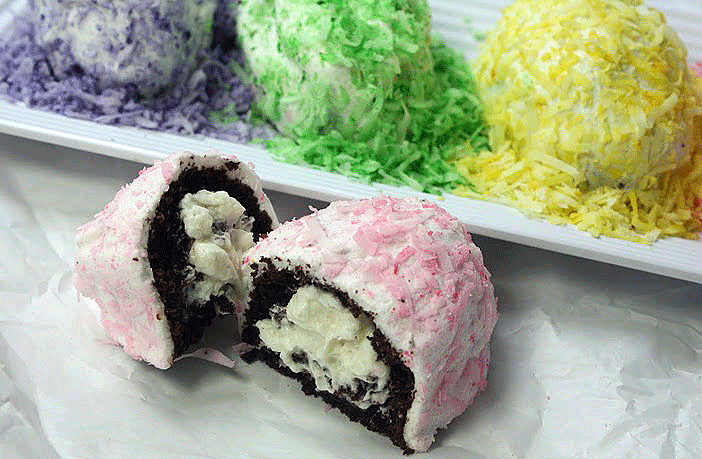
Sno-Eggs {Hostess Knock Off}
On April 13, 2011 by sixtyacrebakerMy mom was an, eat a piece of fruit if your hungry kind of mom. Cakes, cookies and pastries were for special occasions. After dinner, a bowl of fruit, platter of nuts and maybe a hunk of cheese would be placed in the middle of the table. We would solve the world’s problems while the coffee brewed. If I wanted a store bought, cream filled delight, I had to eat at a friend’s house. I have still never tasted an actual hostess snowball. But I get the gist. When I found a fabulous vintage cake pan, with rows of hand-size eggs, at a local shop, I couldn’t wait to make cakes. Cakes with creamy filling, robed in sticky marshmallow, and covered with dreamy pastel-painted coconut.
Marshmallow Cakes
makes approximately 18
Devil’s Food Cake
3 oz bittersweet chocolate chopped
1 1/2 cups hot coffee or hot water or mixture of the two (i use espresso with water)
3 cups granulated sugar
1 1/2 cups cocoa powder
2 1/2 cups flour
2 tsp baking soda
1 tsp baking powder
1 1/4 tsp kosher salt
3 extra large eggs
3/4 cup vegetable oil
1 cup sour cream + 1/2 cup milk or 1 1/2 cups buttermilk
1 tsp vanilla
Melt bittersweet chocolate in hot water/coffee. Sift dry ingredients together (including sugar). Mix together the chocolate/coffee mixture, milk, sour cream and vanilla. In a mixer beat the eggs with the oil until thickened and doubled in volume (about 3-5 minutes). Alternately add the dry and wet ingredients to the mixer, beginning and ending with the dry ingredients. Mix until just incorporated. Butter, or spray cake pan and dust with cocoa powder. Fill to 3/4 full and bake in 350 oven until tester comes out clean. Allow to cool completely.
Cream Filling
1 cup milk
5 Tbs flour
1 1/2 cup powdered sugar
1/2 cup shortening–room temperature
3/4 cup unsalted butter–room temperature
1/2 tsp vanilla
1/4 tsp salt
Over low heat, cook milk and flour in a saucepan until it makes a thick paste. Use a whisk to break up lumps. Let cool. In mixer using whisk attachment, beat shortening, butter, sugar, salt and vanilla. Add in cooled flour paste and whip until light and fluffy. Add more sugar if you want a sweeter taste.
Marshmallow Topping
3/8 oz (1 1/2 pks) unflavored gelatin
1/4 cup cold water
1 cups granulated sugar
water
pinch
1 large egg whites
Put sugar in a saucepan. Add enough water to make a mixture that looks and feels like wet sand. What is most important is that all sugar has the same amount of moisture. place over low heat. Cook until it becomes a sugar syrup of 235-240 degrees. It should have the consistency of corn syrup. Meanwhile…place room temperature egg white into the bowl of your mixer. Add the salt . Also, prepare gelatin. Place 1/4 cup water in a bowl. Sprinkle the gelatin evenly over the water. Let bloom.
Once the sugar syrup is ready, turn off heat and let sit for a couple of minutes…not too long. Start your mixer on low and get the whites to foamy. Mix the gelatin into the sugar syrup and stir until melted completely. Bring the saucepan over to the mixer and turn it to high. Slowly pour the sugar syrup into the bowl, careful not to hit the whisk attachment. Leave on high and mix until the mixture is warm, but full volume and comes to a peak. While it is still warm, pour over your cake(s)
Do not make your marshmallow until you are ready for it. marshmallow sets up quite fast, if possible get someone to help you, this will help it go both smoothly and quickly.
Colored Coconut
Simply take about a cup of sweetened flake coconut and place it in a ziploc bag. Drop in 2-3 drops of food color and close the bag. Massage with your hands until all coconut has a bit of color in it. Set aside until you are ready to use. Do not make your marshmallow until you are ready for it. marshmallow sets up quite fast, if possible get someone to help you, this will help it go both smoothly and quickly.
when you are ready, arrange your filled cakes on parchment paper in groupings of what color you will be topping them with
To Assemble
Using a pastry bag with a “fill” tip, squeeze about 2 Tbs of cream into the center of the cake through the large end of the egg. When you are ready, arrange your filled cakes on parchment paper in groupings of what color you will be topping them with. Make your marshmallow topping. While the marshmallow topping is still slightly warm, but is perfectly fluffed, stop whipping. Immediately begin topping your marshmallows, simply by pouring a bit of marshmallow on top. If you are doing this alone, stop after every two or three and generously sprinkle the coconut on top and sides. If you have a helper, allow them to immediately follow you with the coconut. Your marshmallow will set up within 5 or so minutes. Don’t panic, just be aware.
I think these would be just darling wrapped and hidden in the garden for a truly joyous easter egg hunt

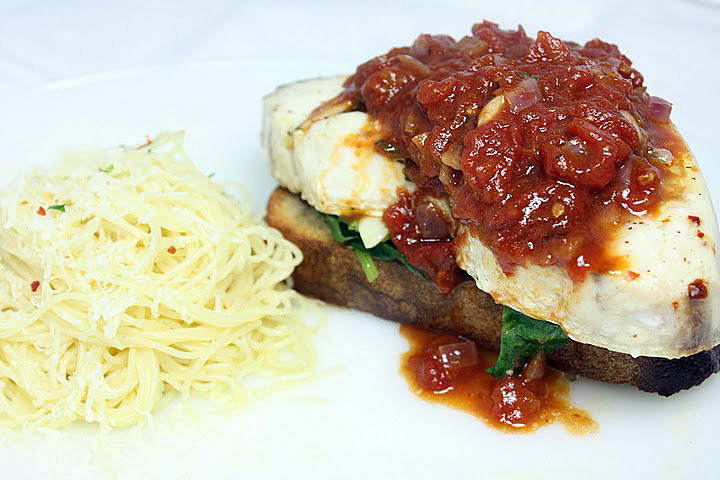
Roasted Swordfish on Garlic Crouton
On April 6, 2011 by sixtyacrebakerOne of the great things about my life is that it has been well lived. I have gathered great friends along the way. Friends from all walks of life and all parts of the world. Friends who know I don’t answer the phone before 9 am. On a Saturday morning recently, I was up early reading my email. One came through from an old friend currently living in Memphis. It asked, “you awake? I have a question for you and I don’t want to wake you”. It was sent at 7:45am. I loved her for her courtesy. I called her 2 minutes later. In return,sshe shared with me an amazing recipe of roasted fish on garlic croutons. She found it on epicurious. I have changed the recipe a bit, but really only slightly. It is so perfect. Just like the lovely who shared it with me.
Roasted Swordfish on Garlic Crouton
olive oil
2 bunches fresh spinach
tomato sauce
1/2 cup onions–finely diced
3 anchovy fillets
large can whole tomatoes
3 garlic cloves–coarsely chopped
about 10 basil leaves
1/4 cup balsamic vinegar
1 Tbs brown sugar
2 Tbs capers-drained
fish
4 swordfish filets or steaks about 7 oz each
olive oil
1/4 tsp dried chili flakes
salt and pepper
garlic crouton
4-1/2″ thick slices country bread
1 clove of garlic-cut in half
preheat the oven to 450F
For Spinach
In a skillet, heat a bit of olive oil over medium heat. Quickly saute the spinach until it is wilted but still has its color. Remove the spinach from the pan and set aside. quickly rewarm just before serving.
For tomato sauce
Heat a large skillet and add enough olive oil to lightly coat the bottom of the pan. Add the onions and cook until they begin to sweat. Add the anchovies and cook until the anchovies have disintegrated into the oil and onions begin to get golden brown. Toss in the garlic and give it a few stirs. Add the tomatoes, crushing each one to bits, by hand, as you add it. Give it a good stir and leave to simmer on medium heat for about 15 minutes. Just before removing from heat, stir in the balsamic vinegar, brown sugar, basil leaves and capers. Taste for salt and pepper. Keep warm
For Fish
Put a little bit of olive oil in the bottom of a casserole dish. Place the fish on top. season with salt and pepper and chili flakes. Drizzle a bit more olive oil on top. place in the oven and cook until the fish becomes opaque, about 8-10 minutes.
For Garlic Crouton
Place your bread slices on a sheet pan in the oven to toast. Slice the garlic clove into 2 pieces. Once the bread is toasted, lightly rub each slice with the garlic.
To Assemble
While everything is still warm, place a garlic crouton on each plate or on serving platter. Top with spinach. Next place a piece of fish on top of the spinach. Generously bathe in the tomato sauce. Drizzle a little balsamic vinegar over the top to serve.
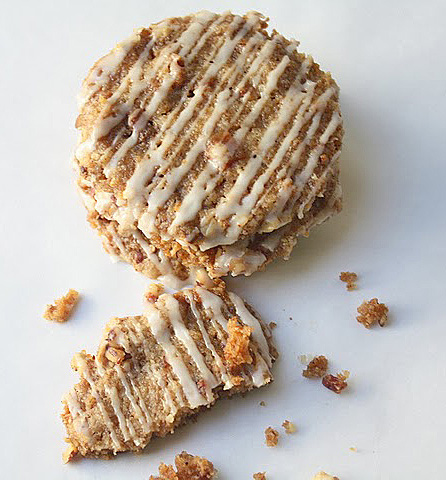
Brown-Butter Bacon Shortbread with Bourbon Maple Glaze
On April 1, 2011 by sixtyacrebakerAt a recent food swap I traded jam for browned butter shortbread. It was out of this world. Within minutes of finishing the very last crumb, I was conspiring to make my own. The gal with whom I swapped was kind enough to share the recipe
from Gourmet magazine.
insert long sigh and whimper mourning the loss of this fabulous magazine
While browning the butter, I was reminded a bit of the smell of bacon.
caveat
I have been known to smell bacon at a kosher deli; I’m slightly obsessed. Chocolate-covered bacon is where I stop the madness; don’t love it, don’t like it. Not bacon’s best move.
But here is what I do love: these crispy, nutty, salty, with throat-warming bourbon glaze, cookies.
Brown-Butter Bacon Shortbread with Bourbon-Maple Glaze
*this recipe only slightly resembles its inspiration. the addition of bacon, bacon fat, nuts, and glaze are all mine
shortbread
4 oz browned butter-cooled to solid in fridge
2 oz bacon grease–cooled to solid in fridge
1/2 tsp grey sea salt (kosher is fine)
1/2 cup dark brown sugar
1 tsp vanilla
1/2 cup bacon–cooked crispy and finely chopped
1 1/3 cup+ 3 Tbs all purpose flour
1 cup toasted and chopped pecans
In the bowl of a stand mixer, cream together the cooled butter, cooled bacon grease and brown sugar. Add the salt and vanilla and stir to mix. Mix in the bacon bits, then the flour. mix only to fully incorporate the flour, do not over mix. Remove the dough from mixer and form into a cylinder on plastic wrap. Roll the dough into the chopped nuts, cover and place in refrigerator. Let rest in fridge for an hour. When ready to bake, heat oven to 350f. Slice the roll into 1/4″ slices and place on lined cookie sheet, leaving about 1/2″ between each cookie. these will spread a bit. Allow to bake about 10-12 minutes or until they start to brown on the bottom. Remove from oven and let cool. Once cool, drizzle with glaze.
bourbon maple glaze
1 cup powdered sugar
1 tsp maple syrup
up to 1 Tbs bourbon
Place powdered sugar in a bowl. Stir in the maple syrup. Add bourbon 1 tsp at a time until it reaches a nice runny consistency, that will barely hold its shape. Pour into a piping bag or use a spoon to decoratively drizzle over the cookies. Allow to sit until the glaze has firmed up.