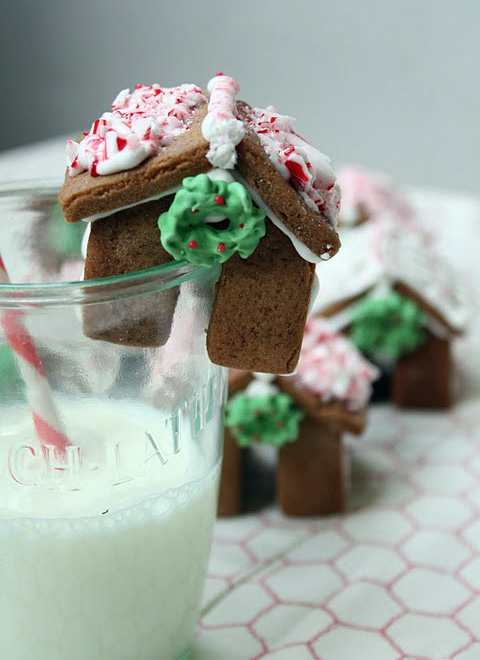
Gingerbread Side Cars
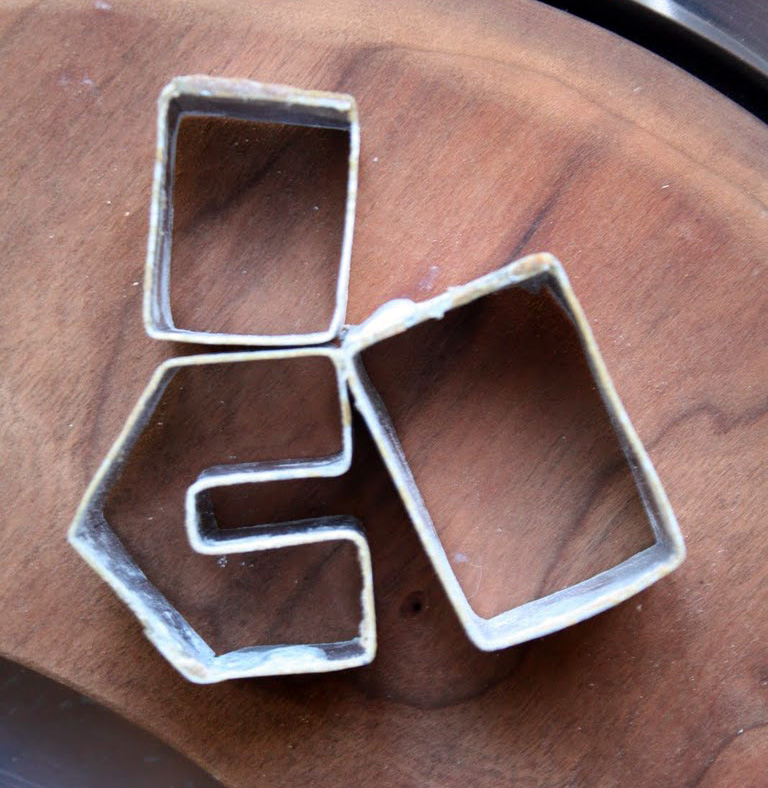
On December 6, 2011 by sixtyacrebakerI have made gingerbread villages, chateaus, and houses for as long as I can remember. Last year I spotted little gingerbread houses perched on a mug at a blog called Not Martha. as far as I can tell–this is her original idea. Giddy and obsessed, as i have been known to get, I went to Mike to beg for help. He agreed to make cookie cutters so i wouldn’t have to knife cut each piece. Blowtorch in one hand, pliers in the other, he made these.
I in turn, made these adorable side cars, for a hot mug of cocoa or glass of milk.
Use your favorite gingerbread cookie recipe and bake as directed. Cool, assemble and decorate. Tip: I plane the sides with a microplane to ensure straight edges. These attach quite easily with royal icing make it nice and stiff. The wreaths are also made from royal icing colored green and piped with a no.63 tip onto parchment paper. I used sprinkles for berries. Allow to dry overnight–remove carefully–attach with royal icing.
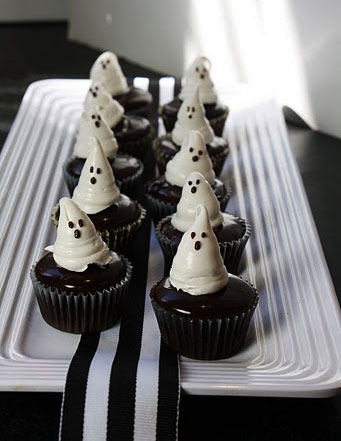
Cake with Ice Cream Ghosts
On October 30, 2011 by sixtyacrebakerThese mini cupcakes are a lot of fun to eat, but if you are a perfectionist and don’t like it when things don’t go your way, don’t do the ice cream part. Use frosting. Make your favorite cupcake recipe and bake in mini-tartlet pan using paper liners. let cool. Dip each in bittersweet chocolate ganache and let firm up. Top with ghost–and serve.
The ghosts are made from homemade Philadelphia Style ice cream. Freeze the ice cream until it is quite thick and could hold shape. Quickly put it into a pastry bag fitted with a tip with a 1/4″ round hole. Pipe the ice cream onto a sheet pan, lined with parchment and immediately put it in the freezer for 4 hours. Remove the ghosts and pipe the chocolate eyes and mouth and return to the freezer. Let freeze overnight. Just before serving, use an offset spatula to move the ice cream from the sheet pan to the mini-cupcakes.
Take your bow, then eat.
If you choose to use frosting rather than ice cream….you can either pipe the ghosts directly on to the cupcake, or you can pipe them on to a sheet-pan, put them in the fridge for an hour or so, decorate with chocolate ganache, and then transfer by offset spatula to the cupcakes
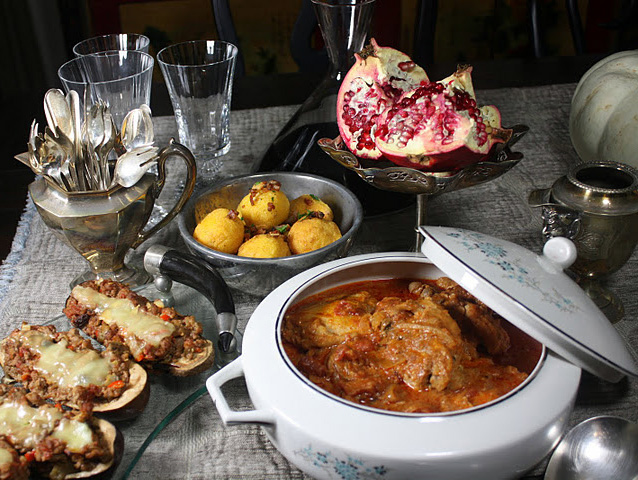
Bram Stoker’s Dracula Dinner
On October 28, 2011 by sixtyacrebaker“We left in pretty good time, and came after nightfall to Klausenburgh. Here I stopped for the night at the Hotel Royale. I had for dinner, or rather supper, a chicken done up some way with red pepper, which was very good but thirsty. (Mem. get recipe for Mina.) I asked the waiter, and he said it was called “paprika hendl,” and that, as it was a national dish, I should be able to get it anywhere along the Carpathians”
“I had for breakfast more paprika, and a sort of porridge of maize flour which they said was “mamaliga”, and egg-plant stuffed with forcemeat, a very excellent dish, which they call “impletata”.
Bram Stoker
Dracula
I‘m really not much for horror stories. However, if the opening chapter references two meals, I become open-minded. For the record, Dracula is a well written story with astounding imagery. We all know Dracula is the only vampire that counts (get it? count dracula!)
If you are indecisive regarding your Halloween meal, I present to you an idea that is both clever and delicious. A Dracula dinner party using recipes inspired by the words of Stoker himself.
Dracula Dinner Party
chicken paprikash
(printable recipe)
eggplant implatata-ish
(printable recipe)
hungarian-bacon stuffed corn fritters
(printable recipe)
custard tart with sour cherry glaze
tokay wine
Sno-Eggs {Hostess Knock Off}
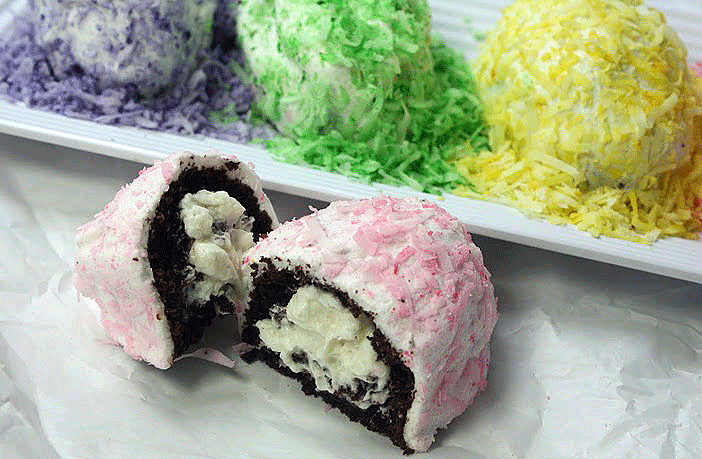
On April 13, 2011 by sixtyacrebakerMy mom was an, eat a piece of fruit if your hungry kind of mom. Cakes, cookies and pastries were for special occasions. After dinner, a bowl of fruit, platter of nuts and maybe a hunk of cheese would be placed in the middle of the table. We would solve the world’s problems while the coffee brewed. If I wanted a store bought, cream filled delight, I had to eat at a friend’s house. I have still never tasted an actual hostess snowball. But I get the gist. When I found a fabulous vintage cake pan, with rows of hand-size eggs, at a local shop, I couldn’t wait to make cakes. Cakes with creamy filling, robed in sticky marshmallow, and covered with dreamy pastel-painted coconut.
Marshmallow Cakes
makes approximately 18
Devil’s Food Cake
3 oz bittersweet chocolate chopped
1 1/2 cups hot coffee or hot water or mixture of the two (i use espresso with water)
3 cups granulated sugar
1 1/2 cups cocoa powder
2 1/2 cups flour
2 tsp baking soda
1 tsp baking powder
1 1/4 tsp kosher salt
3 extra large eggs
3/4 cup vegetable oil
1 cup sour cream + 1/2 cup milk or 1 1/2 cups buttermilk
1 tsp vanilla
Melt bittersweet chocolate in hot water/coffee. Sift dry ingredients together (including sugar). Mix together the chocolate/coffee mixture, milk, sour cream and vanilla. In a mixer beat the eggs with the oil until thickened and doubled in volume (about 3-5 minutes). Alternately add the dry and wet ingredients to the mixer, beginning and ending with the dry ingredients. Mix until just incorporated. Butter, or spray cake pan and dust with cocoa powder. Fill to 3/4 full and bake in 350 oven until tester comes out clean. Allow to cool completely.
Cream Filling
1 cup milk
5 Tbs flour
1 1/2 cup powdered sugar
1/2 cup shortening–room temperature
3/4 cup unsalted butter–room temperature
1/2 tsp vanilla
1/4 tsp salt
Over low heat, cook milk and flour in a saucepan until it makes a thick paste. Use a whisk to break up lumps. Let cool. In mixer using whisk attachment, beat shortening, butter, sugar, salt and vanilla. Add in cooled flour paste and whip until light and fluffy. Add more sugar if you want a sweeter taste.
Marshmallow Topping
3/8 oz (1 1/2 pks) unflavored gelatin
1/4 cup cold water
1 cups granulated sugar
water
pinch
1 large egg whites
Put sugar in a saucepan. Add enough water to make a mixture that looks and feels like wet sand. What is most important is that all sugar has the same amount of moisture. place over low heat. Cook until it becomes a sugar syrup of 235-240 degrees. It should have the consistency of corn syrup. Meanwhile…place room temperature egg white into the bowl of your mixer. Add the salt . Also, prepare gelatin. Place 1/4 cup water in a bowl. Sprinkle the gelatin evenly over the water. Let bloom.
Once the sugar syrup is ready, turn off heat and let sit for a couple of minutes…not too long. Start your mixer on low and get the whites to foamy. Mix the gelatin into the sugar syrup and stir until melted completely. Bring the saucepan over to the mixer and turn it to high. Slowly pour the sugar syrup into the bowl, careful not to hit the whisk attachment. Leave on high and mix until the mixture is warm, but full volume and comes to a peak. While it is still warm, pour over your cake(s)
Do not make your marshmallow until you are ready for it. marshmallow sets up quite fast, if possible get someone to help you, this will help it go both smoothly and quickly.
Colored Coconut
Simply take about a cup of sweetened flake coconut and place it in a ziploc bag. Drop in 2-3 drops of food color and close the bag. Massage with your hands until all coconut has a bit of color in it. Set aside until you are ready to use. Do not make your marshmallow until you are ready for it. marshmallow sets up quite fast, if possible get someone to help you, this will help it go both smoothly and quickly.
when you are ready, arrange your filled cakes on parchment paper in groupings of what color you will be topping them with
To Assemble
Using a pastry bag with a “fill” tip, squeeze about 2 Tbs of cream into the center of the cake through the large end of the egg. When you are ready, arrange your filled cakes on parchment paper in groupings of what color you will be topping them with. Make your marshmallow topping. While the marshmallow topping is still slightly warm, but is perfectly fluffed, stop whipping. Immediately begin topping your marshmallows, simply by pouring a bit of marshmallow on top. If you are doing this alone, stop after every two or three and generously sprinkle the coconut on top and sides. If you have a helper, allow them to immediately follow you with the coconut. Your marshmallow will set up within 5 or so minutes. Don’t panic, just be aware.
I think these would be just darling wrapped and hidden in the garden for a truly joyous easter egg hunt

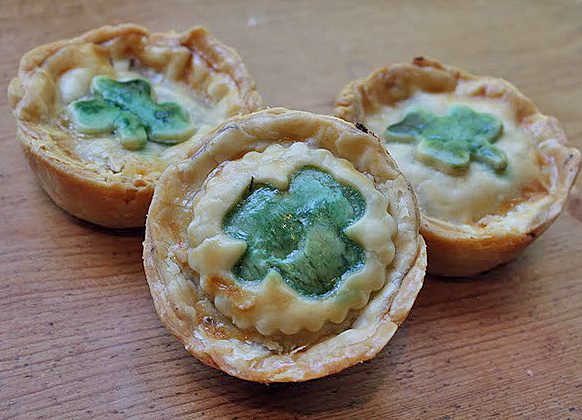
Lunch Box Pies
On March 16, 2011 by sixtyacrebakerGone are the days of the tartan plaid lunch pail replete with soup canister, trapped beneath a spring-loaded arm, and monogrammed cloth napkin. So sad. These savory pies, formed and baked in cupcake tins are perfect for lunch box days, picnics at the lake, afternoon snack for a carload of kids, or enjoyed as we are. As a St. Paddy’s day treat with a Guinness chaser.
Lunch Box Pies
1 lb ground beef
1/2 lb ground pork
1 large onion–finely chopped
2 stalks celery–finely chopped
1/4 tsp salt
1 Tbs creole seasoning
a few shakes of Tabasco sauce more or less to taste
1 cup breadcrumbs
1/4 cup hot water
1 recipe pie crust
Creole Seasoning
from Emeril’s New Orleans Cooking
2 Tbs chili powder and paprika
1 Tbs ground coriander, garlic powder and salt
2 tsp ground cumin
1 tsp cayenne pepper, crushed red pepper, black pepper and dried leaf oregano
Mix together and keep in an airtight container
Chop onions and celery and sauté until soft. Lightly cook pork and drain off grease. Add ground beef to pork and cook 5 minutes. Add onions and celery. Cook over low heat for 25 minutes. Drain any grease. Add seasoning, tabasco and salt. Add hot water and bread crumbs and mix well. Let stand 30 minutes. Meanwhile, line muffin tins with pie crust. Fill the crust 3/4 full with filling. Close with top crust. Decorate as desired. Brush with lightly whisked egg yolk. Bake at 400 until pie crust is golden..about 20 minutes. To make shamrock, color some of the egg with green food color and use a paint brush to paint design.
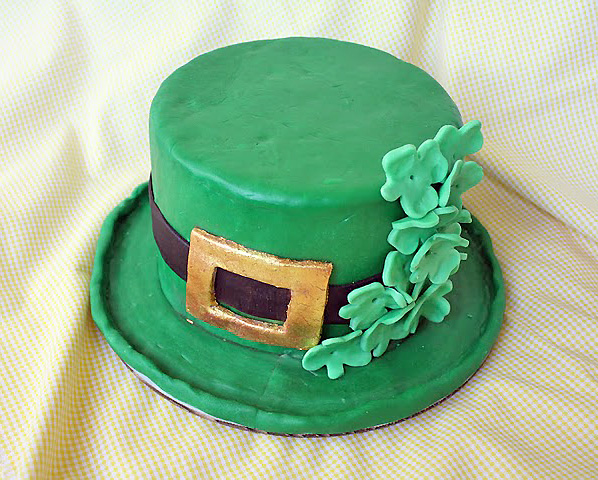
St. Patrick’s Day Cake
On March 11, 2011 by sixtyacrebakerI do enjoy a snazzy chapeau. Especially if it is edible.
This is a simple 7″ layer cake placed on a 10″ cake round. Place the fondant covered cake in the middle of the round. Roll out a strip of fondant wide enough and long enough for the brim, curling up the edges. Using a brush, paint a bit of water on the round (only a little) to help the brim stick and carefully place along the edges of the cake. The shamrocks are fashioned from lightly colored fondant cut out with a cookie cutter. softened the edges a bit with my fingers to give them a bit of movement. The buckle is simply rolled fondant covered in edible gold leaf, then brushed with a bit of bronze luster dust. I used just a bit of water to adhere all the elements onto the cake.
If you would like more details or further instruction on how I made this, please ask. I promise i won’t tell you that a leprechaun left it behind, at the pub I frequent.
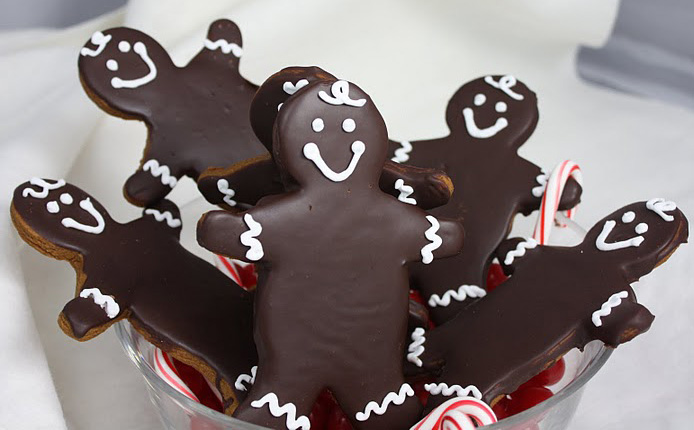
Chocolate Covered Gingerbread
On December 19, 2010 by sixtyacrebakerIt has been quite some time since I have made gingerbread cookies. With all the excitement around gingerbread houses and gingerbread cakes, in our house, the cookies take a back seat.
But I had a special request for the holiday season, so I must oblige.
Twist.My.Arm
I dusted off my cookie cutter and scoured my recipe archives, and found a fun idea in Nancy Baggett’s All American Cookie Book
I slightly altered the recipe, only very slightly. I think the cookie benefits from a bit of honey, and that the glaze needs a nice chocolate bump.
Chocolate Glazed Gingerbread
(adapted from all american cookie book)
6 1/2 cups flour (plus more if needed)
2 Tbs ground cinnamon
2 Tbs ground ginger *
1 tsp ground cloves
1 1/4 tsp kosher salt *
1/2 tsp baking powder
1 1/2 cups dark brown sugar *
1 cup unsalted butter–slightly softened
2 Tbs corn oil (or other flavorless oil)
1 1/4 cup molasses*
1/4 cup honey*
Whisk together the flour, cinnamon, ginger, cloves, salt and baking powder in a large bowl and set aside. In an electric mixer, beat together the brown sugar, butter, and oil until light and fluffy. Beat in molasses, honey and 2 1/2 Tbs water until well blended. Beat in half the flour mixture until well blended. Stir in the remaining flour. knead the dough until it becomes smooth and shiny. If dough is too stiff, you may add a bit more water, if too sticky, add flour. Divide dough into three pieces. Roll each piece in between pieces of wax or parchment paper to 1/4″ thick. Place in the refrigerator to firm up (about 3 hours). When ready to use, peel back the parchment from both sides and using a cookie cutter, stamp out design. Bake on a parchment lined cookie sheet for approximately 6-12 minutes at 350F. Keep a close eye. Let cool, then dip in chocolate glaze
Chocolate Luster Glaze
1 1/2 ounce unsweetened chocolate–coarsely chopped and melted*
3 1/4 cups powdered sugar
pinch kosher salt*
1/3 cup unsweetened cocoa powder*
1/3 cup water
1 Tbs light or dark corn syrup*
1 tsp vanilla extract
Heat the water and corn syrup in a sauce pan, over medium heat until it just comes to a boil. Remove from heat. Sift together the powdered sugar, salt and cocoa powder. Stir the hot syrup/water into the powdered sugar mixture and beat by hand until smooth and shiny. Toss in the vanilla and melted chocolate and beat again until smooth. Dip cookies or use an offset spatula to frost. Let cookies sit a minimum of 3 hours to ensure they are set. Decorate as desired.
the ingredients marked by * have been altered, or added by yours truly.