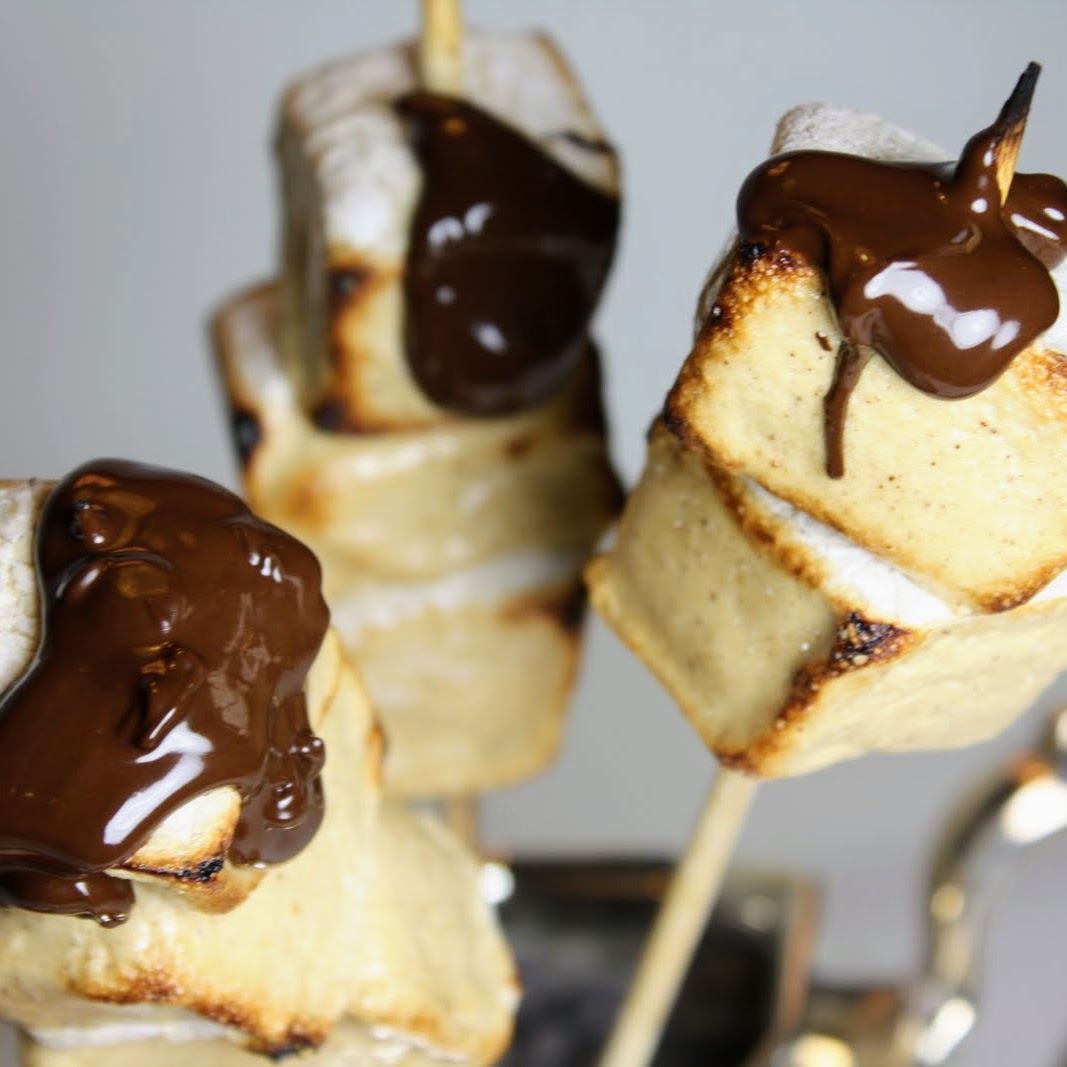
Gingerbread Marshmallows
On June 28, 2018 by Christy LarsenRoasting marshmallows is a year-round sport in my house. Sometimes, I just turn on the stove burner, load a fork, and fire away. Normally, eating ‘mallows out of hand is not my thing…I like a charred exterior and molten center. I do make an exception with these, as they are so good au natural, lightly toasted and dipped in chocolate, or as a float on your favorite hot beverage {even tea…especially tea}.
Gingerbread Marshmallows
3/4 oz gelatin
1/2 cup cold water
1 1/2 cups granulated sugar
1/2 cup dark brown sugar
1/4 cup water
2 Tbs molasses
1/4 tsp kosher salt
1 tsp ground ginger
1 tsp ground cinnamon
1/2 tsp ground clove
2 egg whites
Put sugars in a saucepan. Add 1/4 cup water to make a mixture that looks and feels like wet sand. What is most important is that all sugar has the same amount of moisture. Add molasses, salt, ginger, cinnamon and clove, and place over low heat. Cook until it becomes a sugar syrup of 235-240 degrees. It should have the consistency of corn syrup.
Meanwhile…place 2 room temperature egg whites into the bowl of your mixer. Add the salt .
Prepare gelatin. Place 1/2 cup water in a bowl. Sprinkle the gelatin evenly over the water. Let bloom.
Once the sugar syrup is ready, turn off heat and let sit for a couple of minutes…not too long. Start your mixer on low and get the whites to foamy. Mix the gelatin into the sugar syrup and stir until melted completely. Bring the saucepan over to the mixer and turn it to high. Slowly pour the sugar syrup into the bowl, careful not to hit the whisk attachment. Leave on high and mix until the mixture is warm, but full volume and comes to a peak. While it is still warm, pour into tin or pan. Sift powdered sugar on top. Cut into squares and store in airtight container.
These are yummy tossed into a cup of hot cocoa and a real grown up treat when toasted and sandwiched into a s’more.
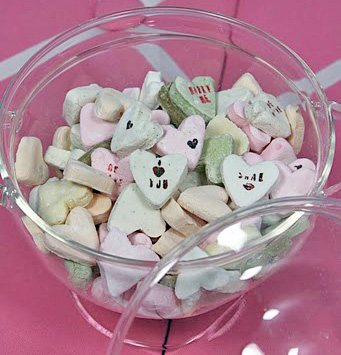
Homemade Conversation Hearts
On February 5, 2015 by sixtyacrebakerValentine’s day wouldn’t be complete without a conversation through candy hearts. I remember the days when hearts were carefully shared, making sure “i love you” didn’t get inadvertently passed, to a 4th grade crush. Also important: sharing only
the good flavors. Anyone would shudder to see the object of her affection, chewing up and spitting out her heart. Ten years old is too young to fully understand foreshadowing. I am confident any valentine would appreciate an “i love you” or three in flavors such as orancello, coconut, green tea, almond, anisette, coffee and vanilla bean. These are so much fun to make. I think a robin’s egg blue box full of “marry me” hearts would be a darling proposal. Or a love poem stamped out word by word, heart by heart, snaked down the dining room table, as a simple but thoughtful centerpiece. The possibilities are endless.
Just. Like. Love

Conversation Hearts
1/4 oz gelatin
1/2 cup water
2 tsp light corn syrup
2 lbs powdered sugar
cornstarch
flavorings
color
rubber stamp kit and/or food color pens
Place water in a bowl and sprinkle gelatin over. Let bloom. Add the corn syrup and gently cook in the microwave until the gelatin and corn syrup have melted. Do this in 20 second intervals. Mix the gelatin mixture into about 2/3rds of the powdered sugar. Knead with your hands, adding more powdered sugar as necessary until the dough is satiny and doesn’t stick to the counter. Divide the dough into 6-8 pieces, coloring and flavoring as desired. Keep tightly wrapped in plastic wrap, as this dough will dry out quickly. Keep some powdered sugar on hand, in case adding color and flavor makes the dough sticky.
Roll the dough out and cut with small heart cutter. Place on a cornstarch dusted sheet pan and let dry a minimum of 48 hours. When ready to decorate, use food color based pens, or brush food coloring directly onto a rubber stamp with the words spelled backwards. Press the heart onto the stamp and let dry about 15 minutes. You can also paint food coloring directly onto the heart as well.
{this is a post transcribed from my blog fudgeripple. the content exclusively belongs to me}
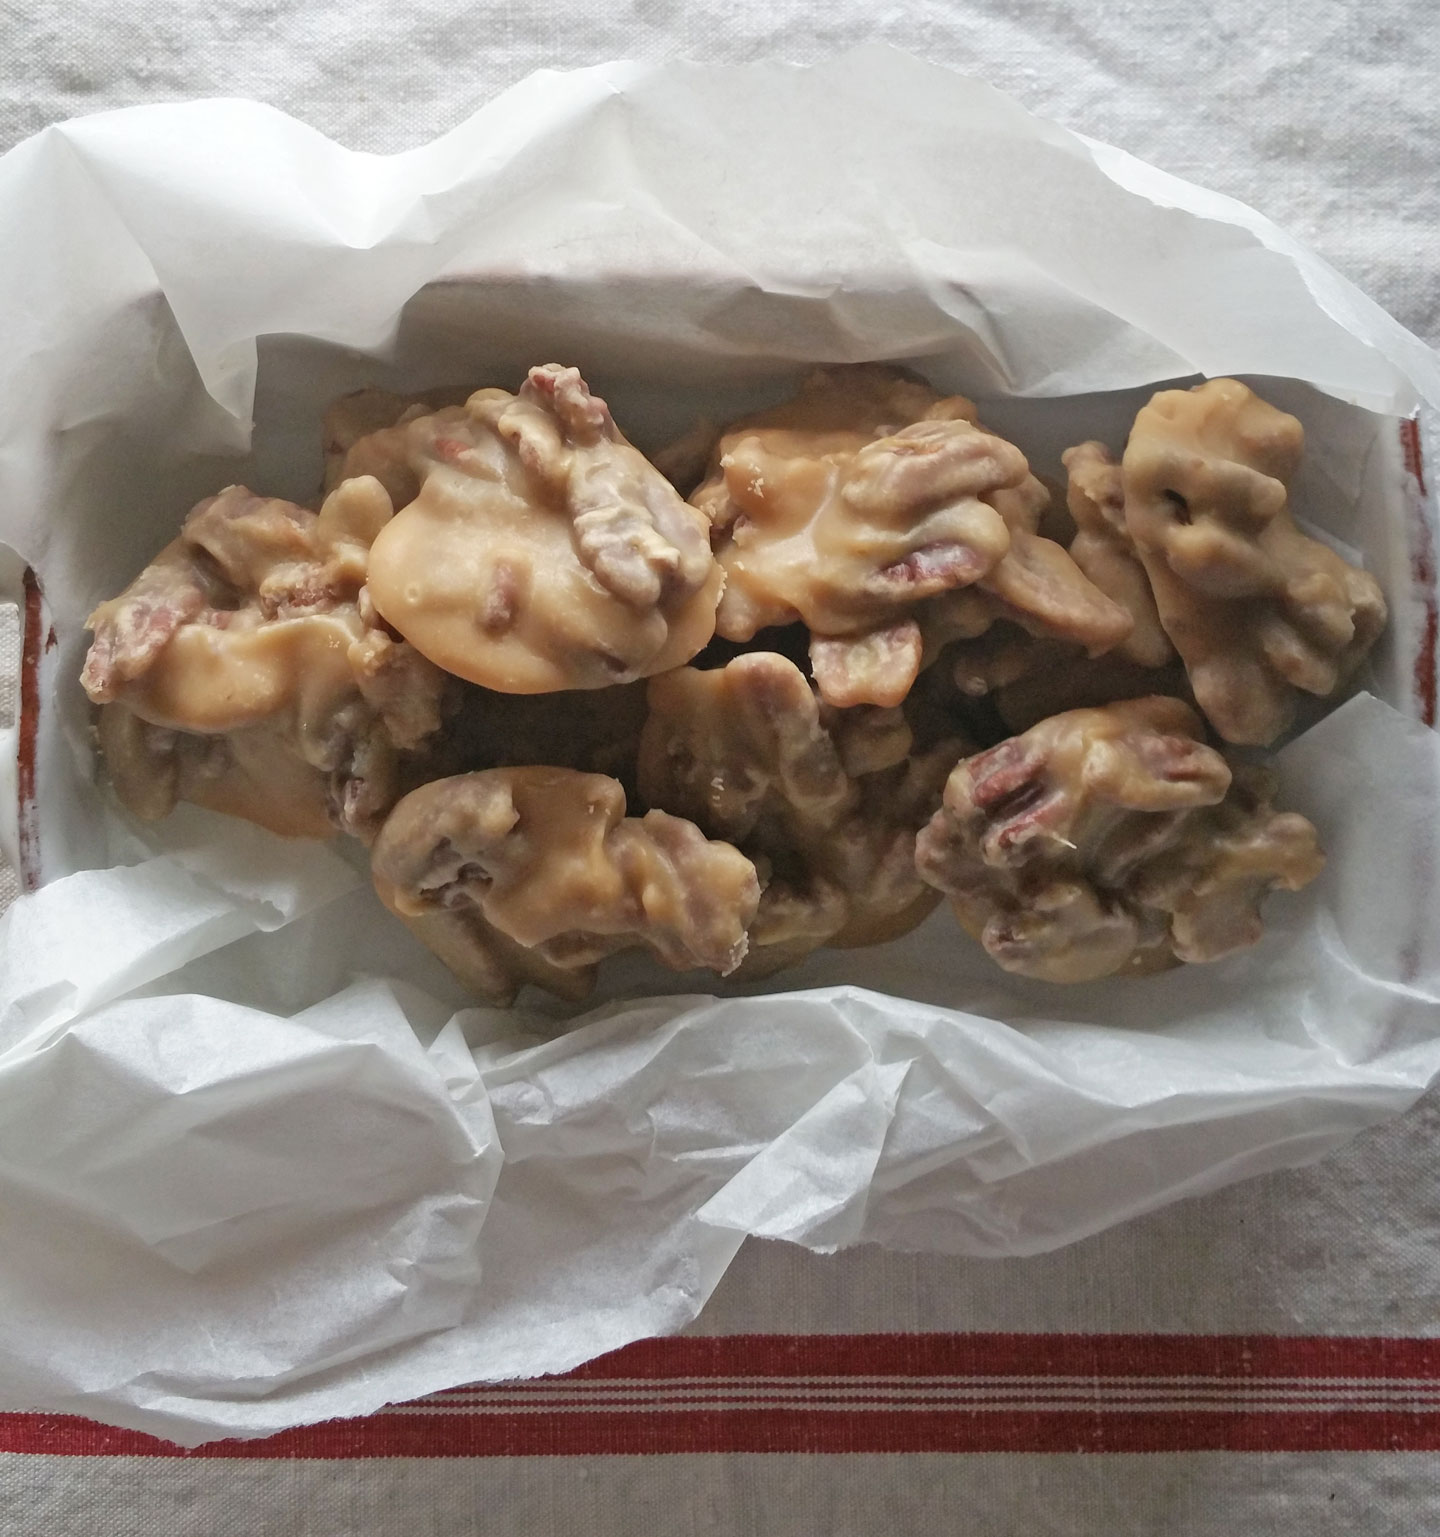
Pecan Pralines
On December 15, 2014 by sixtyacrebakerPRAWWWWWWlines. Say it with me, and then get in the kitchen and make some. You won’t be disappointed. I Guarantee It.
This recipe came from my love of the sweet confection. I have been obsessed with the treat since my first visit to New Orleans way back when Emeril had a last name. I printed this recipe and a story to go with it on my previous blog, but they are so good, I thought they warranted their own page on Sixty Acre Baker. They make a perfect holiday (or any time of year, really) gift.
Pecan Pralines
1 quart heavy cream
3 cups granulated sugar
generous pinch of kosher salt
1 1/2 lbs toasted pecans
1 Tbs+ 1 tsp lemon juice
1 Tbs unsalted butter
2 tsp vanilla
In a heavy bottomed pan, stir together the cream, sugar and salt. Place on low to med-low heat and pop in a candy thermometer. Cook until thermometer reaches 234 degrees F. The wait between 220 and 234 is lengthy..don’t be tempted to up the heat to make it happen faster. You can pretty much leave it alone until it reaches 220, at 220, stay in the kitchen checking on it frequently. When it hits 230, watch it and start stirring, it will start to change colors at this point and you want to make sure the bottom doesn’t burn. There will be brown bits, but just mix them in. Stir, stir, stir. When it hits 234, take the pot off the heat, remove the thermometer and add the lemon juice, vanilla, butter and pecans. Stir to incorporate, then pop the thermometer back in and bring the temp back to 234. It will go a bit faster this time, keep an eye on it and stir continually to prevent burning on the bottom. When it hits 234, spoon it out in dollops (i use a soup spoon),onto parchment lined cookie sheets, or aluminum foil that has been sprayed or greased lightly.There are a lot of pecans in this, so make sure you get a nice mix of the caramelly goodness. One batch will make about 50 moderately sized pralines. They will look like caramel until you cool them. As they cool and sit, they will begin to get a bit cloudy. That is a good thing. You are not looking for chewy here.
Let cool for a few hours. They will keep for quite a while if you keep them in an airtight container in a dry place. Please, do not put in the fridge.
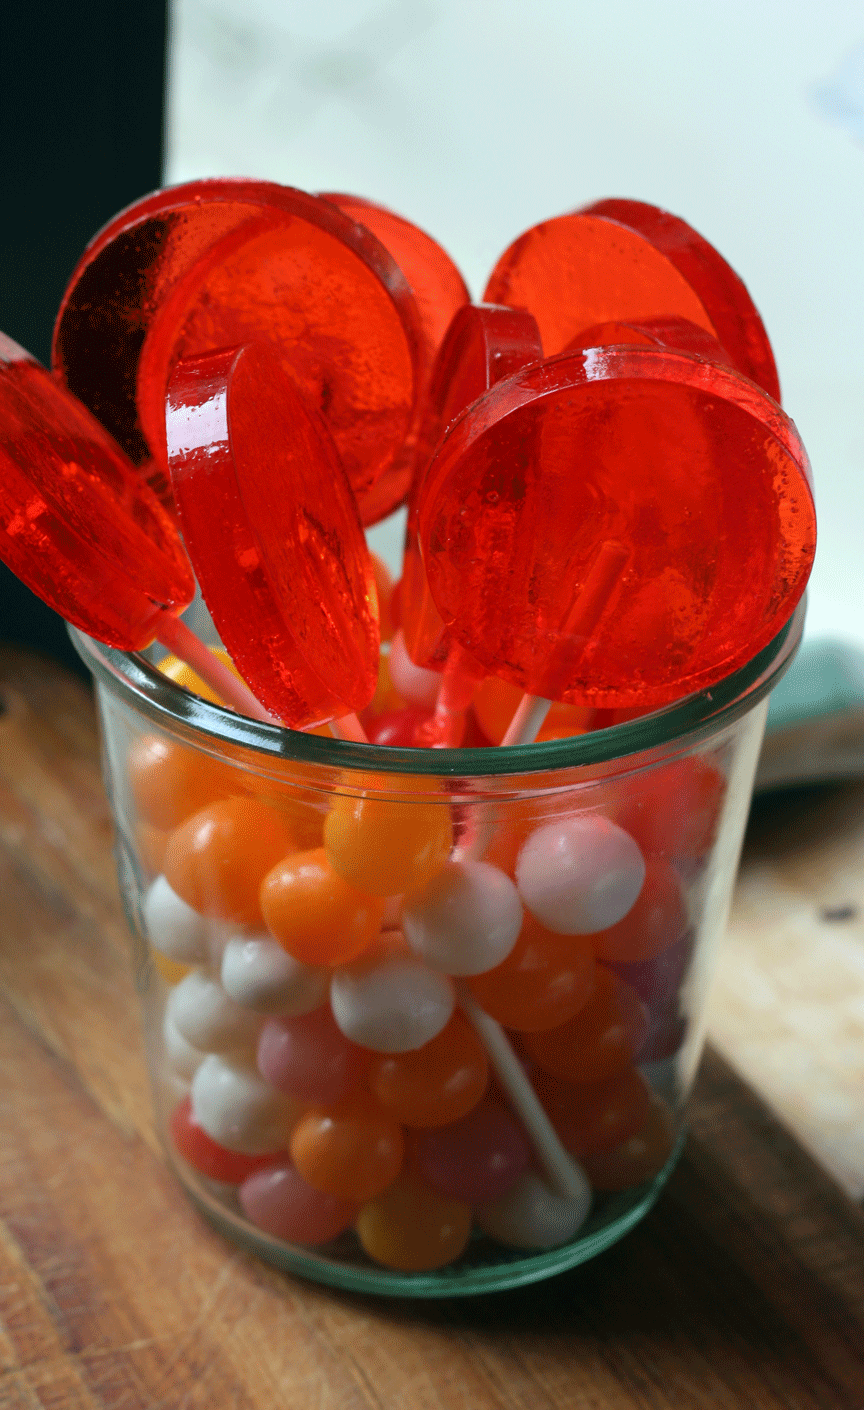
Lollipops
On March 8, 2013 by sixtyacrebakerThese are rather simple. Of most importance is that you thermometer is accurate and humidity levels are at a minimum.
Lollipops
2 cups sugar
2/3 cup corn syrup
1/2 tsp cream of tartar
1/4 cup water
2 tsp flavor (if using extract–much less if using oils)
food color
Place sugar, corn syrup, cream of tartar and water in a heavy bottomed pot. Stir to combine, and wash down sides with a pastry brush dipped in a bit of water. Place on very low heat and stir until the sugar has melted and the liquid begins looks clear. Cease stirring and insert candy thermometer. Allow to boil, untouched until the syrup reaches 290F. Don’t loose patience, keep the fire on very low. At 290F, begin to watch very carefully. I like to allow the temp to come all the way to 310F, but if you are making a light colored pop, you may want to stop at 300F, as the sugar begins to develop a color around 295F. When you reach your desired temperature, add the food color and flavoring, and swirl to incorporate. Keep the pot on the fire and allow it to come back up to temperature (300F or 310F respectively). Carefully pour into your molds, or onto a greased sheet of foil. Add sticks and then allow to cool at room temperature.
makes about 18-20 2″ pops
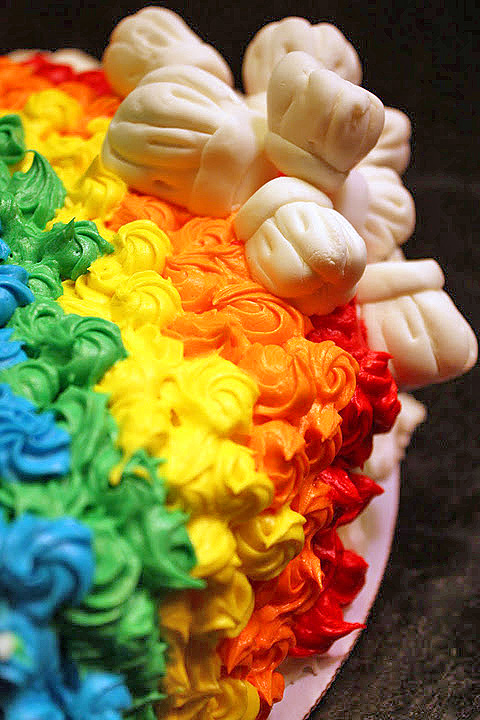
Cake Decorating Birthday Party
On December 17, 2011 by sixtyacrebakerYesterday was my niece’s 7th birthday. We threw a cake decorating party. She was very specific about the cake. White, one layer, vanilla frosting with rainbows, sprinkles and chef hats. There was also a request for the cakes the kids would decorate. Hot pink fondant and lots of candy. I aim to please.
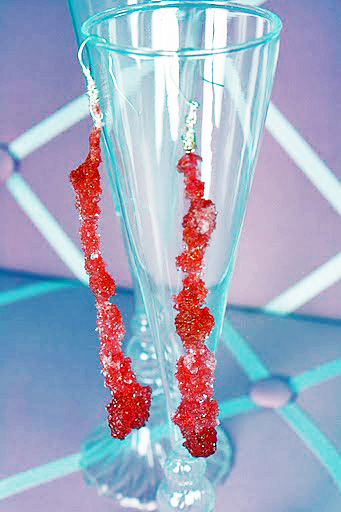
Rock Candy
On February 3, 2011 by sixtyacrebakerMy kitchen has been looking like a science lab lately. Not because it is pristinely clean with clutter free counter tops and nerdies wandering around; but because I have been making rock candy. Several attempts
I might add . It all started out innocently enough: sugar, water, string. But then I got sassy. Like i am Debeers or something. I thought it would be fun and cheeky to make rock candy jewels. Something for a big night out . I settled on drop earrings. Simple, right?
Here is the rub; the fun flew faster than a spy plane out this nerdies door, while obsessive took its place.
In the end, I got the perfect pair.
Now I’m not sure if I should wear or eat them.
Rock Candy
2 cups water
4 cups sugar
food coloring (optional)
up to 1 tsp flavoring (optional)
baker’s twine
granulated sugar
cut the baker’s twine to desired length. tie the twine off to a wooden skewer or pencil. this will allow you to suspend it in the syrup. Dip the twine in water, then roll in a bit of granulated sugar to coat. allow to dry while you make the syrup.
bring water and 1 cup of sugar to a simmer in a saucepan. while the water is still simmering, add sugar, 1 cup at a time, stirring and ensuring the sugar has completely dissolved before adding the next cup. once all sugar is incorporated, remove from heat and add coloring and flavoring. allow the syrup to cool slightly, then pour into a clean and sterilized glass jar or tall glass. you will need a separate glass for each rock candy you want to make.
suspend the twine in the syrup being careful that it does not touch the bottom or sides of glass. crystals should begin to form in about 4 hours. if there is no activity within 24 hours remove the twine, pour the syrup back into a pot and heat to a simmer. return to the clean and sterilized jar and start again. if you see excessive crystallization on the sides of the jar or glass, remove the twine and perform the above steps, otherwise you will have a glass full of hard sugar crystals.
check your twine daily. when you have the rock candy of your desire, remove from the syrup and allow to hang dry for a few hours.
Cookie Dough Candy Cups
On January 15, 2011 by sixtyacrebaker I might be one of very few whom actually prefer baked cookies to raw.
The cause possibly may have been the constant threat my mother herald:
“raw cookie dough will give you worms”
I don’t recall that it ever happened to anyone but perhaps it isn’t discussed in polite society.
Still, I find it astounding in a medical sense. I really should have paid more attention in high school biology class.
With that introduction; how could you not be hungry for a little bit of cookie dough?
(wink, wink)
This recipe is sans eggs so no need to worry. I filled little chocolate cups but you can also roll the dough and dip in chocolate or just eat them out of
cookie dough
1/2 cup unsalted butter–softened
3/4 cup brown sugar
pinch salt
1 tsp vanilla extract
1 cup
evaporated milk (as needed)
1 cup semi-sweet mini chocolate chips
walnuts–
toasted and chopped (optional)
chocolate ganache for topping or tempered chocolate for dipping.
With a mixer, beat the sugar and butter until creamy. Add the salt, and vanilla and beat again. Stir in the flour until just incorporated. Add evaporated milk a bit at a time until you reach the consistency you want…it won’t take much. Stir in the chocolate chips and nuts (if desired). If putting into cups, generously scoop dough into cups and then dip in ganache & top with chocolate chips or colored candy. If making into truffles, scoop out desired portions and put on lined cookie sheet. Refrigerate until hardened. Remove from fridge, roll into balls and dip in tempered chocolate. Top with chocolate chips or colored candies as desired.
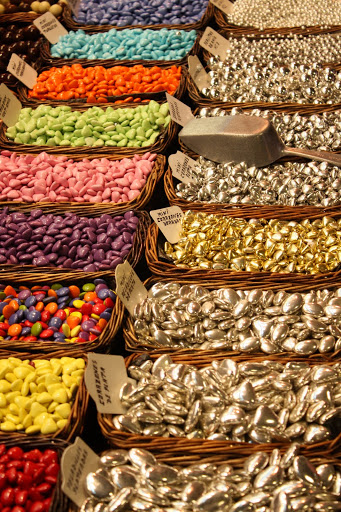
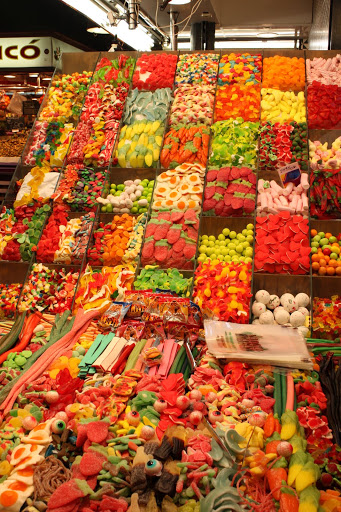
Sweet Barcelona
On November 5, 2010 by sixtyacrebakerJust a little bit of what we found on our walkabout town this evening. Just off La Rambla sits La Boqueria where they sell beautiful produce, meats, fish, and my favorite of all sweets. Beautiful, tasty sweets. Enjoy I know I did.