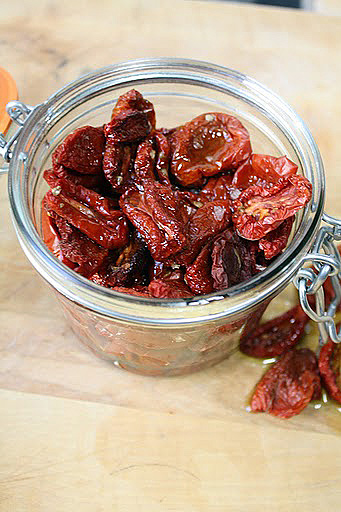
“Sun Dried” Tomatoes
On July 30, 2011 by sixtyacrebakerOur first tomatoes to ripen this season were our Romas. Unfortunately, they ripened while we were away from home. By the time I picked them they had shriveled on the vine. Handfuls upon handfuls of tomatoes baking in the sun. Going from sun-kissed
to heat stroke in my absence. Solar energy had zapped my tomatoes. Once picked, I sliced each tomato in half, placed them cut side up on a sheet pan and sprinkled with sea salt. I popped them in a 175-200 degree oven to dry. About 2 hours later, or maybe 3 i lost count. They should be checked on every 30 minutes after the 1st hour. They should be dry, but not dried out. After cooling, I stuffed the deep red chewy goodness into a fancy jar and smothered them with good olive oil.
Triple Berry Dessert Sauce
On July 23, 2011 by sixtyacrebakerWe grow strawberries in our garden. Each June we joyfully harvest them. We also grow raspberries, blackberries and boysenberries. They are only evident by the bare vines choking our fences. Those sweet berries are harvested by the local fauna; which possess ripeness gauges to rival a seasoned gardener. I buy most of our berries at the local farmer’s market. This week I found gorgeous raspberries, perfectly ripe and brightly colored, at four bucks a punnet. Here I was, mulling my decision to buy when a woman beside me said “they would make the most delicious coulis”. “do you know what a coulis is?” she asked with a tip of her head. I sweetly smiled (which is a bit of a feat), and and said “yes i do” and “yes they would”. But what I was thinking was lady, you are either crazy or rich; four dollars a handful is not a bargain. Furthermore, if I planned to whirl these in a blender with some sugar, I might as well buy frozen ones for half the price. This was going through my mind, as I handed over my eight dollars and chose the ripest berries, in the most full containers.
I brought them home and they sat. Then I moved them to the fridge where they satsome more.
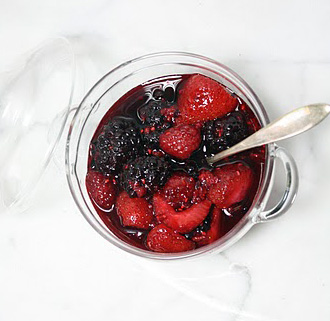
Today, I am reminded of that woman at the market with her clarvoyant premonition, as I simmer these over-ripe berries into a sauce. Not a coulis. But a sauce just the same.
Triple Berry Dessert Sauce
1 pint raspberries
1 pint blackberries
1 lb strawberries–hulled and cut in half
juice of 1 lime
3/4 cup granulated sugar
1 oz cassis
Place all ingredients in a saucepan and simmer on low until the berries are soft and the sugar is melted. The strawberries may take a bit longer to soften than the raspberries or blackberries. If you find this happening, just turn the burner off and allow the berries to sit in the warm juice for 10 minutes or so, the strawberries will continue to soften from the residual heat. Allow to cool to warm. spoon over ice cream or a slab of shortcake. Refrigerate whats left. Will keep about 5 days.
Lemon-Chevre Ravioli
On July 18, 2011 by sixtyacrebakerI have been making homemade pasta for as long as I can remember. Growing up, as summer arrived, so would my grandparents. Both sets. Heavily ladened with luggage and lessons, my grandparents were old school Italians. The “grandpops” sat on the sun porch playing cards and tending to the vegetable garden planted each year. The “grans” would sit at the kitchen table compiling lists of what would be needed for the evening supper. Pasta was always a side dish always homemade. We would make it several times each summer; filling our bellies and the freezer. The dining room became pasta central. The dining room table only used at Christmas, in a room that appeared hermetically sealed, would become a work bench covered in flour. We’d spend hours kneading, rolling, cutting, and drying our summer staple. It must be said, we never used 00 flour. It was hard to find and expensive–we used what we had on hand. It was delicious.
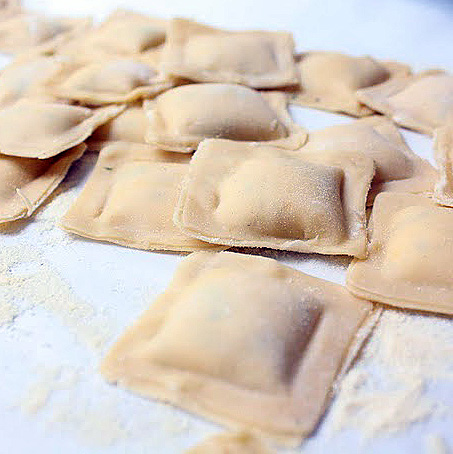
My grandparents have all passed and with them many of the summer traditions we all enjoyed. I still make pasta, in small quantities, with the same equipment as generations past. However, it is abundantly less shocking to see my dining room, littered with flour and covered in pasta. Sometimes I use 00 flour, if I have it on hand. But mostly, I use a high quality cake flour, which works beautifully for a delicate pasta, like this lemon pasta I used to make chevre ravioli. It is not quite how nonna would do it, but delicious none the less.
Lemon-Chevre Ravioli
for the pasta
3 cups cake flour (i use king arthur)
5 extra large eggs
2 tsp finely grated lemon peel
Place the flour in a mound on your work bench. Using your fist, make a large well in the center of the mound. Using the fork, bring the flour into the eggs to begin forming a dough. Continue bringing the flour in until you have a sticky mixture. Begin working the rest of the flour in by hand and knead for at least 10 minutes, and until you have a very smooth dough. The dough must be very smooth and well kneaded before leaving it to rest for 10 minutes or up to an hour at room temperature. Cover the dough with plastic or a towel or something to discourage a “skin” from forming. When ready, use a bit of flour so the dough does not stick and roll very thin. Cut in desired shape(s)
for the filling
5 oz chevre–room temperature
3 oz cream cheese–room temperature
1/2 tsp garlic powder
pinch nutmeg
1 tsp finely grated lemon peel
2 Tbs basil leaves–chiffonade
pinch salt
1/4 tsp white pepper
1 egg
1/4 cup grated parmesan cheese
Mix everything together until evenly incorporated. Place in refrigerator until using. Can be made up to a day in advance and kept covered in the refrigerator.
to assemble
small bowl of water and pastry brush
flour
semolina flour or cornmeal
It is important that your dough is rolled out thin, because you are using two pieces. it doesn’t have to be as thin as a won ton wrapper, but it should be close to it. If you are using a pasta machine, roll the pasta to the second thinnest setting.Place 1 sheet of pasta, cut into strips 2″ wide and as long as you like on your work surface. make sure your surface is dusted with flour to prevent sticking. Place filling with a teaspoon in the center of the dough, leaving room for even border on all sides. brush the dough, where you are going to seal the top piece, with water. Place a second piece of dough on top. Press around the filling with your fingers until you have a nice seal. Stamp with your ravioli cutter, cut with a knife, roller or cookie cutter to make uniform ravioli. Press the seams one more time. Place on a cookie sheet sprinkled with a bit of semolina or cornmeal to prevent sticking. Use immediately, or freeze for future use.
Home Cured Maple Bacon
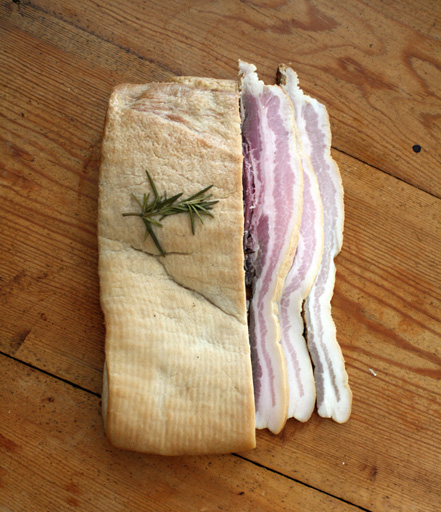
On July 1, 2011 by sixtyacrebakerHere is something i can hardly believe myself. I shunned bacon for 5 years. It was complicated, and in hindsight, foolish. I mean really religious convictions aside I can’t think of a reason NOT to eat it. It is just.that.good. Recently, curing my own bacon has elevated to obsession status. A few bats of my baby blues and Mike agreed to buy a smoker. It was time. He is itching to make venison jerky and of course, I have my bacon thing. Here is my first attempt. Honest report–it is good. Now, I made the mistake of washing off the brine, but not soaking, the bacon before smoking. This meant it came out very salty. I soaked it after the smoke, which not only soaked out the salt, but also the smokiness. So I cold smoked it again and it just isn’t perfect,
but it is close.
Maple-Brown Sugar-Rosemary Bacon
3lbs pork belly
1/4 cup +/- kosher salt
1/4 cup +/- brown sugar
3 Tbs good quality maple syrup
1 Tbs fresh rosemary
place pork belly in a large tupperware type container
3 Tbs maple syrup & rosemary sprig (post curing)
apple or cherry wood chips for smoking
rub all sides with salt
Mix together the brown sugar, maple syrup and rosemary. Rub all sides of the pork belly with the mixture. Cover and place in the refrigerator for 24 hours. After 24 hours, repeat the process and place back in the refrigerator. Check daily, if liquid begins to gather on the bottom, pour it off and place back in the refrigerator. At 5-7 days, you should be done. The pork belly will be a bit more dense, and firm. Rinse the pork belly well and dry with paper towel. Slice off a small piece and fry. If too salty, place the belly in a bowl of cold water and place in the fridge for 1 hour. Dry, slice off a piece and fry a piece. If it is still too salty, repeat the soaking process, 1 hour at a time. Once the bacon is to your liking, dry off. Rub the fatty side with maple syrup and place rosemary sprig on top. Meanwhile prepare your smoker
I smoked my bacon at 120 degrees and smoked it to an internal temperature of 130. There are so many different philosophies on this. you can cold smoke it, hot smoke it, not smoke it at all. This will not keep in the fridge like store bought bacon…it does not have nitrites. It is best to cut what you will eat within a week, then freeze the rest. It is very important to keep your pork belly at proper temperatures and to keep all surfaces it touches very clean. This is not a time to be lenient in your sanitary rituals. Bacon should not be eaten raw, once cured and smoked, it should be cooked fully before enjoying.