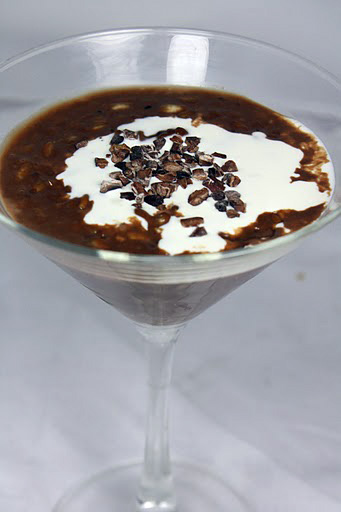
Chocolate Malted Risotto
On February 25, 2011 by sixtyacrebakerAbout last night. Mike and I returned from our stay at a farm watching lambs being born and bottle feeding those yet able to get their fill. We spent the days eating glorious fresh food; hoarding a small taste of what we hope our lives will be soon. Not the lamb part but a reason to be tethered to our home. As we rolled in to our lives in the city, I felt a yearning for something warm and satisfying and chocolatey. I hope it will comfort me in my passage from what will be to what is. This warm, creamy and malted risotto was like a warm woolly blanket for my heart.
Chocolate Malted Risotto
1 Tbs unsalted butter
1 cup arborio rice
3 1/2 cups milk–warmed on the stove
pinch kosher salt
2 Tbs granulated sugar
1/2 cup bittersweet chocolate–cut into bits
1/4 cup + 2 Tbs malted milk powder
1 tsp vanilla
heavy cream for garnish
cocoa nibs for garnish
additional malted powder for garnish
Melt the butter over low heat in a sided pan large enough to hold the rice in a thin layer. Once the butter is melted, toss in the rice and stir to evenly coat the rice. Allow the rice to cook for just a couple of minutes before you begin to add the milk. Increase the heat to low-medium. Add 1/2 cup of milk at first and stir until the milk is almost completely absorbed. Now begin to add the milk, just until it covers the top layer of rice but not more than a cup at a time. Allow the rice to absorb the milk, but come in to stir quite frequently. When the milk has almost completely absorbed, add the next amount. After you have done the second addition, stir in the sugar and salt, then add the third addition. Cook until the rice is soft, but with just a little hint of a bite, you do not want it to be crunchy or chewy. Remove from heat and add the chocolate and vanilla. Stir until the chocolate is completely melted and incorporated. Serve warm with a bit of heavy cream and dusted with malted milk powder and cocoa nibs. Serves 4.
How I Celebrate
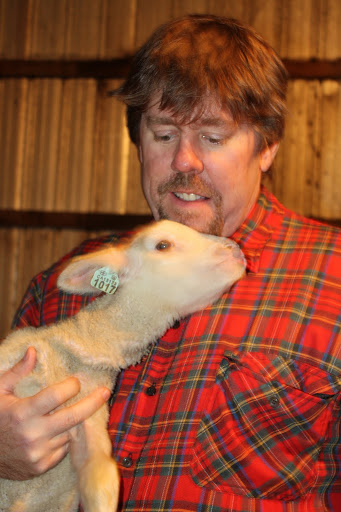
On February 22, 2011 by sixtyacrebakerToday is my birthday. Kind of a big one, but not a milestone. If I live a nice long healthy life; today is the day I hit mid-life. Not too long ago, I heard someone say mid-life is not for a crisis but for readjustment. I like the idea. Look back
see what worked well, what didn’t, and maneuver the next half of my life applying what I’ve learned. This year in celebration Mike and I slipped away. We are spending a few days on a sheep farm. Lambing is in full swing. Today the bleat of new babies is the only song I wish to hear.
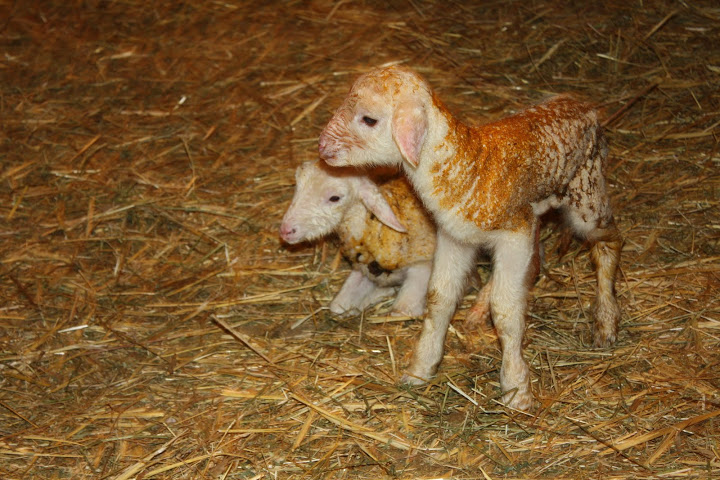
The Newly Born
Mike and his new BFF
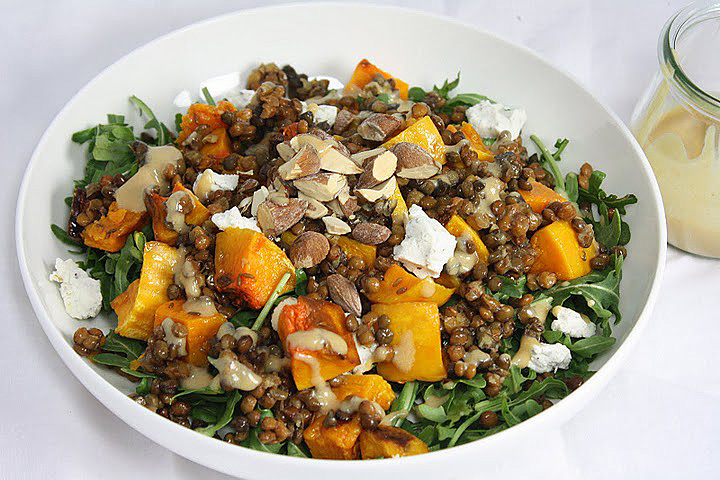
Winter Harvest Salad
On February 20, 2011 by sixtyacrebakerThese past few days Mike has been ill with the flu, Which means, I get to eat what I like. And I like butternut squash and arugula.
Winter Harvest Salad
roasted butternut squash–roasted with olive oil and sea salt
arugula
cooked puy lentils (i buy mine at trader joes)
goat cheese
roasted and salted almonds–chopped
Yogurt Date Dressing
2 pitted dates soaked in boiling water-just to cover
2 Tbs plain non-fat greek yogurt
1 Tbs cider vinegar
splash balsamic vinegar
2-3 Tbs olive oil
4 roasted garlic cloves
(i roast a head of garlic along with the butternut squash)
1 tsp or more of lemon juice
For the Dressing
Place all ingredients, including water from dates, in a blender and whirl until smooth. You may need more or less olive oil…depending on your specific taste. Add salt and pepper to taste. Use to dress salad.

Spa Party Cupcakes
On February 17, 2011 by sixtyacrebakerMy niece Julia turns 12 this month. She asked if I would make cupcakes with lots of fondant apparently, she loves it, in a spa-sleepover theme. She chose blue and pink as her colors.
I made the fondant toppers the day before baking the cupcakes, and let them sit at room temperature overnight. So the “trinkets” would stand out nicely, I made a circular piece to use as a base. Coupled with the mounds of frosting, these were truly fit for a girl’s night in.
<strong<*note, i used duff goldman black fondant and it worked well–i liked the texture a lot. it is important to warm it in the microwave a bit before working with it. i didn’t use dg white, as it is “buttercream” flavored, not the flavor my niece loves. for the white and colored pieces i used satin ice brand tinted with gel food color.
I am not compensated for endorsing or mentioning either brand.
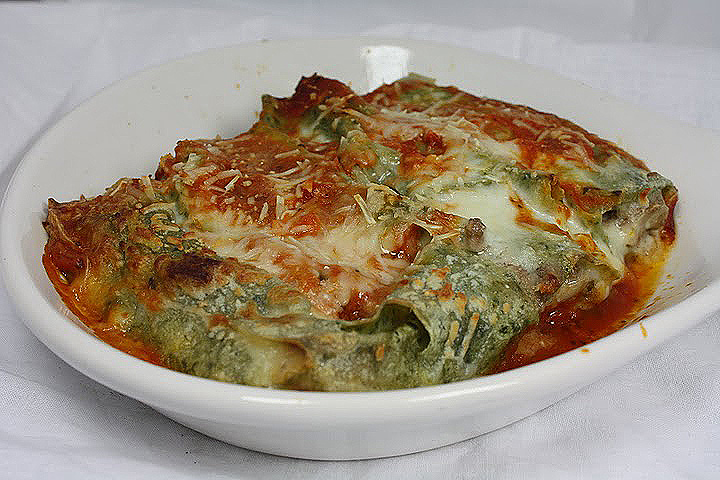
Cannelloni
On February 16, 2011 by sixtyacrebakerAfter dinner Mike leaned in real tight and whispered; “you make a great lasagna.” This is delicious, but lasagna it is not.
Cannelloni
adapted from mario batali
fresh pasta sheets–boiled and shocked in ice water
For Filling
olive oil
1/2 lb ground pork
1/2 lb lean ground beef
1/2 cup grated parmesan cheese
1 generous Tablespoon flour
1 cup milk
1 egg–lightly beaten
pinch freshly grated nutmeg
salt and pepper to taste
Glug enough olive oil to just cover the bottom of skillet. Add pork and beef and cook until no longer pink. Drain off excess fat. Stir in flour. Add milk and Parmesan cheese. Cook on low for about 10-15 minutes until thickened. Remove from heat. Let cool a bit, then add egg, nutmeg salt and pepper. Let cool completely while you boil pasta.
For Tomato Sauce
use your favorite recipe or even a bottle sauce…you need only a little for this recipe
For Besciamella
3 Tbs unsalted butter
3 Tbs flour
1 1/2 cups milk
1/4 cup parmesan cheese
1/4 tsp nutmeg
pinch salt
Melt the butter in a saucepan. Whisk in the flour and cook for just a minute or two. do not brown. Whisk in milk and bring to a simmer. As it begins to thicken, add the Parmesan, nutmeg and salt. The sauce is to be thickened, but not gooey. It is a sauce.
To assemble
Place a bit of tomato sauce in the bottom of an oven safe dish. Use a very generous tablespoon of meat for each cannelloni. Place meat in the center of the pasta sheet and spread evenly. Roll the pasta into a tube, leaving the ends open. Place in the prepared dish. Repeat with remaining meat and pasta. Once completed, cover in beciamella, swirl in a bit more tomato sauce. Sprinkle with Parmesan cheese. Bake at 350 until heated through and the beciamella begins to bubble.
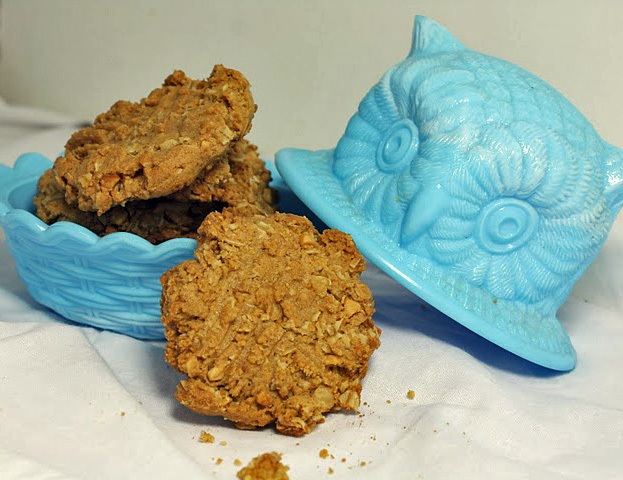
Peanut Butter and Oatmeal Cookies
On February 12, 2011 by sixtyacrebakerI‘m that person. The one that is rarely late. The one that calls restaurants to say I’m running behind schedule. I’m that person leisurely sauntering through the airport, who doesn’t huff and puff when someone has 7 layers of clothes to remove
along with lace up knee high boots, at security. Because I am neurotic, I always have time to spare. I missed a plane once. It was in the 90s, and because of an accident on a country road. Traffic was stopped dead, no fighting it. It was 3 days before my sister’s wedding, I was maid of honor, and I hadn’t had my dress fitting. Consequently, it took me more than a day of travel. Which led to a last minute dress fitting; resulting in a poorly made dress. When my dance partner accidentally stepped on the bottom of my dress, most of it (the dress) ended up lying in a heap on the dance floor. There I stood, in my very classy maroon stockings, 3 inch heels and crop top.
I am now neurotic about airline travel. 2 hours before flight time I like to be sitting at the gate: not at the check in or security, but at.the.gate.
Which brings me to today’s recipe. Recently, while enjoying the sights and sounds of Milwaukee International Airport, for hours on end, I purchased a peanut butter oatmeal cookie as big as my head. Mike and I both thought it was genius: peanut butter and oatmeal. Sadly, genius it was not. Great idea. poor execution. I knew I could make something that tastes better. And i did.
Peanut Butter and Oatmeal Cookies
1 1/2 sticks unsalted butter
1 cup dark brown sugar
1/2 cup granulated sugar
1 egg
2 tsp vanilla
1 1/4 cup crunchy peanut butter
1 tsp kosher salt
1 tsp baking soda
1 cup all purpose flour
1/2 cup graham cracker crumbs
3 cups old fashioned oatmeal
Mix the salt,baking soda, flour, graham cracker crumbs and oatmeal in a large bowl. In a mixer fitted with paddle attachment, beat together the butter, dark brown sugar and granulated sugar, until fluffy. Add the egg and vanilla..and beat until fully incorporated. Beat in the peanut butter and beat for 1 minute. Add the dry ingredients all at once and stir until fully mixed. Form into balls and flatten with the tines of a fork. Bake at 350 for about 10 minutes. These are delicious right out of the cookie jar, but also wonderful with a scoop of peanut butter chocolate ice cream sandwiched between.
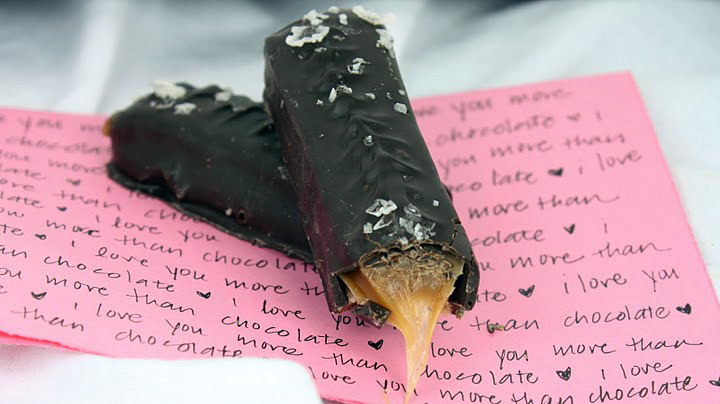
Homemade “twix” Bars
On February 8, 2011 by sixtyacrebakerA few years ago, a friend of a friend said to me, regarding chocolate, if you could come up with something that has chocolate, caramel, and a cookie, I would totally go for that. And I said, you mean..like a twix? And she replied, exactly like a twix. I gave her 25 cents and walked away.
Fast forward a few years…
I was digging through the freezer and came across shortbread cookie dough; and figured why not. I could take a twix and make it just a wee bit better; using fine chocolate, homemade caramel and a smattering of shaved sea salt.
folks
This is good. This is valentine good. This is write 100 times on the chalkboard “i love you more than chocolate” good.

Rock Candy
On February 3, 2011 by sixtyacrebakerMy kitchen has been looking like a science lab lately. Not because it is pristinely clean with clutter free counter tops and nerdies wandering around; but because I have been making rock candy. Several attempts
I might add . It all started out innocently enough: sugar, water, string. But then I got sassy. Like i am Debeers or something. I thought it would be fun and cheeky to make rock candy jewels. Something for a big night out . I settled on drop earrings. Simple, right?
Here is the rub; the fun flew faster than a spy plane out this nerdies door, while obsessive took its place.
In the end, I got the perfect pair.
Now I’m not sure if I should wear or eat them.
Rock Candy
2 cups water
4 cups sugar
food coloring (optional)
up to 1 tsp flavoring (optional)
baker’s twine
granulated sugar
cut the baker’s twine to desired length. tie the twine off to a wooden skewer or pencil. this will allow you to suspend it in the syrup. Dip the twine in water, then roll in a bit of granulated sugar to coat. allow to dry while you make the syrup.
bring water and 1 cup of sugar to a simmer in a saucepan. while the water is still simmering, add sugar, 1 cup at a time, stirring and ensuring the sugar has completely dissolved before adding the next cup. once all sugar is incorporated, remove from heat and add coloring and flavoring. allow the syrup to cool slightly, then pour into a clean and sterilized glass jar or tall glass. you will need a separate glass for each rock candy you want to make.
suspend the twine in the syrup being careful that it does not touch the bottom or sides of glass. crystals should begin to form in about 4 hours. if there is no activity within 24 hours remove the twine, pour the syrup back into a pot and heat to a simmer. return to the clean and sterilized jar and start again. if you see excessive crystallization on the sides of the jar or glass, remove the twine and perform the above steps, otherwise you will have a glass full of hard sugar crystals.
check your twine daily. when you have the rock candy of your desire, remove from the syrup and allow to hang dry for a few hours.