
Artichoke Stuffed Artichokes
On April 9, 2018 by Christy LarsenWhen it starts to warm up, and spring is in full swing, we dine alfresco. Our tiny house doesn’t have a dining room, and our “table for two” is never large enough for the number of people eating on any given day. So we take it outside.
Eating outside is wonderful but has some drawbacks; like keeping hot things hot. This is why I shift my cooking to things that are best served at ambient temperature. Unless we have cocktails prior to dinner; because if we have cocktails, then no one really notices that the steak is a bit cold.
One of my favorite dishes is this artichoke stuffed artichoke salad. It is very simple, and is a wonderful way to use up those half-full jars of pickled and marinated veggies in your fridge.
-Wash and trim artichokes and place them in either a steamer or a pan/pot of water with a lemon or two squeezed in it. Don’t fully immerse the artichokes, but use enough water that it won’t evaporate completely before the artichokes are cooked. Place on medium heat and cook covered until you can easily pull a leaf off. Remove from heat, drain and let cool.
-Cut the artichoke in half and use a spoon to remove and discard the choke {the part that has those hairy bits}. Lay the artichoke halves on a platter face up {or alternatively, you can brush with oil and char on the grill, then place on a platter}. Dress with a bit of your favorite vinegar and olive oil. Set aside
-In a large bowl combine your salad ingredients. I like to use, canned artichoke hearts, tomatoes, roasted peppers,red onion, celery, olives, fresh bell peppers, and any cooked rice or barley or grain I have in the fridge. You can use virtually anything you have hanging in the fridge or pantry. Toss together with oil, vinegar, salt and pepper and place a generous scoop into each artichoke half.
-Serve cold or room temperature
Ten Layer Lemon Meringue Cake
On April 8, 2018 by Christy LarsenLet me get something off my chest; I have a problem with layer cakes that are 3 inches of cake for every 1/4″ of icing. My ideal is {in equal measure} cake, icing, cake, icing ..and so on and so forth until you run out of both. I want layers upon layers that are none too dry or too sweet. It makes it difficult to have perfect sides, and 30 second videos of the perfect spin and frost technique. But it tastes good. Perfect is fine, but delicious is divine.
I first put together this cake for a dear friend’s 80th birthday almost a decade ago. It has become a family favorite. It is perfect all year ’round, but I like to make it when lemons are at their seasonal best.
Lemon Meringue Cake
Cake Layer
{from Nick Maglieri}
3 cups all purpose flour
3 tsp baking powder
1/4 tsp kosher salt
18 Tbs unsalted butter–softened
2 1/4 cups sugar
1 Tbs vanilla extract
9 lg egg whites
1 1/8 cups milk
reheat oven to 350. Whisk together flour, baking powder and salt in a bowl. In a mixer, fitted with paddle attachment, beat the butter and sugar until very soft and light. Whisk together the milk, egg whites and vanilla until just combined. Reduce the mixer speed to low and alternately beat in the flour and milk in 4 batches; starting and ending with flour. In order to not over-mix, do not fully incorporate each addition before adding the next one. Scrape down the sides in between each addition.
I bake this off in thin layers, making it easier to stack when putting the cake together. You can make 2 layers and slice into thin layers, if you prefer…but I like taking the time to bake off thin layers that make assembly a bit more fuss free.
This will make 6-7 thin cake layers. Each layer should be less than 1/2″ thick–i use approximately 3/4 cup batter for each layer.
Spray 9″ cake tins with pan spray and place a circle of parchment in the bottom. If you only have 2 pans, you will have to wash in between bakins. Bake each layer approximately 10 minutes, but carefully watch, as the layers are so thin, they will brown easily. Once you pull the pan from the oven, wait a few minutes, then turn out onto parchment. Wash and dry the tins, then start the process again. Let the layers cool completely. {can be made a day ahead and stored at room temperature, or well ahead and frozen}
Lemon Curd
grated zest from 1 lemon
3/4 cup lemon juice
1 1/4 cup sugar
12 Tbs unsalted butter–cut into small pieces
12 large egg yolks
Whisk the yolks, sugar, lemon juice and lemon zest in a bowl. Place bowl over bain-marie and cook, stirring continually until the liquid thickens to a nappe {coats the back of the spoon and retains shape when you swipe your finger down the middle}. Do not let it boil, as the eggs will scramble. Remove from heat and pour through a sieve into a clean bowl. Toss in the butter while the curd is still hot. Stir until the butter is fully incorporated. Cover with plastic wrap placed directly on top of the curd. Refrigerate until cool and set. {Can be made a day in advance}
Lemon Italian Buttercream Icing
{if you have a favorite icing, use it and add the lemon curd and whip until creamy}
1 cup granulated sugar
1/4 cup water
4 egg whites–room temperature
2 cups unsalted butter–room temperature
1 tsp vanilla extract
1/2 tsp salt
about 1/2 cup lemon curd {this is to taste, it depends on how lemony you want your buttercream}
Place egg whites and salt in the bowl of an electric mixer fitted with whisk attachment. Combine 3/4 cup of the granulated sugar with water in heavy saucepan and bring to a boil over medium heat. Continue cooking until it reaches 235F (just before soft ball stage).
Meanwhile, while the sugar is boiling, begin whisking the egg whites. Once, frothy, “rain” in the remaining 1/4 cup sugar. Whip to soft peak. When syrup reaches 235F remove from heat (it will continue to get hotter and reach the desired 240F). With the mixer on medium speed, begin immediately pouring the hot syrup into the egg whites. Be careful not to hit the whisk directly. Once all the syrup is incorporated, kick the speed up to high and whisk until it cools to room temperature.
Change the attachment from whisk to paddle, and begin adding butter, a few bits at a time. Once it is all incorporated and it looks like buttercream, mix in the vanilla and curd (to desired flavor)
-can be made several days in advance
Meringue
3 large egg whites–room temperature
1/4 tsp cream of tartar
3/4 cup granulated sugar
1/2 tsp vanilla
pinch salt
Make sure the beater and bowl are extremely clean and free of any oil or fats. Beat whites on low until foamy. Add salt and then kick up the speed to medium. Add cream of tartar. Beging to slowly add the sugar “raining” it into the egg whites. Continue to beat until soft peaks form, then add vanilla. Beat to stiff and firm peaks.
If you over-beat, you will see moisture starting to “weep” from the whites. If this happens, start over!
-must be used day it is made
PHEW! –now that you have all the elements, you can start building your cake
To Assemble
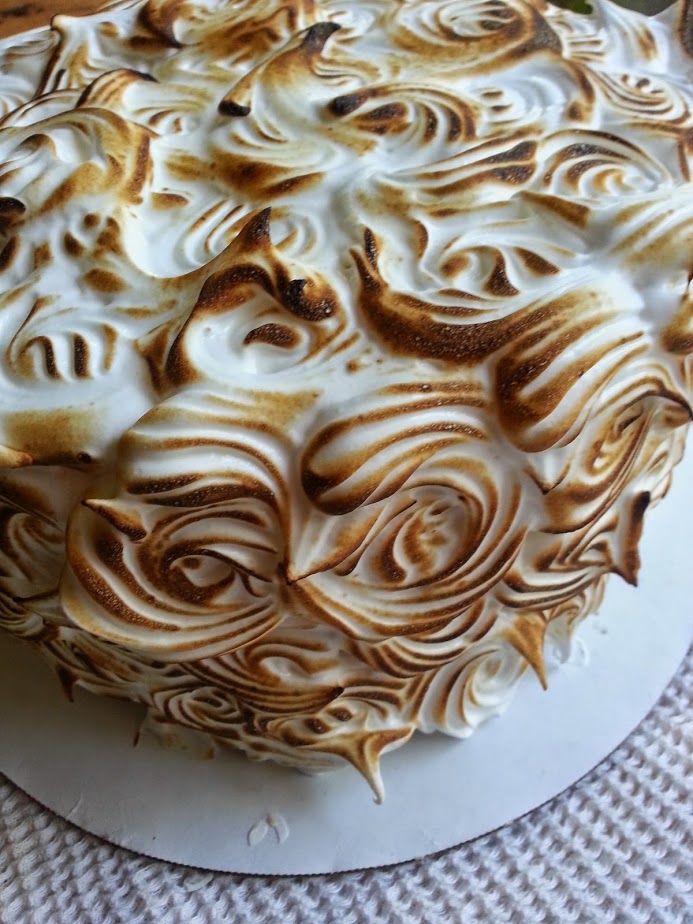
Place 1 cake layer on a round cake board. Pipe buttercream around the edge of the cake making a dam. Fill with lemon curd. This curd is quite tart, so you don’t want to over-do it. Also, your filling should not be thicker than your cake layers. Place another cake layer on top of the curd. Pipe a layer of buttercream. Continue with cake, buttercream dam & curd, cake, buttercream, cake….until you run out of cake layers. the top layer should be cake. Refrigerate until cold and firm. You can cover with plastic wrap and refrigerate for 24 house. When ready to finish and serve, cover in meringue (i have piped swirls), and hit with a torch to brown the edges. I do not recommend using the oven as the buttercream and curd will melt quickly.
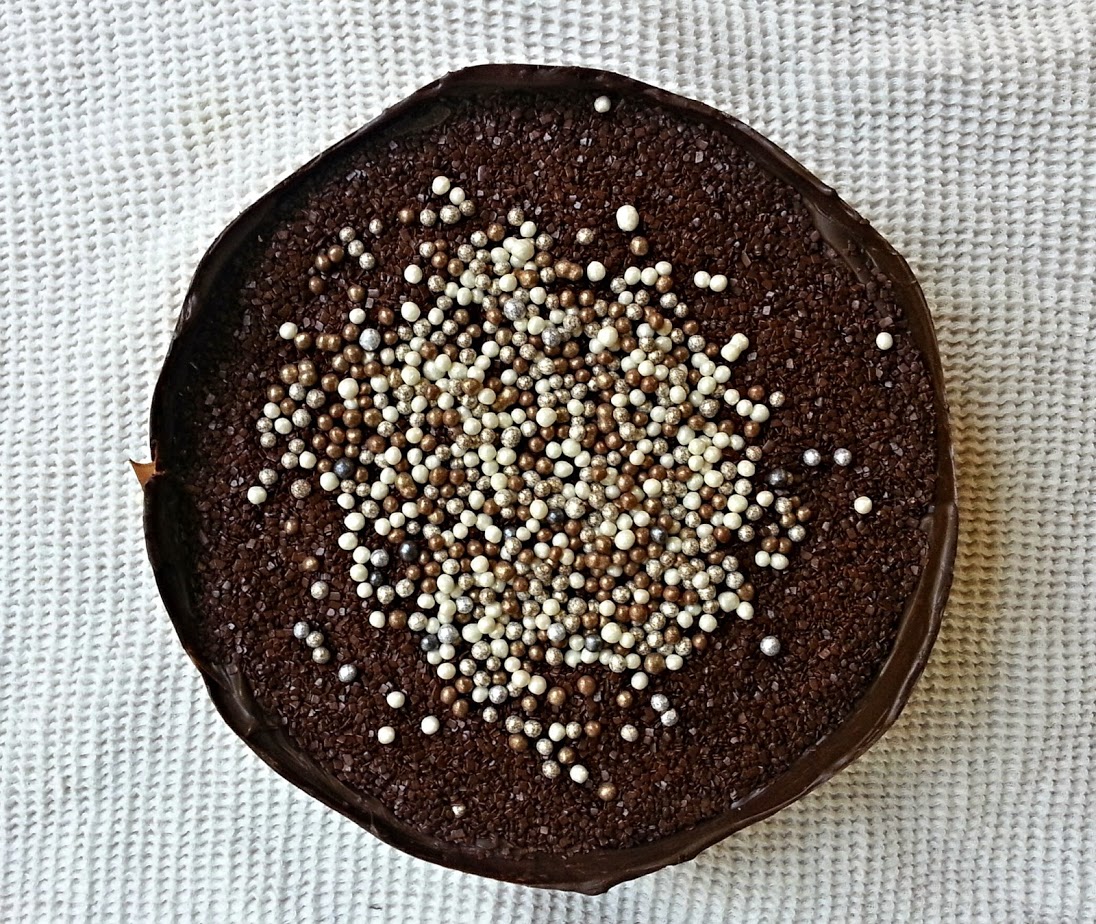
Gateau Noir
On April 6, 2018 by Christy LarsenThis cake is actually named “chocolate nemesis”. It is a wonderful invention of the brilliant ladies at River Cafe in London; and it is simply spectacular.
I call it gateau noir; because, well, it makes me smile. Gateau noir is the name we gave a suitor {not mine} of a girlfriend; whom in my retelling of the 30 year old story, lovingly prepared gateau noir for her in the hope she would be his steady.
Had he used this recipe he might have succeeded.
Gateau Noir
(adapted from river cafe cookbook)
3/4 lb 70% bittersweet chocolate pieces
(please do not make this with nestle or similar chocolate chips–you will not get the result you deserve)
5 large eggs–room temperature
10 1/2 oz granulated sugar
1/2 lb unsalted butter–room temperature
pinch salt (my addition)
1 tsp vanilla (my addition)
1/2 cup water
Place eggs, 1/3 of sugar, salt and vanilla in the bowl of a stand mixer fitted with the whisk attachment. Whisk until the eggs have tripled in volume, and thickened. This will take a minimum of 10 minutes. In the meanwhile, place the remaining sugar in a saucepan with 1/2 cup of water. Bring to a boil and let boil for 3 minutes. Remove from heat and stir in butter and chocolate…letting them melt completely. Allow to cool slightly then slowly pour into the whipped eggs. Whisk for 1 minute, if it doesn’t fully incorporate in that time, use a spatula and fold to fully incorporate. pour into prepared pan.
* to prepare the pan: use a springform pan and spray with pan spray…and then instead of flour, use cocoa powder to coat the pan, tapping out any excess.
there are two ways to bake this cake
To produce a creamy cake, a bit like pudding (this is in tune with the original recipe) bake the cake in a water bath (place your prepared pan, wrapped in foil, into a larger pan that will leave a “moat” of no less than 1″ on all sides. fill the “moat” with enough hot water to reach halfway up the sides of the prepared pan). It is best to do this with the cake pans already in the oven, to avoid spilling water all over the kitchen floor and into the cake batter.
Place prepared pan into a water bath and bake for approximately 35 minutes at 325. the cake is done when it no longer jiggles, but the center still seems a bit soft. if it begins to pull away from the sides, it is over-cooked. After 30 minutes, place your flat hand on top of the center of the cake, if it is no longer liquid, and looks as if it has a skin similar to that of chocolate pudding, and the cake doesn’t jiggle, it is fair to say it is baked enough.
For the more cakey, fallen souffle type of cake; pour the batter into the prepared pan and bake it in the oven without the water bath at 350 for about 30-40 minutes. the cake will rise considerably, then fall. it will look like a fallen souffle and have a light crispy exterior with a dense chewy interior. i love it this way…it tastes just as good and is not nearly as fussy.
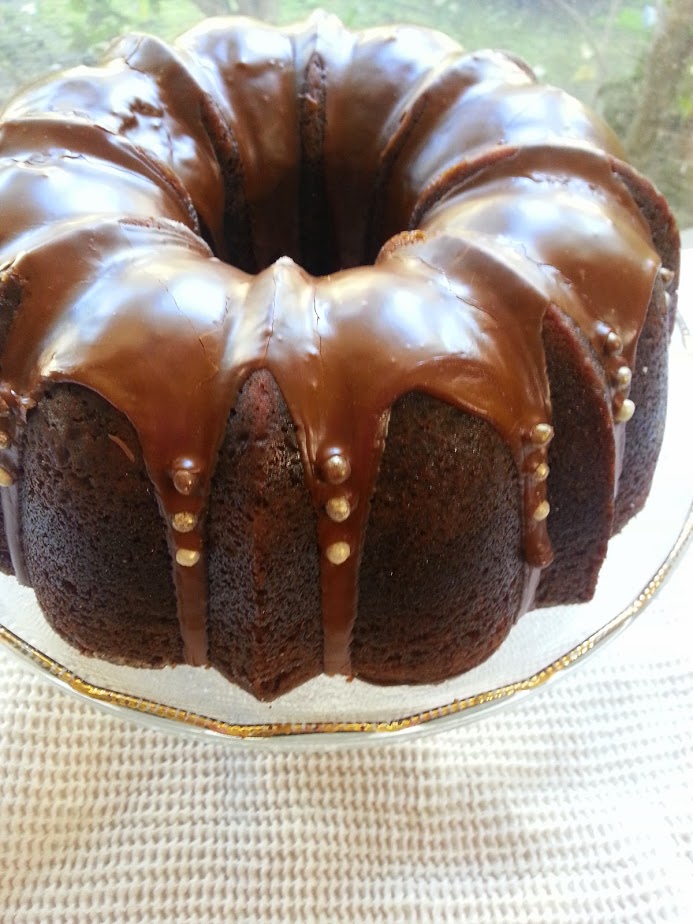
Gingerbread Bundt with Espresso Glaze
On April 5, 2018 by Christy LarsenI disagree that enjoying gingerbread is a cold weather affair. Case in point; this cake. Not only rich and delicious, it is a great way to use up that lingering bottle of guiness a month past St. Paddy’s day.
{this recipe comes from Gramercy Tavern…and developed by Claudia Fleming. I have made this recipe and the recipe in her book “The Last Course”. I prefer this one. I have made a couple very minor adjustments to the recipe, which I will announce so you may or may not choose to do the same}
Gingerbread Bundt
{Gramercy Tavern}1 cup oatmeal or guiness stout
1 cup dark (not blackstrap) molasses
1/2 tsp baking soda
2 cups all purpose flour
1 1/2 tsp baking powder
2 Tbs ground ginger
1 tsp ground cinnamon
1/4 tsp ground cloves
1/4 tsp freshly grated nutmeg
pinch ground cardamom
generous pinch kosher salt {my addition–optional}
3 large eggs
1 cup dark brown sugar
1 cup granulated sugar
3/4 cup vegetable oil
1 Tbs Trablit coffee extract *or 1 Tbs espresso powder {my addition-optional)
Preheat oven to 350F. Use shortening to grease pan (trust me on this…pan spray will not work, butter works better, but shortening works the best) and then dust with flour. Set aside.
Boil stout (or other beer if using) with molasses. Take off heat and then whisk in baking soda. The mixture will bubble up, so make sure your pan has plenty of room, so the mixture does not overflow. Allow to cool to room temperature. Sift together flour, baking powder, salt (if using), ginger, cinnamon, cloves, nutmeg, and cardamom {if using espresso powder, sift with flour. If using coffee extract, whisk in with eggs and sugar} Whisk together eggs, brown sugar and granulated sugar until completely incorporated. Whisk in oil and then molasses mixture. Add flour in single addition and whisk until it is just combined. Pour into prepared pan and bake about 50 minutes or until a tester comes out clean. Allow to cool in pan on rack for about 5 minutes, then turn onto rack, and allow to cool completely.
Espresso Buttermilk Glaze
{this is entirely my addition and is optional}
1 lb confectioner’s sugar
1 oz strong espresso
1 Tbs Trablit coffee extract or 1 Tbs espresso powder
buttermilk
Place the confectioner’s sugar in a bowl. Mix the trablit or espresso powder into the espresso. Pour the espresso bit by bit careful not to thin out the confectioner’s sugar too much. If the confectioner’s sugar is still too thick to pour, add buttermilk until you get a pouring consistency. NOTE: this uses such a small amount of buttermilk, if you don’t have it on hand, you can easily substitute cream, half and half or milk.
Generously pour over cooled cake and allow to harden.
*Trablit is a very strong and specific coffee extract. It cannot be substituted with clear extract or candy oil. If you can’t find it (or it is cost prohibitive) please use espresso powder.